Learn how to extrude in Cinema 4D with these helpful tips and tricks.
Extruding is one of the fastest ways to transform 2D vector artwork into 3D geometry. It’s also an essential aspect of polygon modeling. This article will cover some of the basic methods for extruding splines and polygons in Cinema4D.

What does extruding in Cinema 4D do?
Extruding in Cinema 4D can be pretty contextual, meaning how it works and what it makes can vary a lot depending on the situation you are using it in. However, one thing remains constant, extruding always creates new geometry out of existing splines or polygons.
EXTRUDING 101: EXTRUDING SPLINES WITH THE VECTOR IMPORT
Let's say a client sends you their fancy logo as an Illustrator file. This is no problem in Cinema 4D, because vector files can be brought in as splines and geometry using the Vector Import tool. These can be extruded faster than you can say, “No a screenshot is not the same as the actual .ai, could you send that instead?”
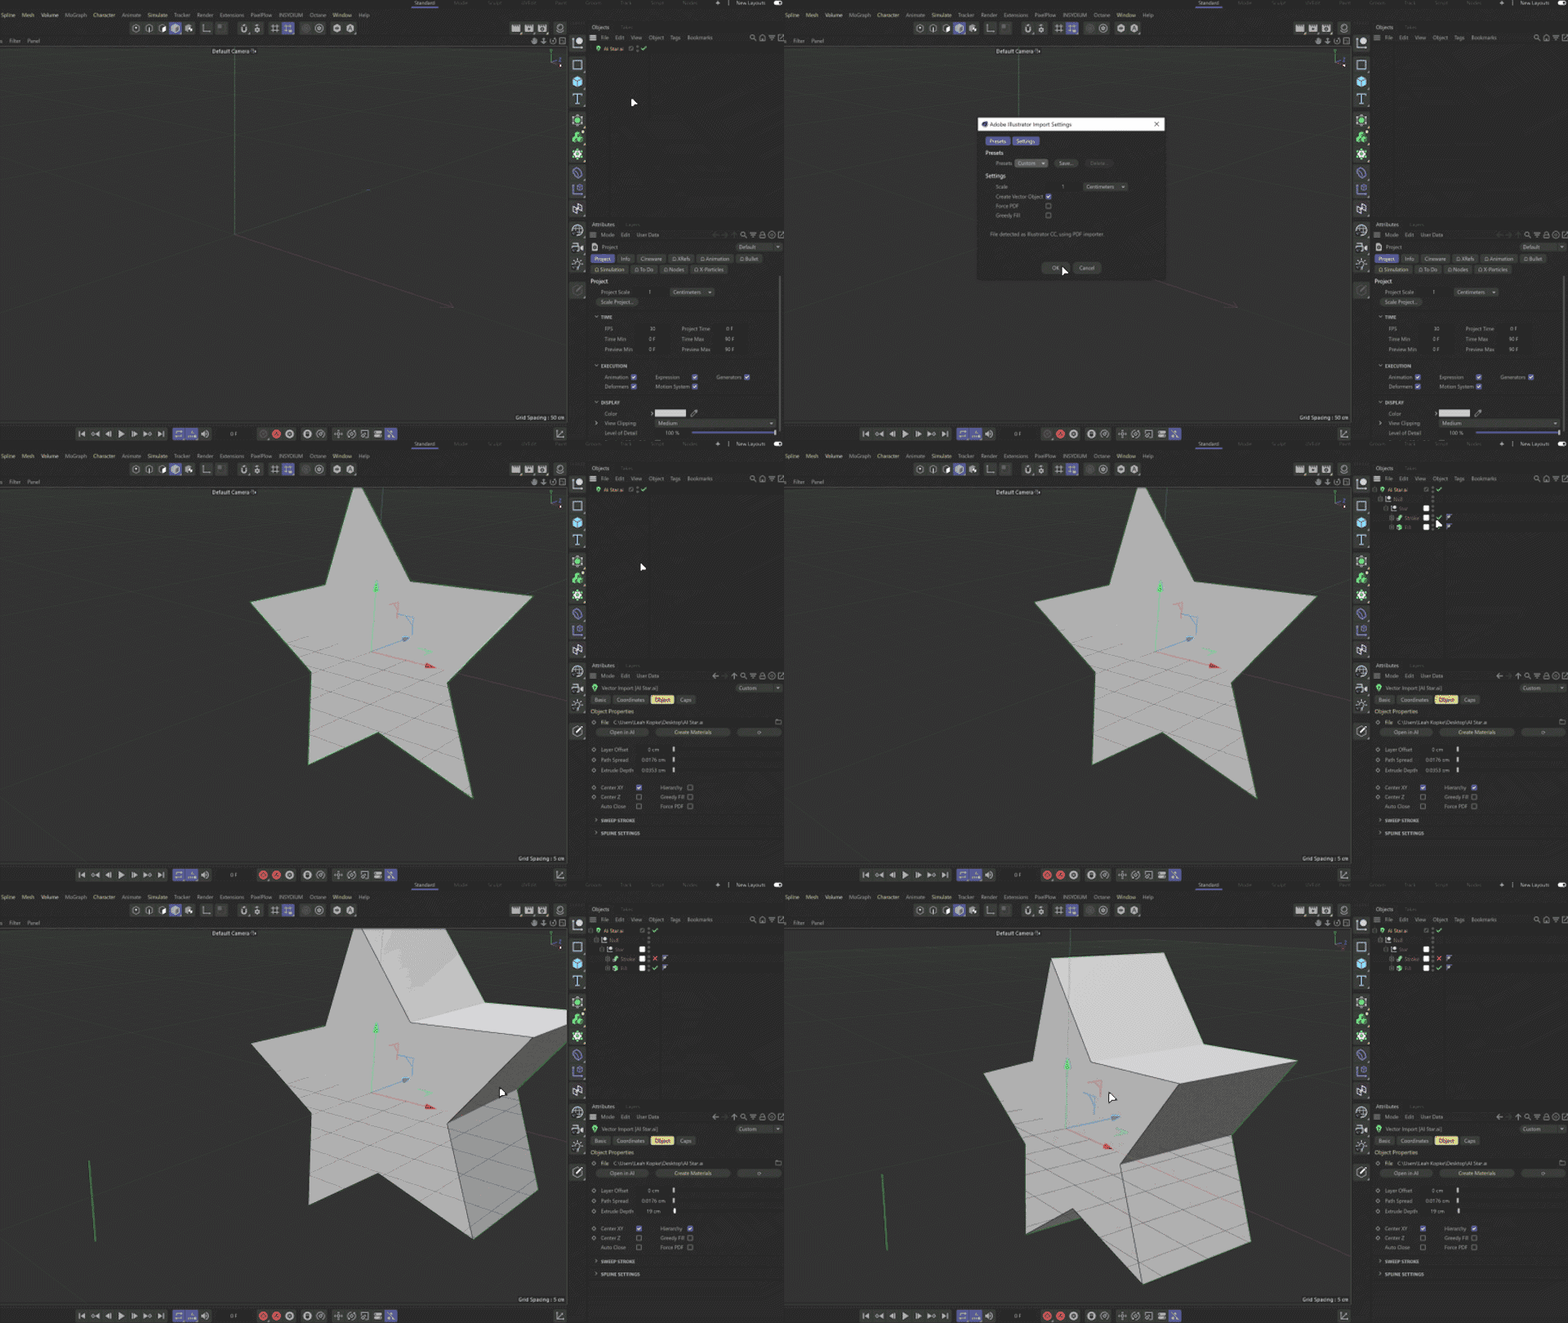
THE EXTRUDE OBJECT
The Extrude Object is a generator that works on any kind of spline in Cinema4D. Like other generator objects, the effect of the Extrude is only apparent once you give it a child object to operate on, in this case a spline.
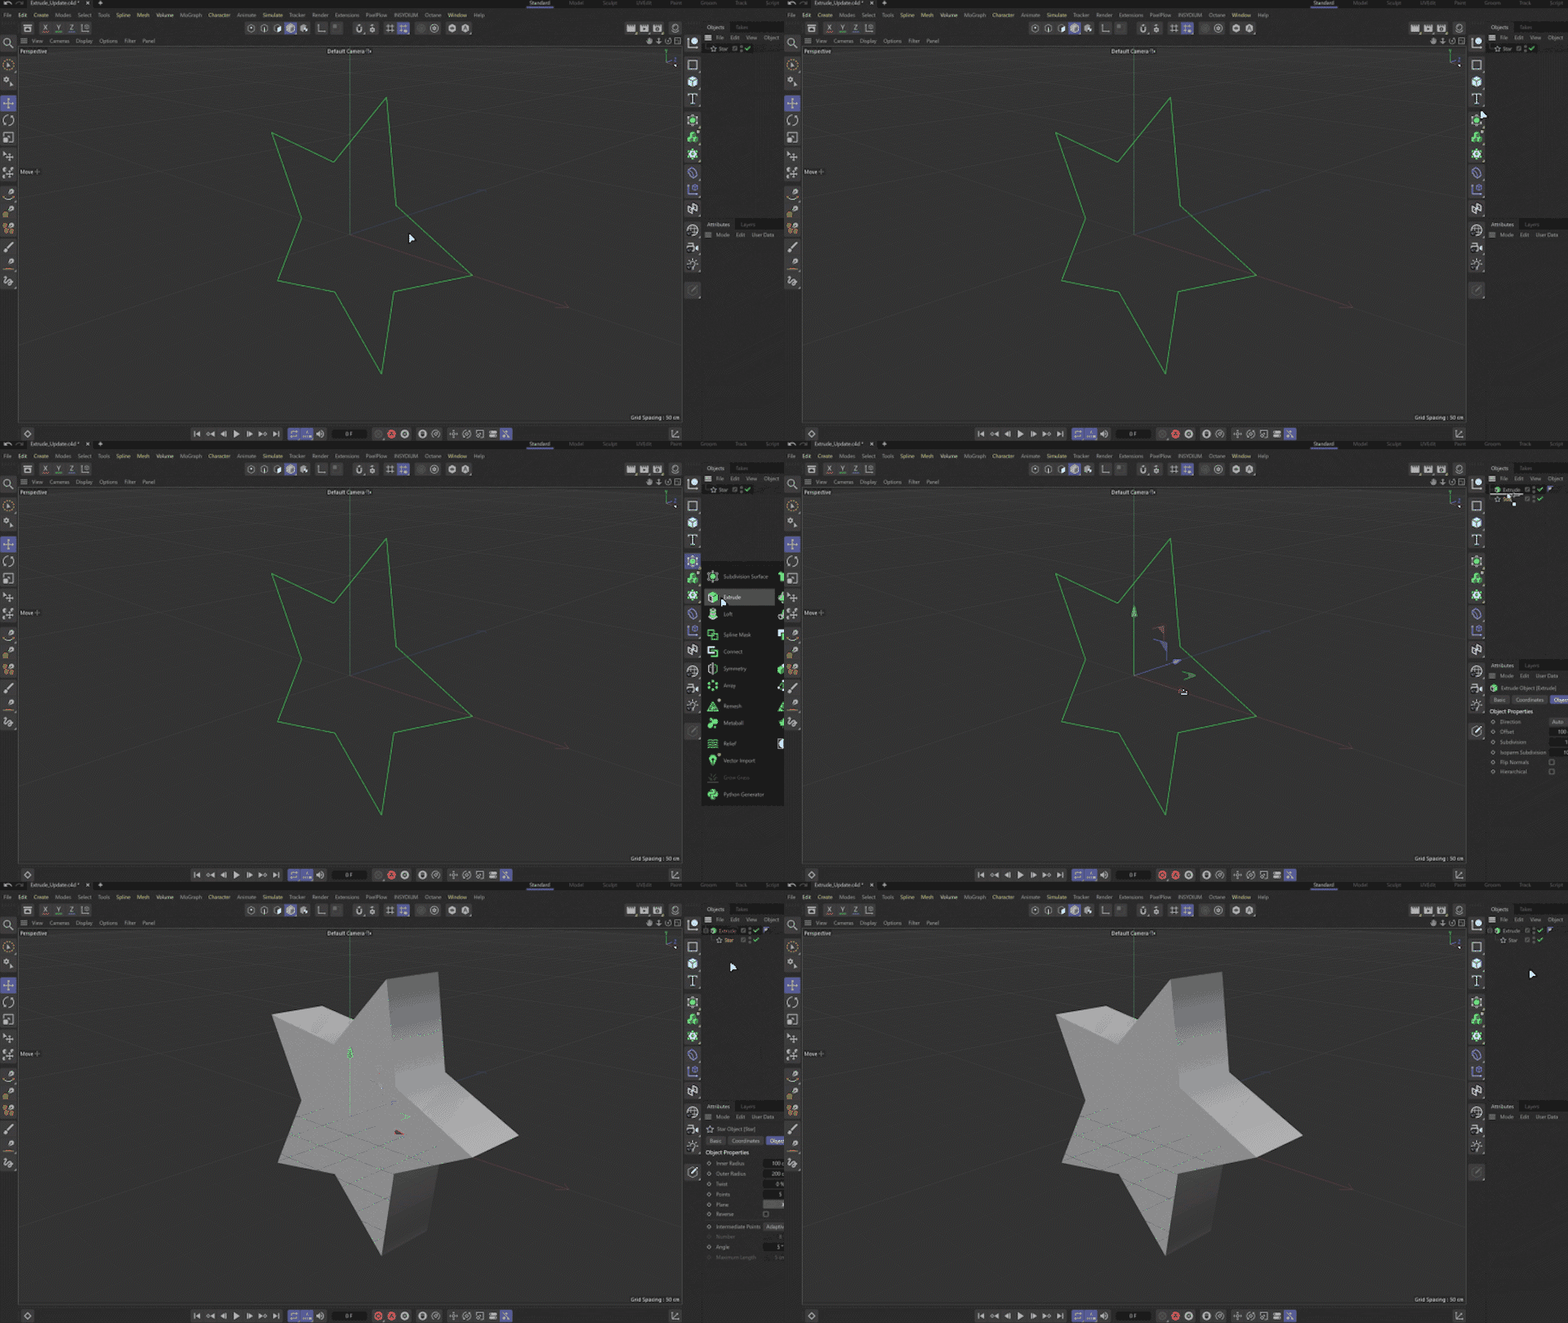
It's almost too easy.
Extrude Object Parameters in Cinema 4D
Let's take a look at some of the different Extrude Object Parameters in the menu.
DIRECTION
Here you can determine the direction of the extrusion relative to the object itself. This can be done differently using the following options in the Direction drop down menu.
Auto: This is the default option. Cinema 4D will create an extrude perpendicular to the plane in which the spline lies.
X, Y, Z: The direction of the spline will be determined by the axis chosen.
Custom: This would allow you to use the movement setting to define the directional vector. Movement specifies the direction and length of the extrusion relative to the orientation of the Extrude Object itself. This is why it’s a good idea to make sure any spline you wish to extrude is oriented to one of the three main planes (XY, XZ, or ZY).
Once you have it extruded the way you like, you can control rotation of the newly formed object from the Coordinates tab of the Extrude Object.
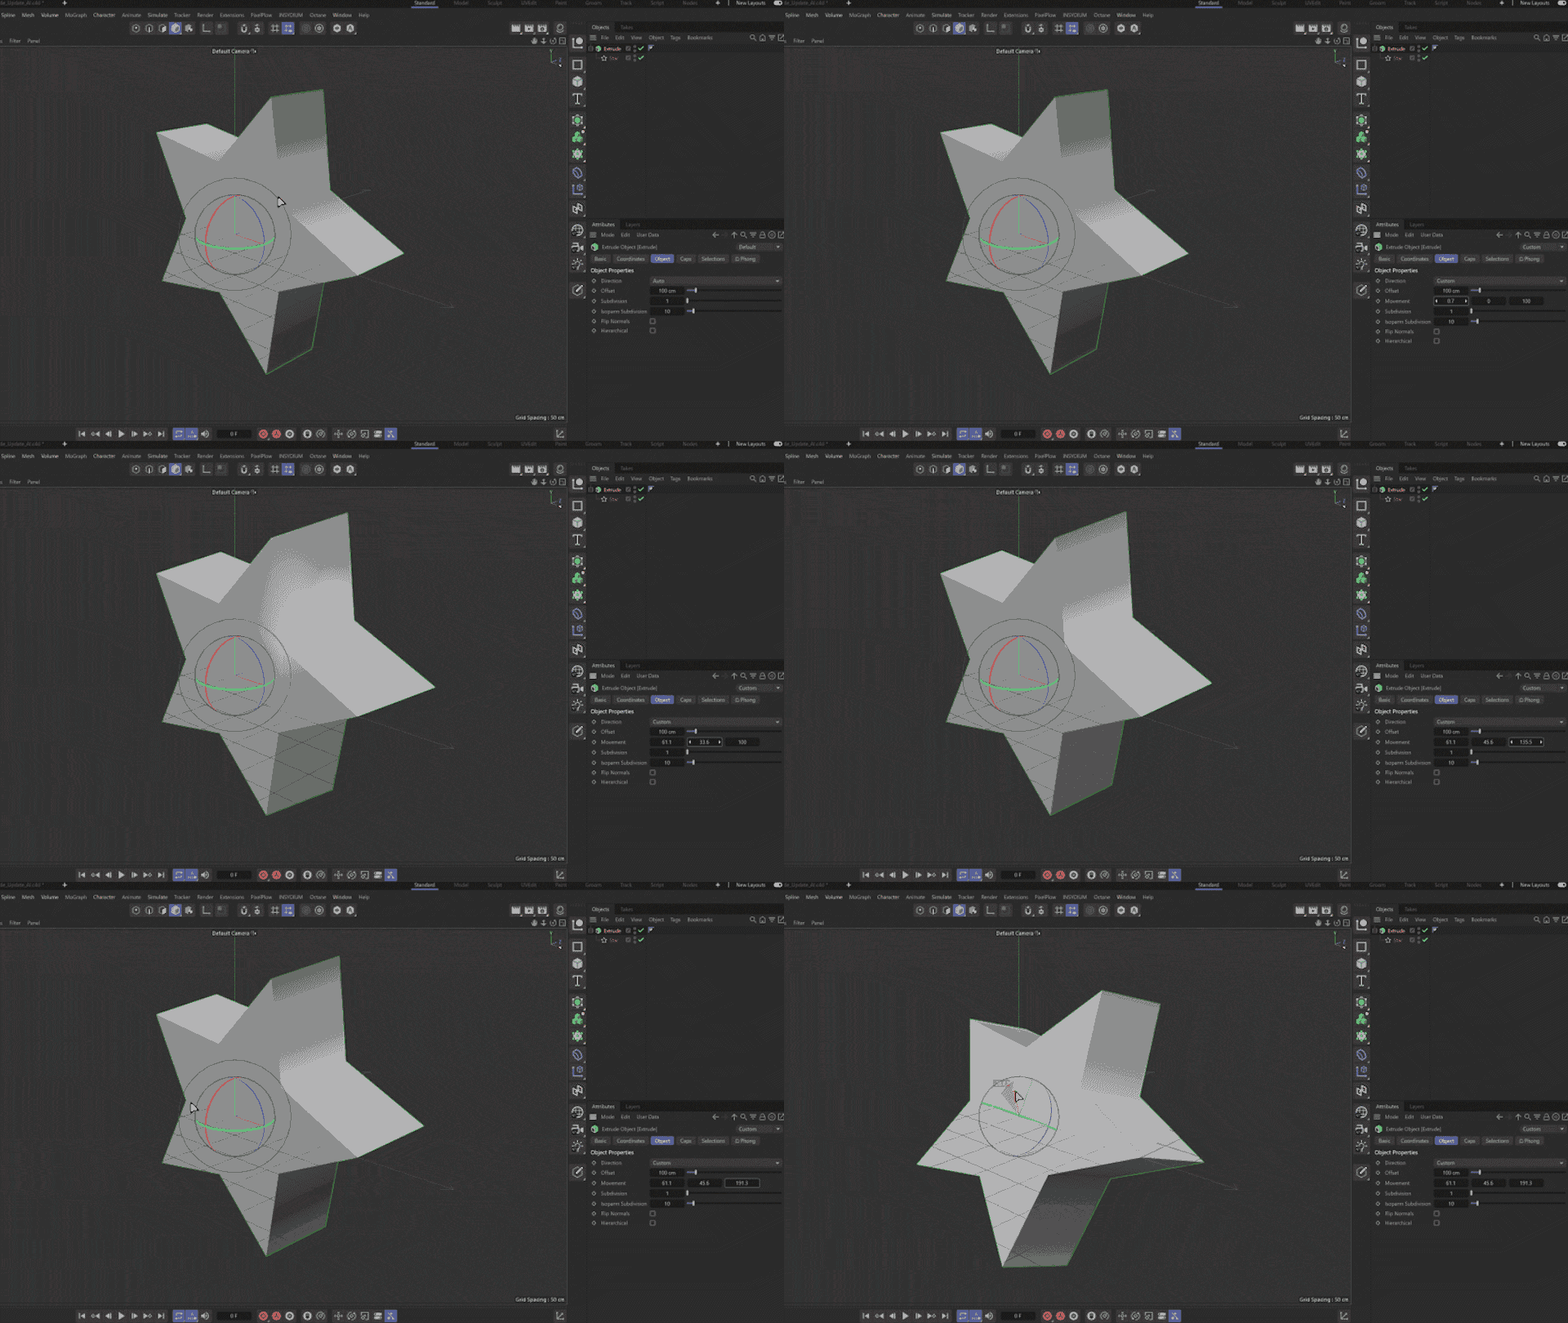
The three movement boxes correspond to the XYZ directions relative to the Extrude object, regardless of how the spline is oriented.
OFFSET
Here you can define the length of the extrude.
SUBDIVISION
Subdivision controls the number of loops created along the extrusion edge. This is useful if you intend to perform any kind of deformation on the geometry.
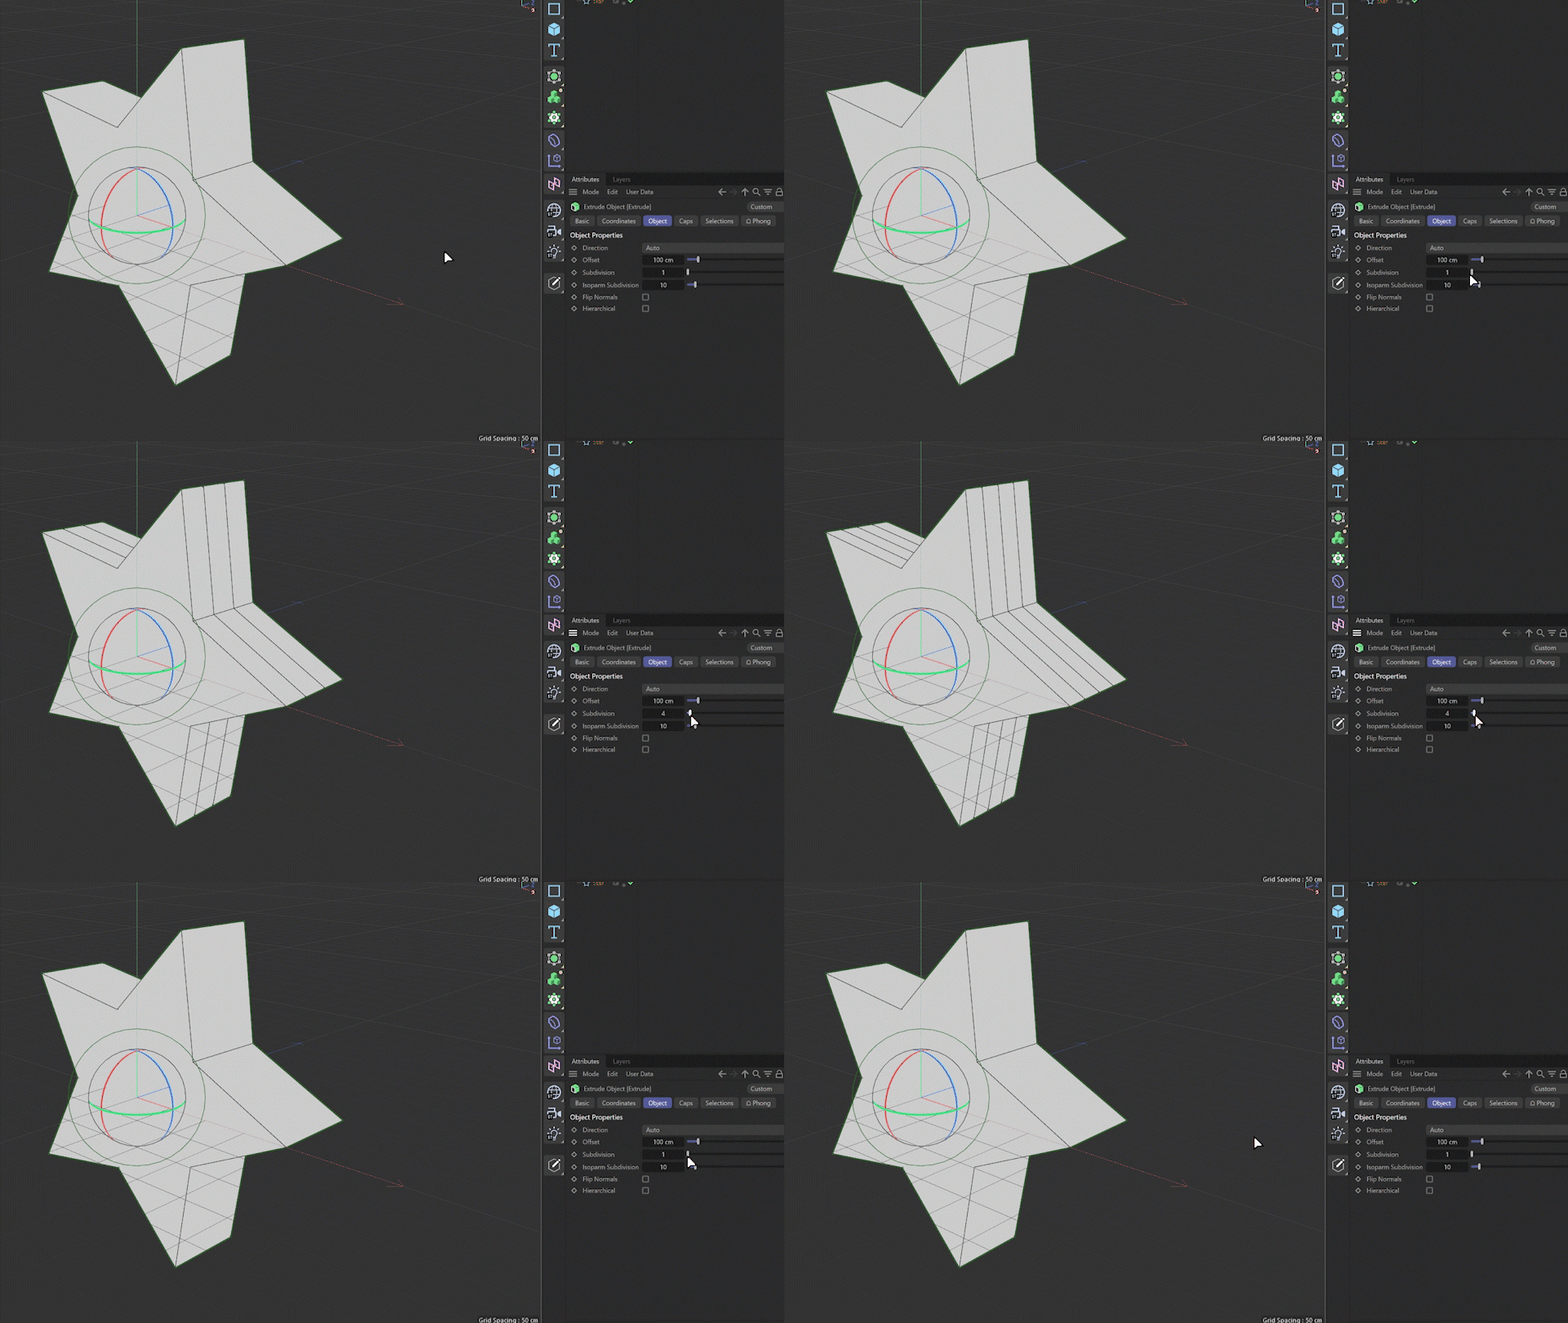
Subdivisions remain evenly spaced according to the total length of the extrusion.
HIERARCHICAL
Hierarchical will force the Extrude Object to look at all child splines. This is helpful when you have many disconnected splines you want to extrude. Keep in mind, this will apply the same extrusion settings to all splines.
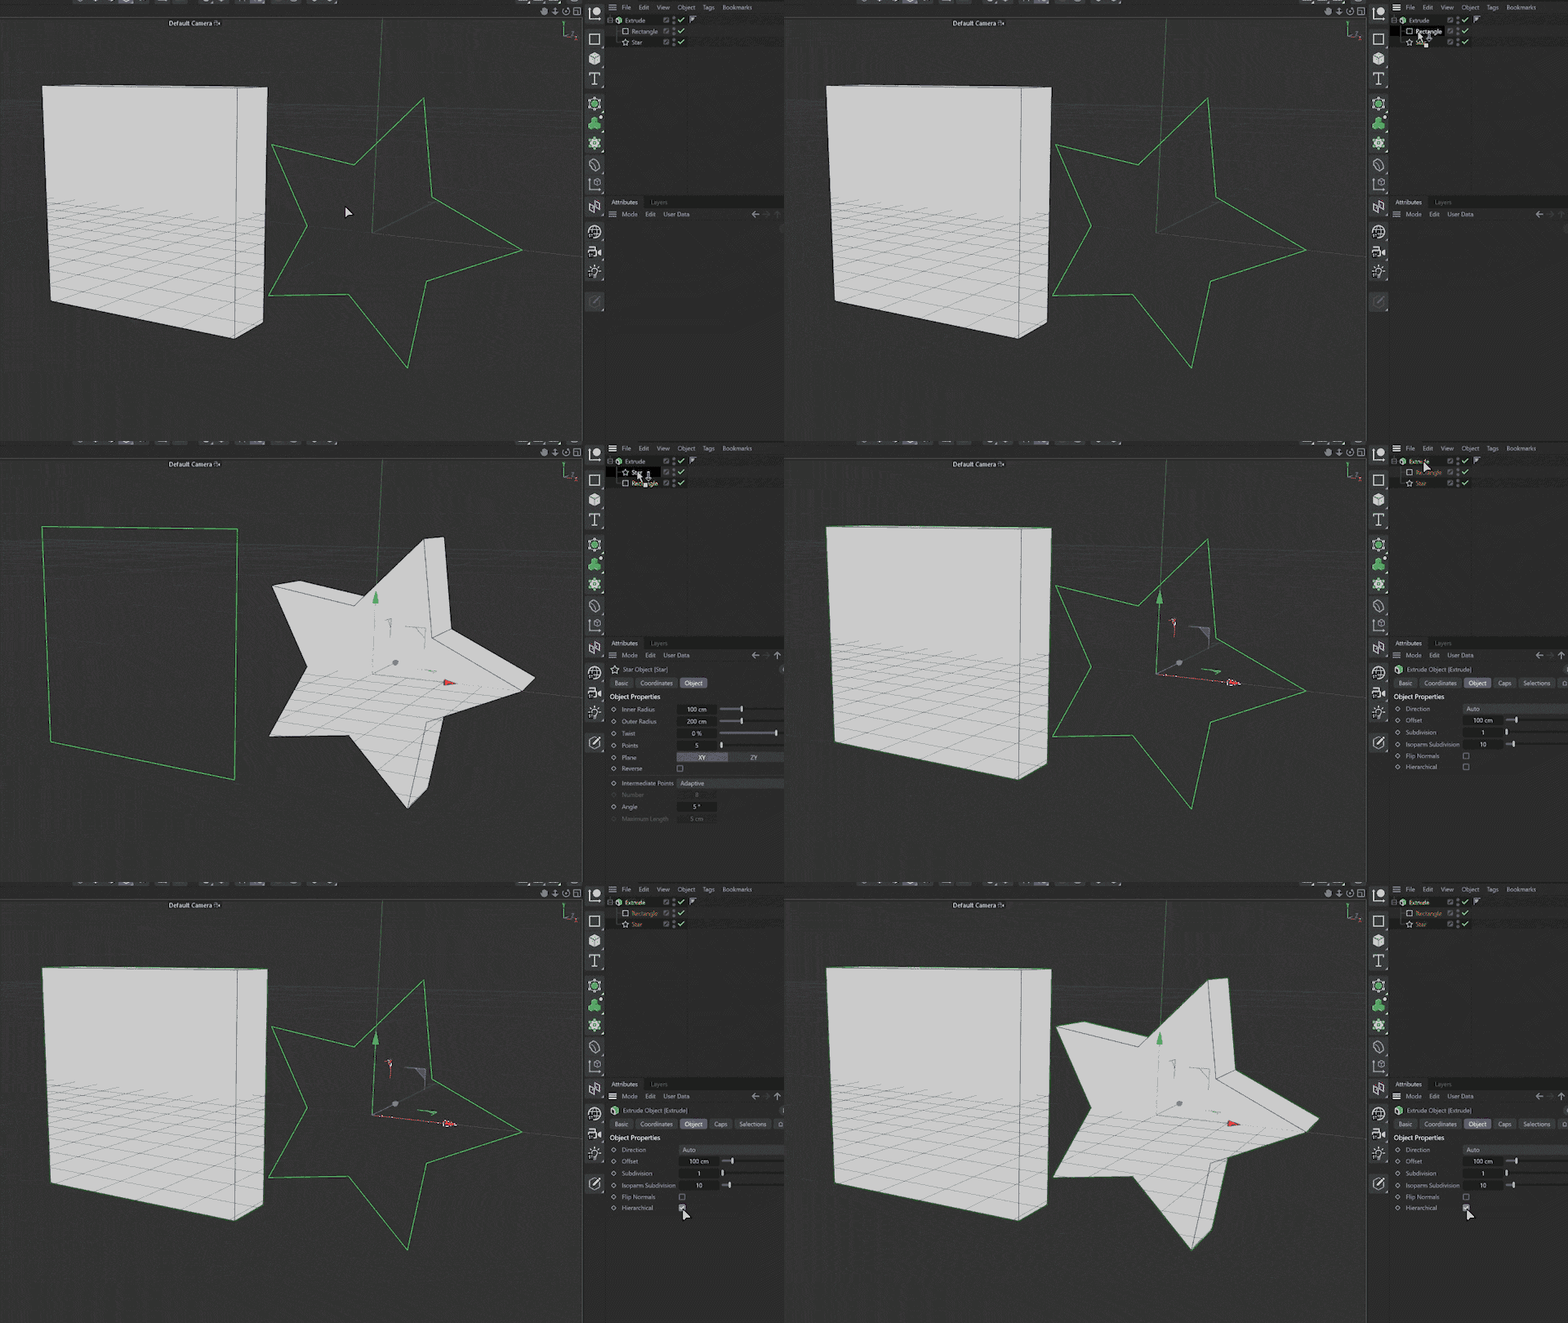
Imported vector art often comes in as a series of many separate splines. Being able to use one extrude object for all of them is much more efficient and quick.
CAPS AND BEVELS
By default, closed splines will extrude with caps enabled. These give the appearance of closed meshes. The rounding controls refer to the fillets or chamfers that will form between the caps and the extruded sides.
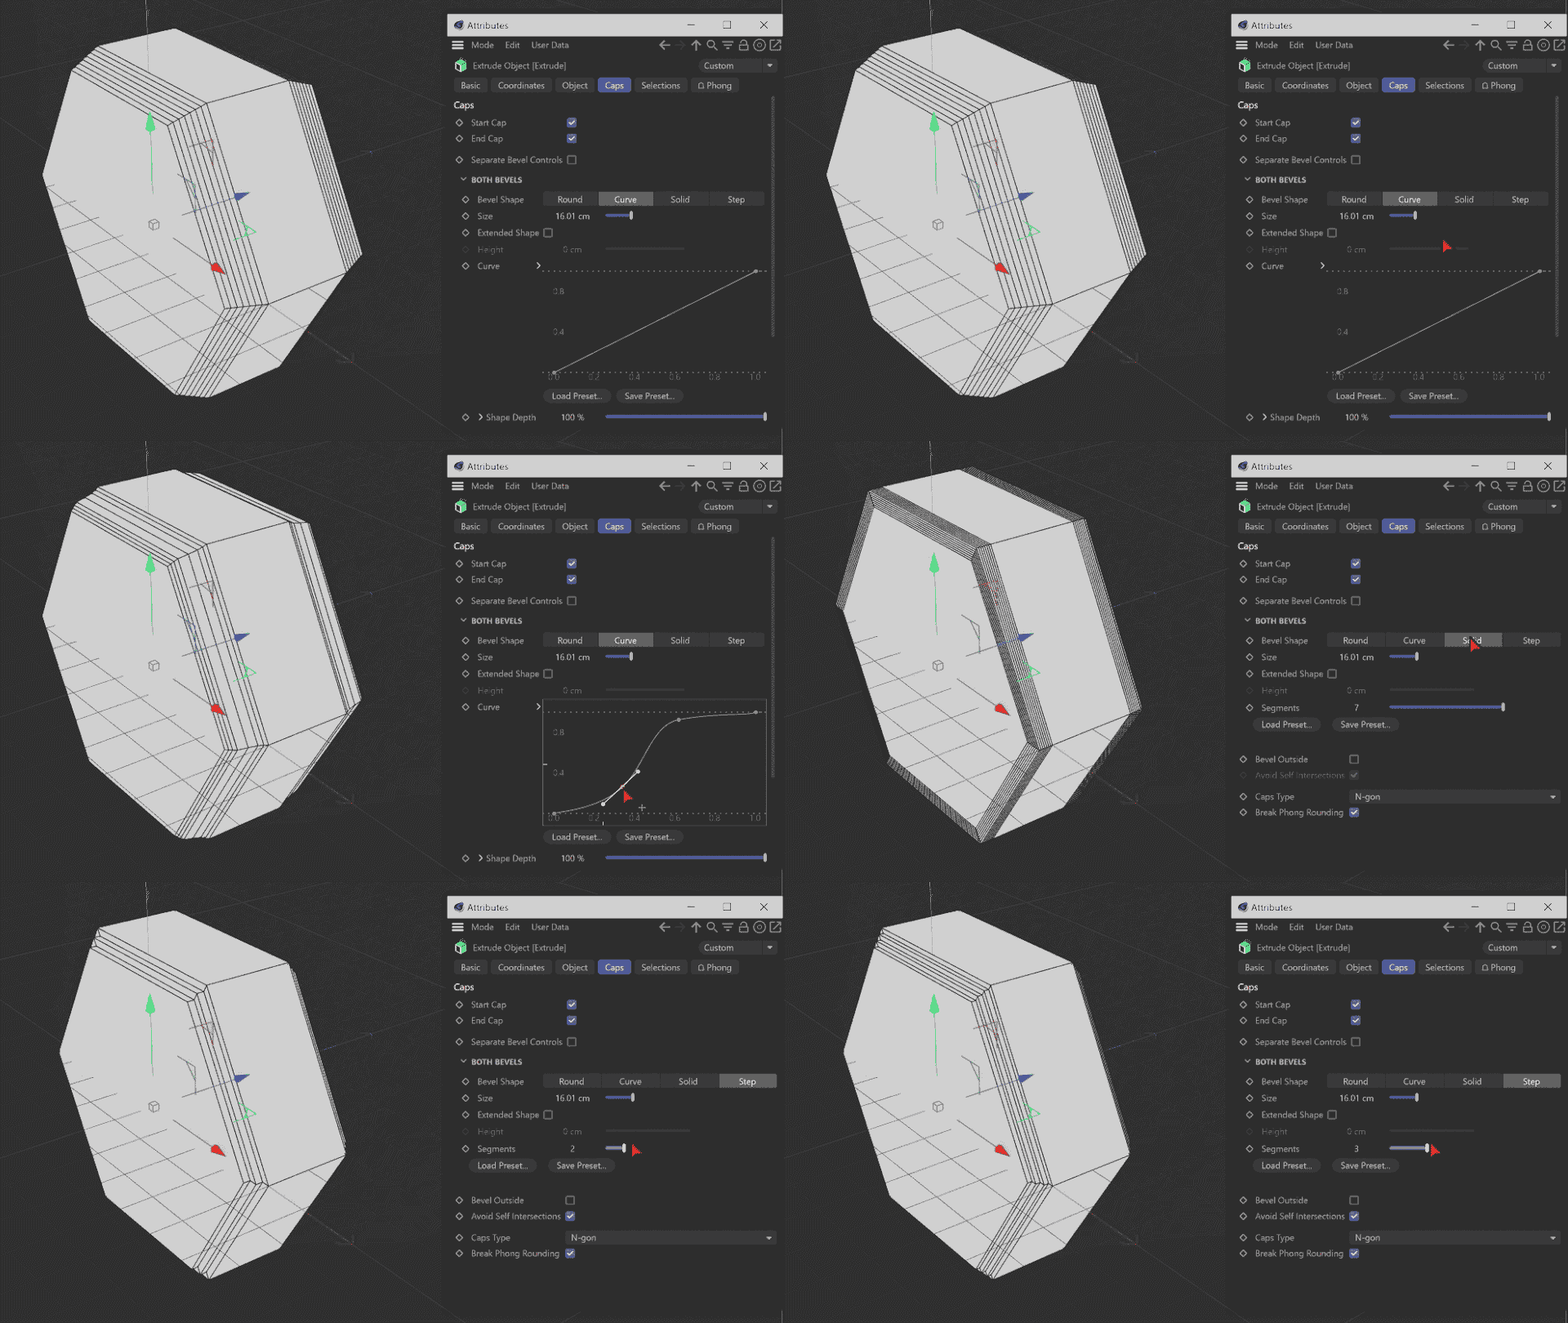
Fillets might as well be called the "make s#!* awesome" button
Pro-Tip: Most seasoned 3D artists will tell you that even a small fillet can go a long way in enhancing the realism and appeal of your object. These roundings will catch highlights and naturally define the form of your object. Go ahead, enable those fillet caps.
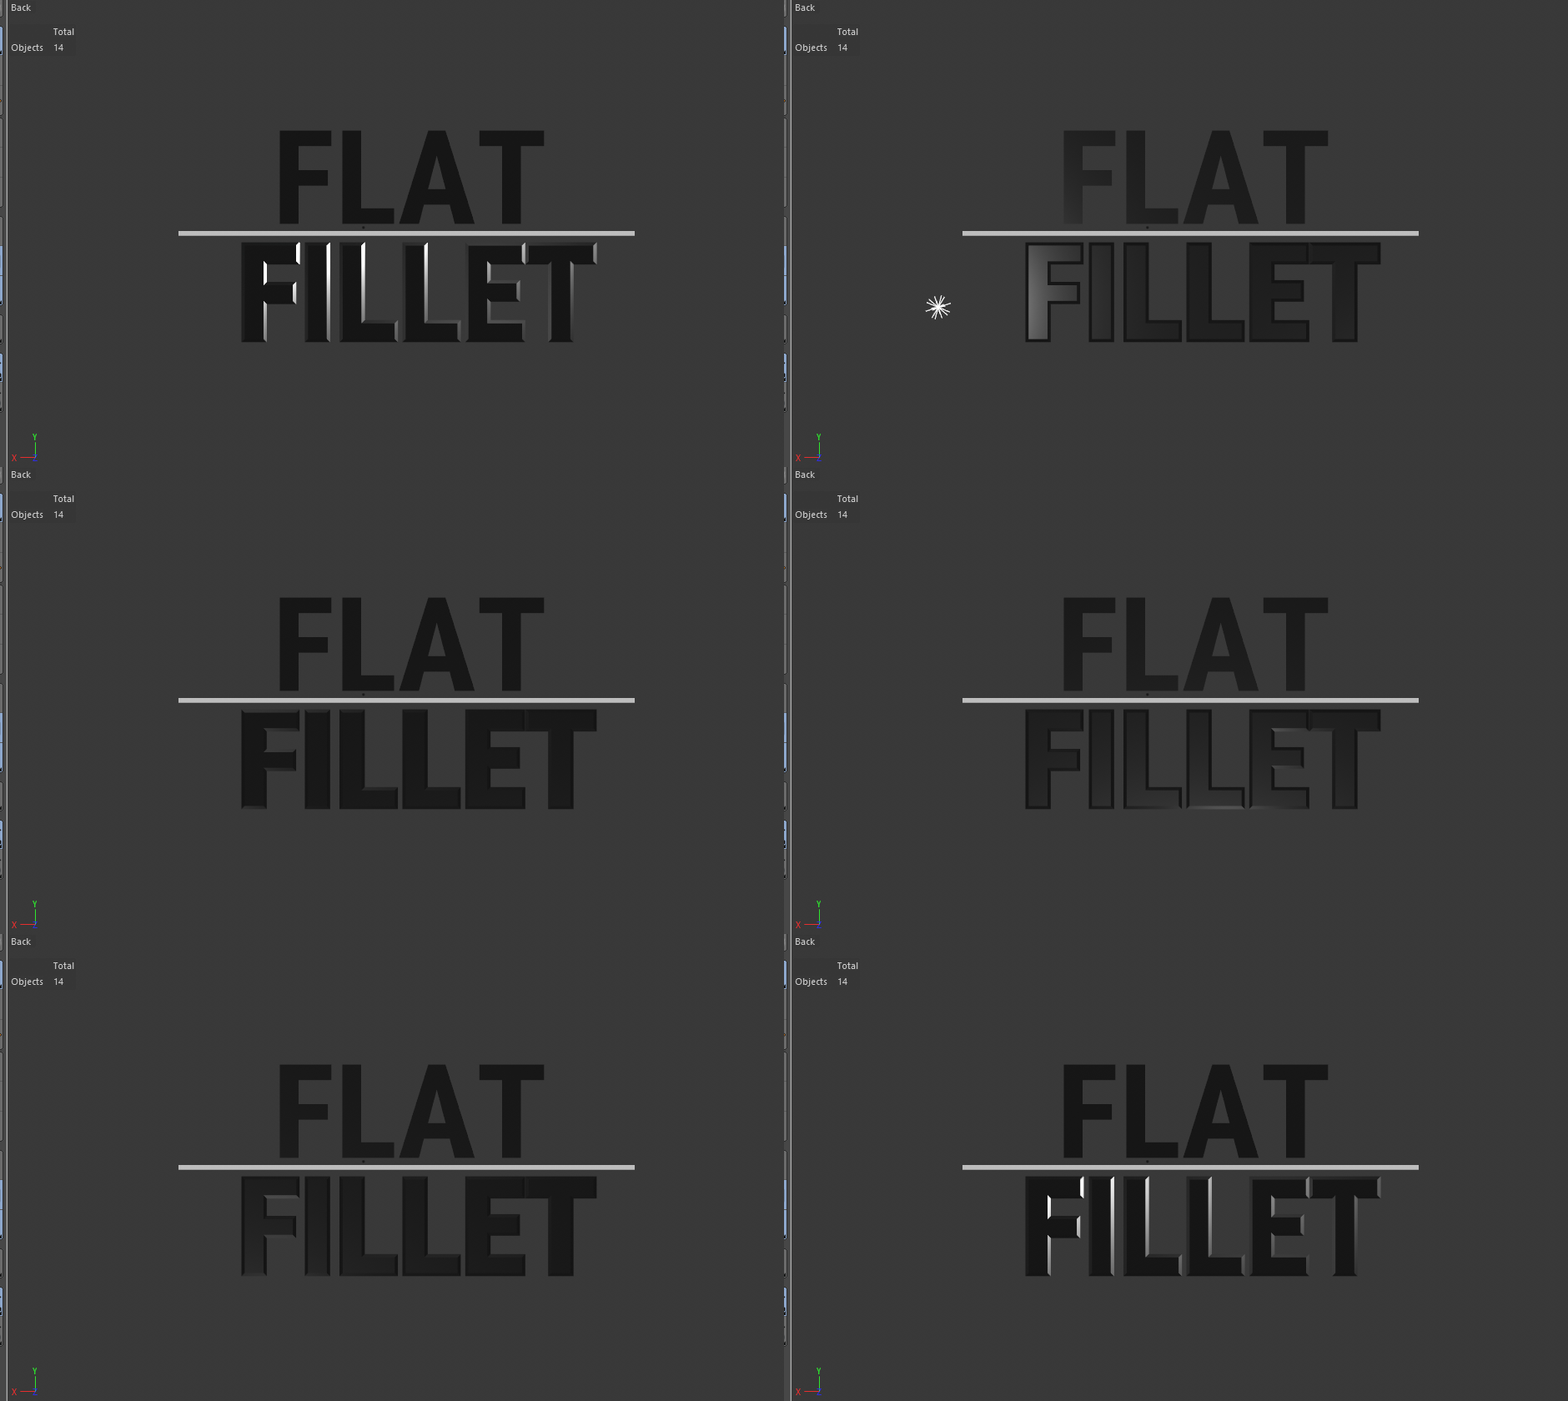
Fillets, the reason you learned 3D
By default, fillets expand the radius of your spline. This can create problems in situations where acute angles in the spline may intersect once expanded. Reducing the bevel size may help.
Extruding Polygons
When modeling, extrusions are performed hundreds or thousands of times to spontaneously create new geometry that can be pushed and pulled to form your model. This is not a procedural process, so each extrusion is recorded as a step, Control+Z to undo and try again.
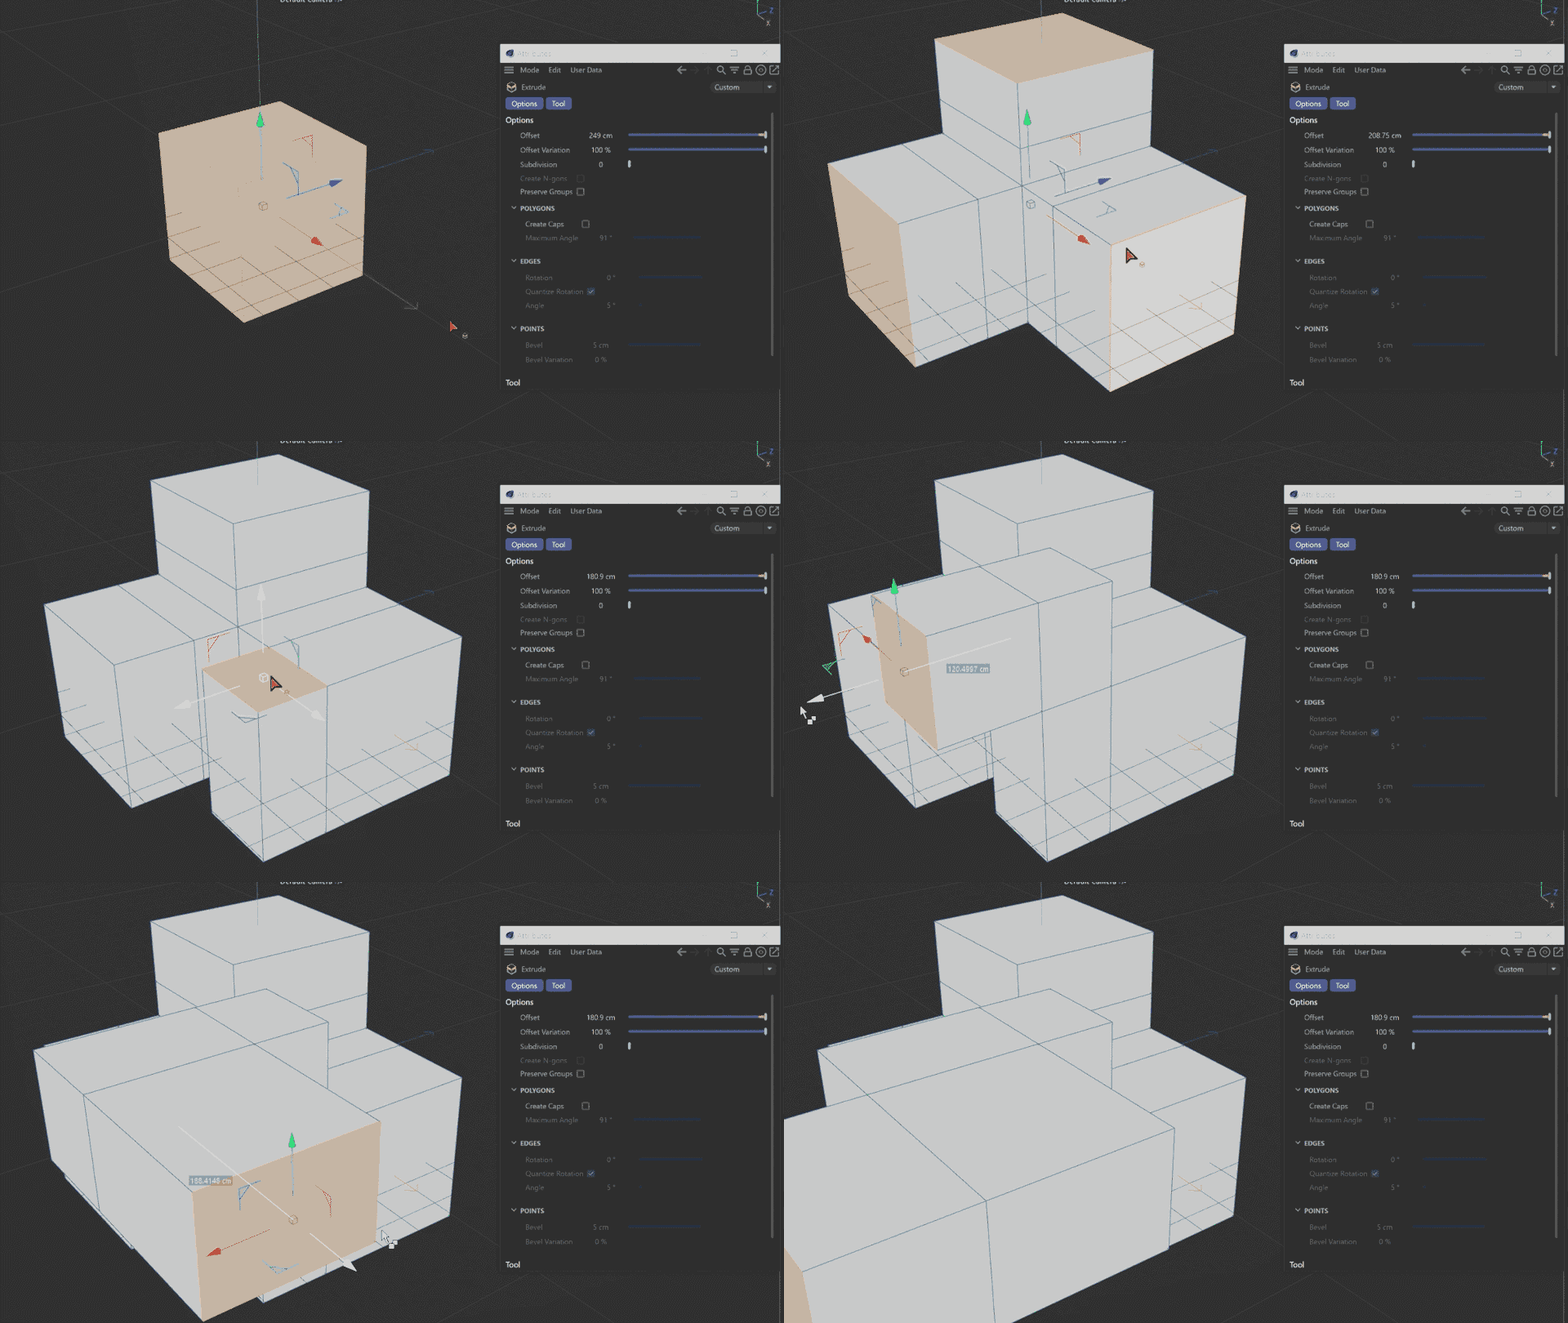
"Mommy, where do new polys come from?" "Well when a modeler hits the D on their keyboard..."
THE EXTRUDE TOOL IN CINEMA 4D
To extrude geometry, you’re going to need to remember just a few things:
- You need editable geometry. Modeling tools don’t work on parametric objects.
- You need to select the polygons or edges you plan on extruding.
- You need to activate the extrude tool.
We’re going to assume you know about making geometry editable (select it in your object manager and hit the C-key). Now you are free to make any kind of selection you want. By default, the extrude tool will keep adjacent polygons connected when they are extruded if Preserve Groups is checked in the extrude tool settings. You can turn this off it that’s not your desired behavior.
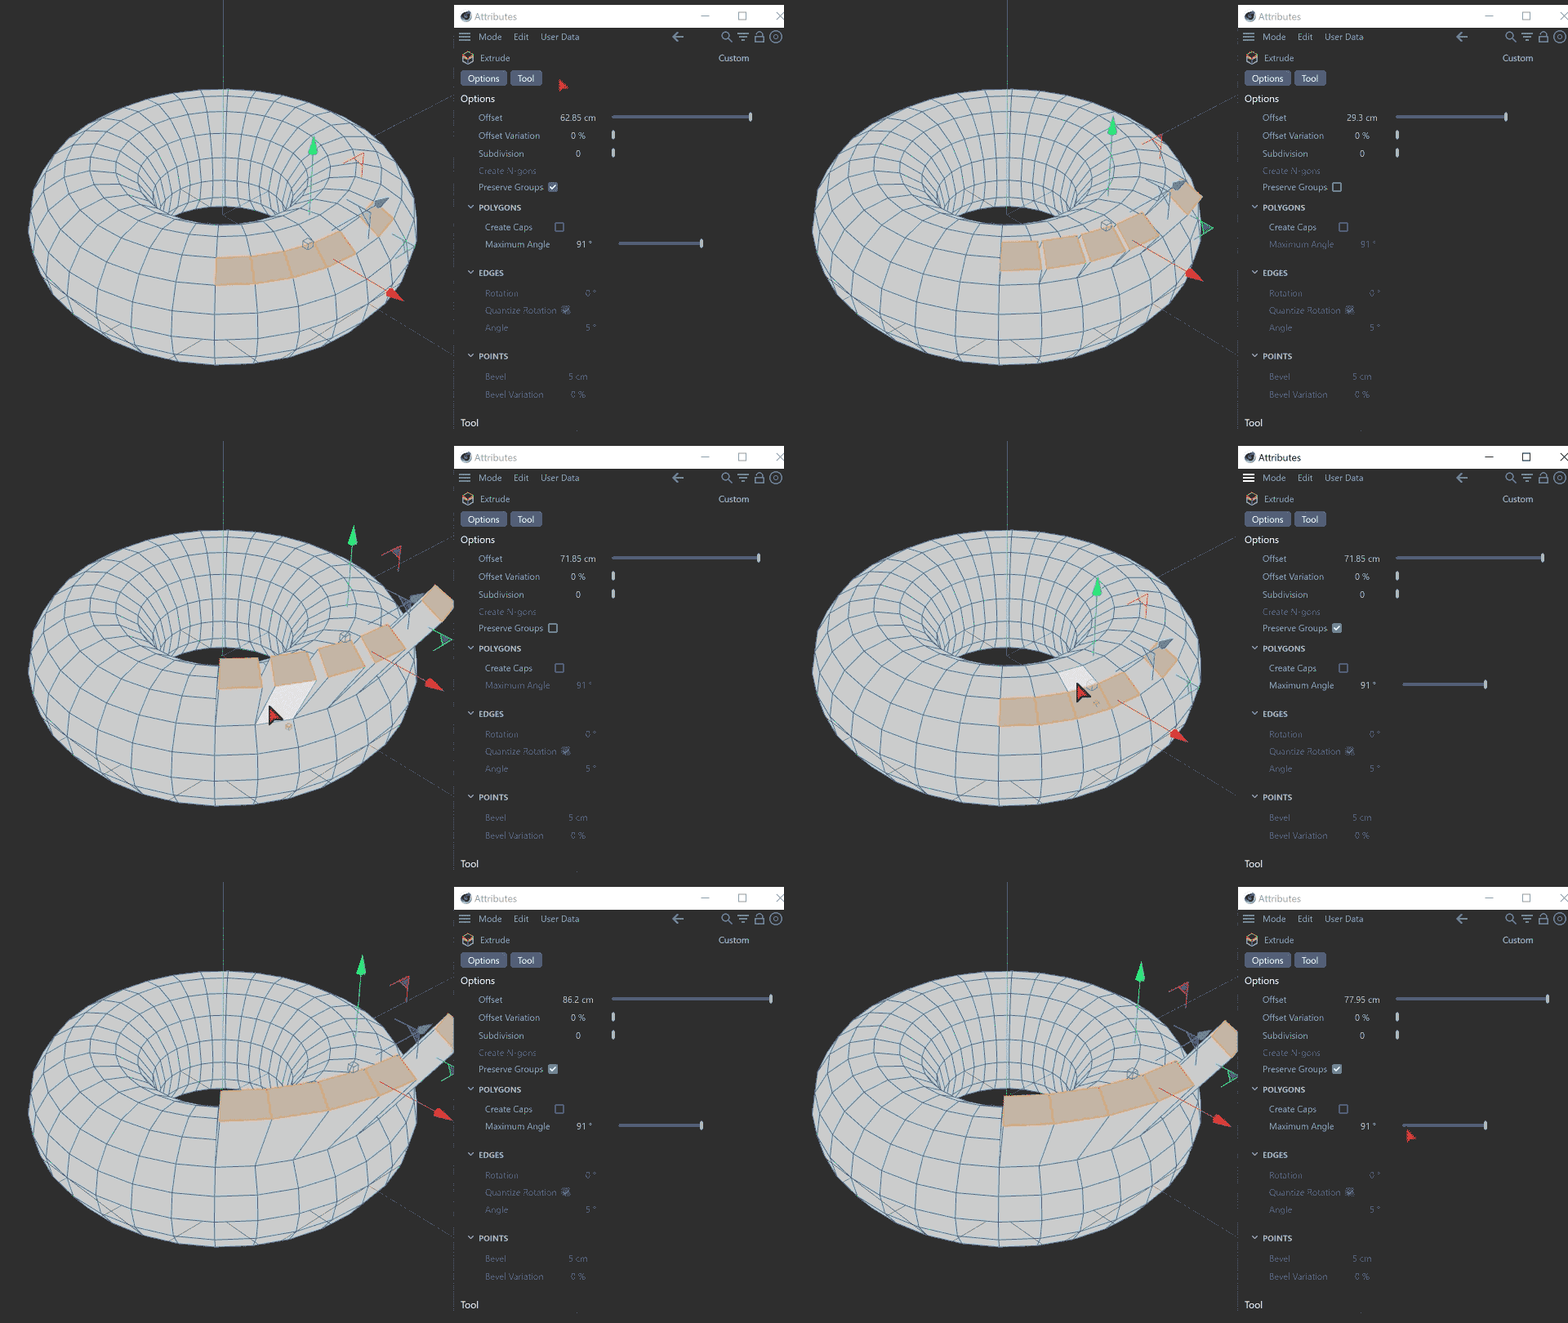
Preserve groups will keep adjacent extruded polygons together if their shared edge is below the Maximum Angle threshold. Now just throw in a Subdivision Surface and your 50% of the way to a tentacle monster
Extrude Tool Tips
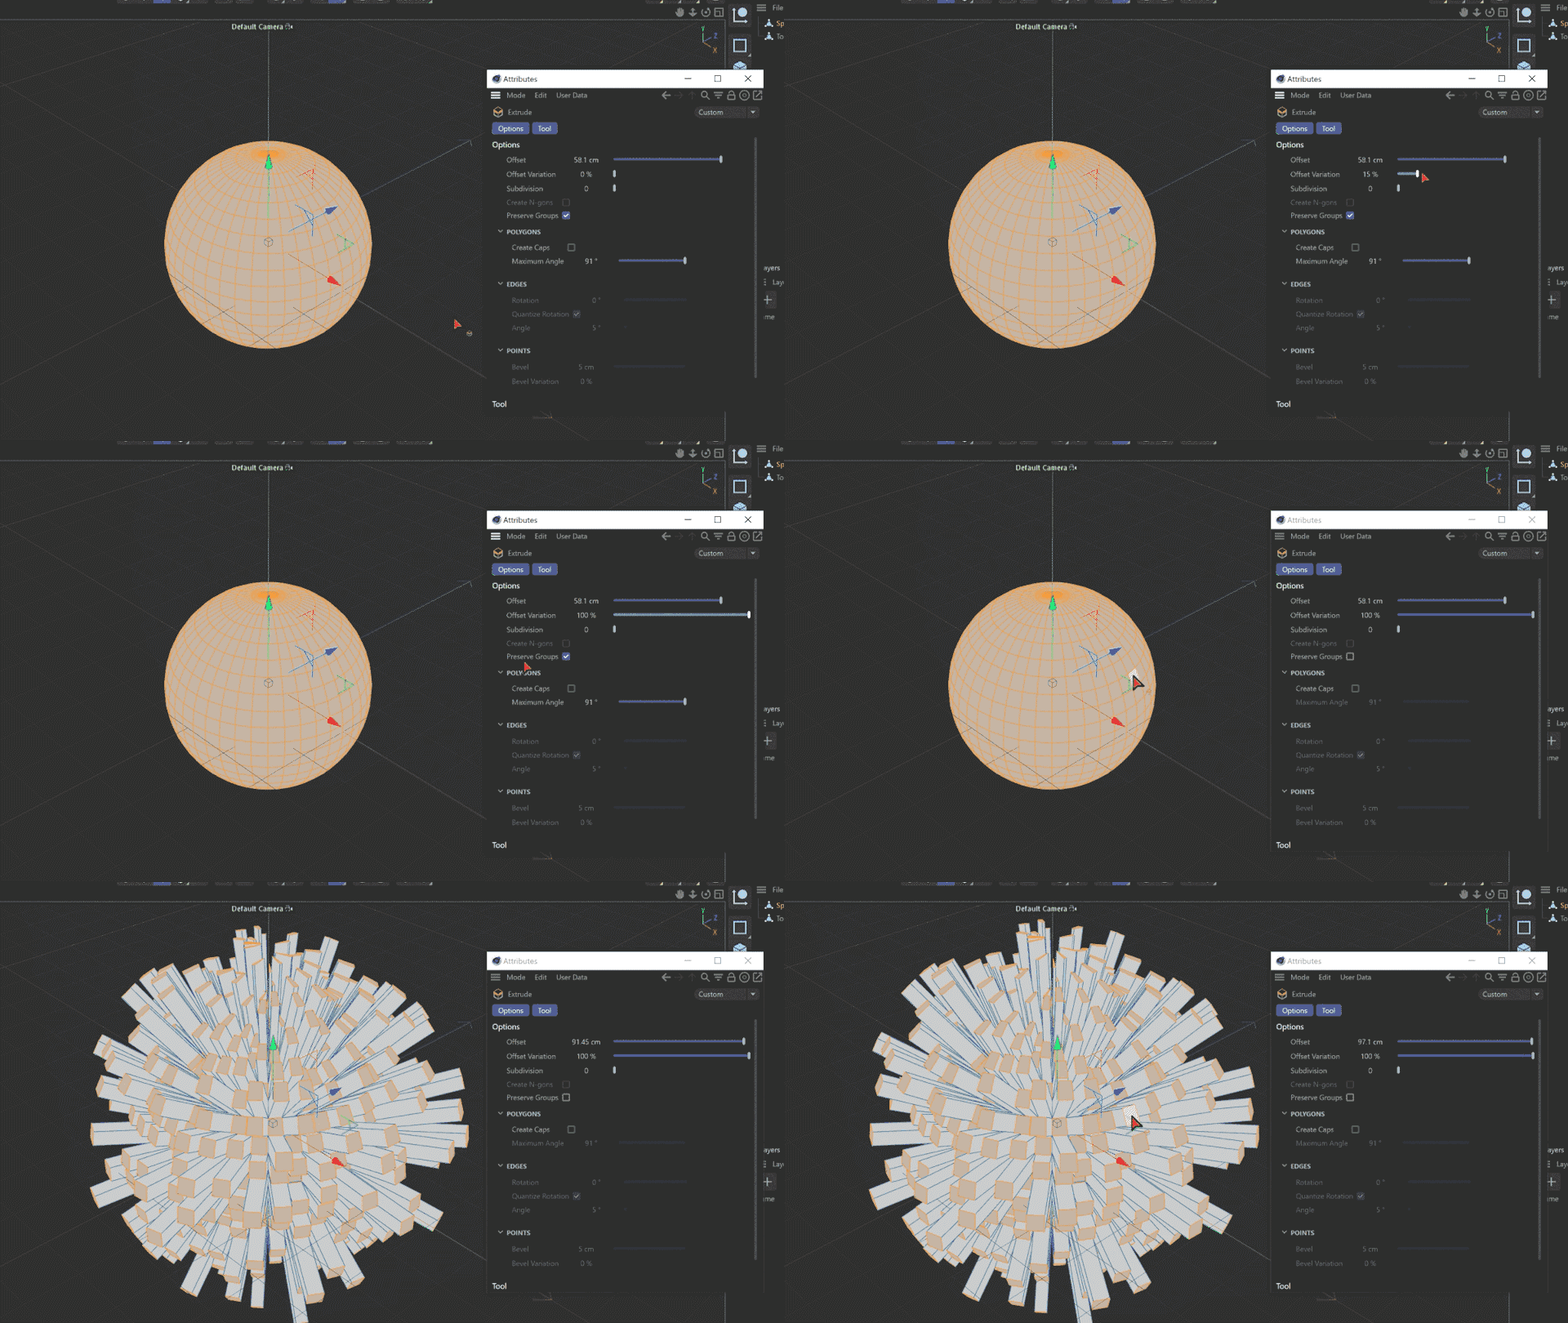
Using the Variance option in the tool can let you quickly create greebled looks on any kind of geometry in your scene, adding a secondary layer of detail and complexity. Just remember, the extrude tool is not parametric, so if you decide much later down the line you want to change the look of the extrusions, it could be pretty difficult to get back to the original state.
For the quick-paced extrusion operations you need to perform hundreds of times while modeling an object, you can select polygons and use the movement axis handles while holding Control to make extrusions in a more free form way. This brings polygon modeling closer to the fluid and free form process of sculpting. And by the way, this works for edge selections too!
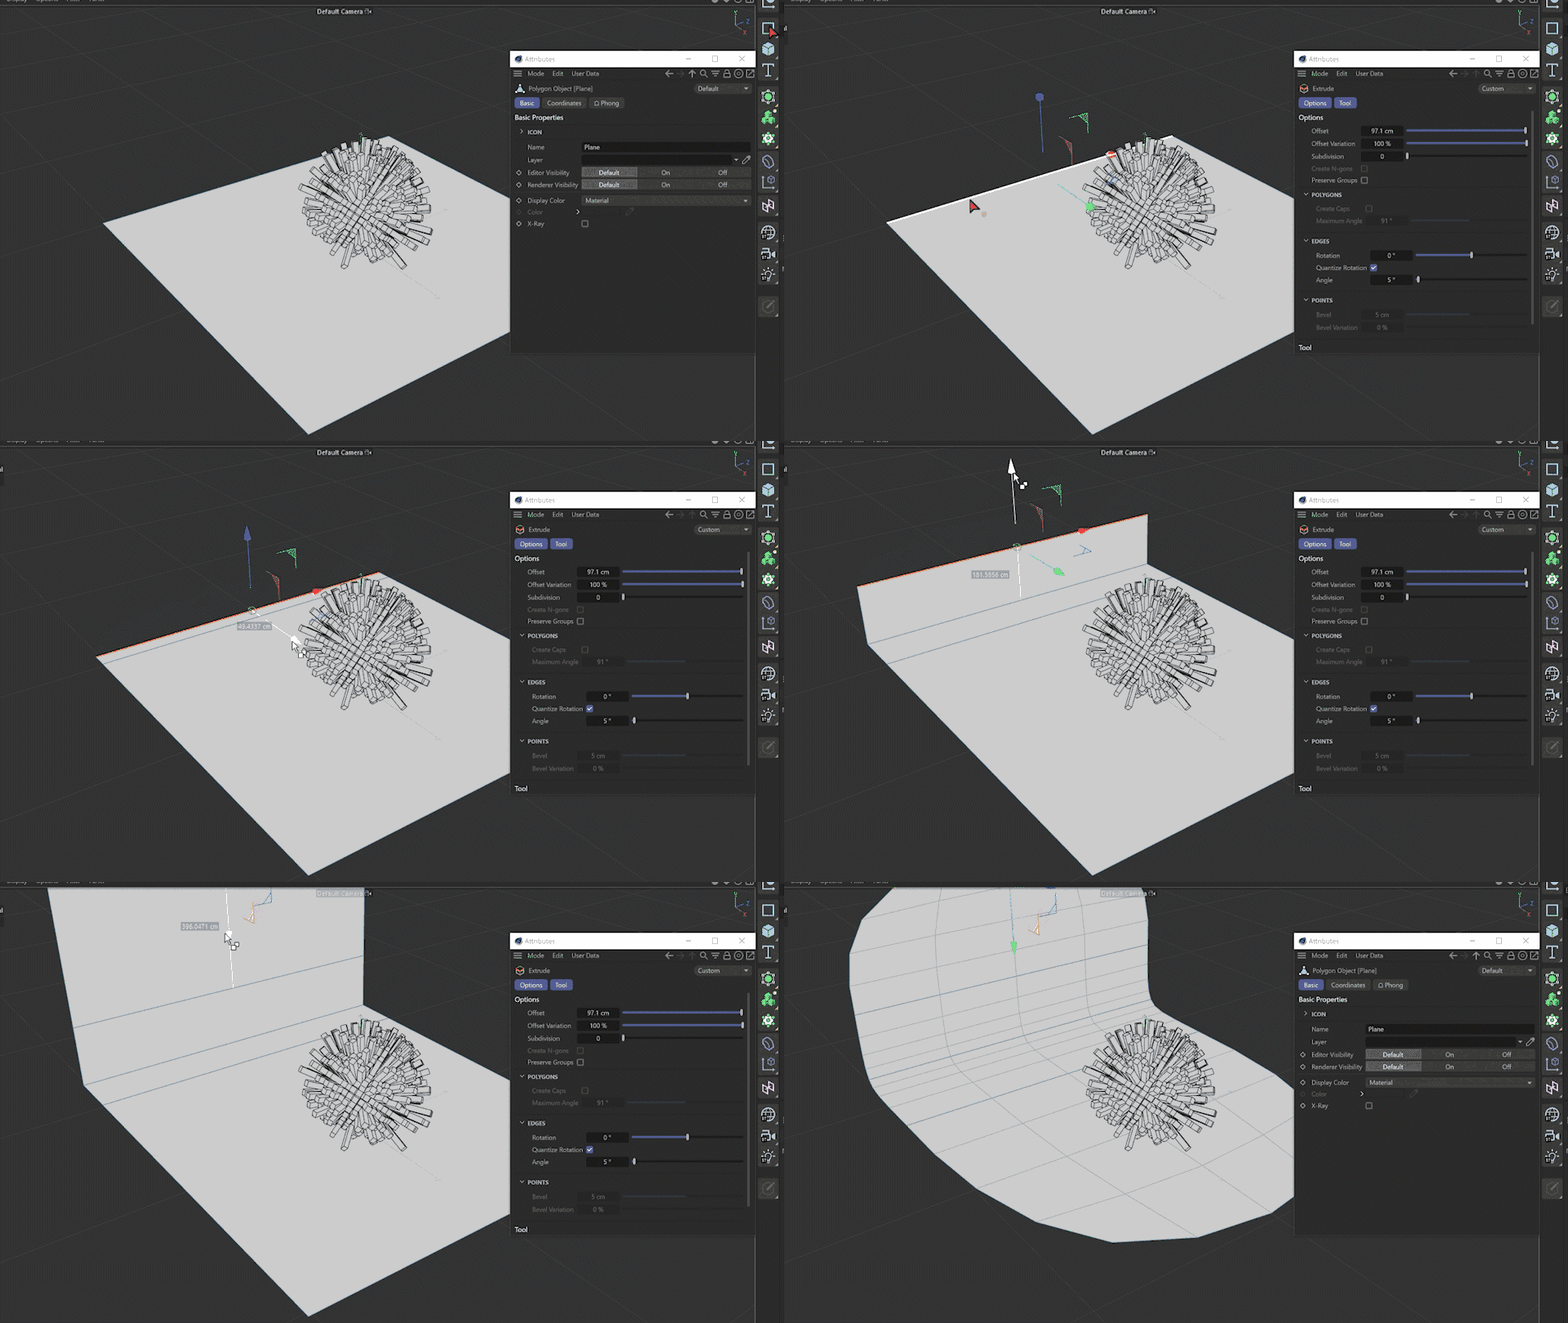
For those times when you just don't have the patience to figure out which way the Bend deformer needs to be rotated.
Congrats! You're extruding like a pro. Start digging through those old Illustrator files and see what you can do to make them look even better in 3D. Or, ya know, just do some good old fashioned IRL extruding, up to you.

Become familiar with more deformers and 3D modeling techniques in Cinema 4D Basecamp! It is a 12 week class, taught by EJ Hassenfratz, that teaches you the basics of Cinema 4D so you’ll feel comfortable jumping into your next 3D project. Within the class, you’ll receive feedback on your homework from professionals working within the field so you can advance your workflow and eye for design.
{{lead-magnet}}
ENROLL NOW!
Acidbite ➔
50% off everything

ActionVFX ➔
30% off all plans and credit packs - starts 11/26

Adobe ➔
50% off all apps and plans through 11/29

aescripts ➔
25% off everything through 12/6
Affinity ➔
50% off all products

Battleaxe ➔
30% off from 11/29-12/7
Boom Library ➔
30% off Boom One, their 48,000+ file audio library
BorisFX ➔
25% off everything, 11/25-12/1

Cavalry ➔
33% off pro subscriptions (11/29 - 12/4)

FXFactory ➔
25% off with code BLACKFRIDAY until 12/3

Goodboyninja ➔
20% off everything

Happy Editing ➔
50% off with code BLACKFRIDAY

Huion ➔
Up to 50% off affordable, high-quality pen display tablets

Insydium ➔
50% off through 12/4
JangaFX ➔
30% off an indie annual license
Kitbash 3D ➔
$200 off Cargo Pro, their entire library
Knights of the Editing Table ➔
Up to 20% off Premiere Pro Extensions
Maxon ➔
25% off Maxon One, ZBrush, & Redshift - Annual Subscriptions (11/29 - 12/8)
Mode Designs ➔
Deals on premium keyboards and accessories
Motion Array ➔
10% off the Everything plan
Motion Hatch ➔
Perfect Your Pricing Toolkit - 50% off (11/29 - 12/2)

MotionVFX ➔
30% off Design/CineStudio, and PPro Resolve packs with code: BW30

Rocket Lasso ➔
50% off all plug-ins (11/29 - 12/2)

Rokoko ➔
45% off the indie creator bundle with code: RKK_SchoolOfMotion (revenue must be under $100K a year)

Shapefest ➔
80% off a Shapefest Pro annual subscription for life (11/29 - 12/2)

The Pixel Lab ➔
30% off everything
Toolfarm ➔
Various plugins and tools on sale

True Grit Texture ➔
50-70% off (starts Wednesday, runs for about a week)

Vincent Schwenk ➔
50% discount with code RENDERSALE

Wacom ➔
Up to $120 off new tablets + deals on refurbished items


