Photoshop is one of the most popular design programs out there, but how well do you really know those top menus?
Most of your time in Photoshop is spent on the canvas, but sometimes you’ve got to know how to navigate the menus. There are lots of hidden gems buried in the massive list of commands living in the menu bar at the top of Adobe programs. In this article we’re going to go through some of the most useful commands in Photoshop’s File menu.
Sure, you can probably open, close, even create a new document with easy-to-remember keyboard shortcuts. But just glance at the File menu in Photoshop; there are many commands that you may not even know existed. Here are three essential menu options that’ll help you export your documents with ease:
- Export As
- Save For Web
- Image Processor
Export > Export As in Photoshop
You’ve finished your design and are ready to export. There are a million and one ways to do that in Photoshop, so which way is the right way? 9 times out of 10, it’s Export As. With your document open and ready to go, head up to File > Export > Export As.
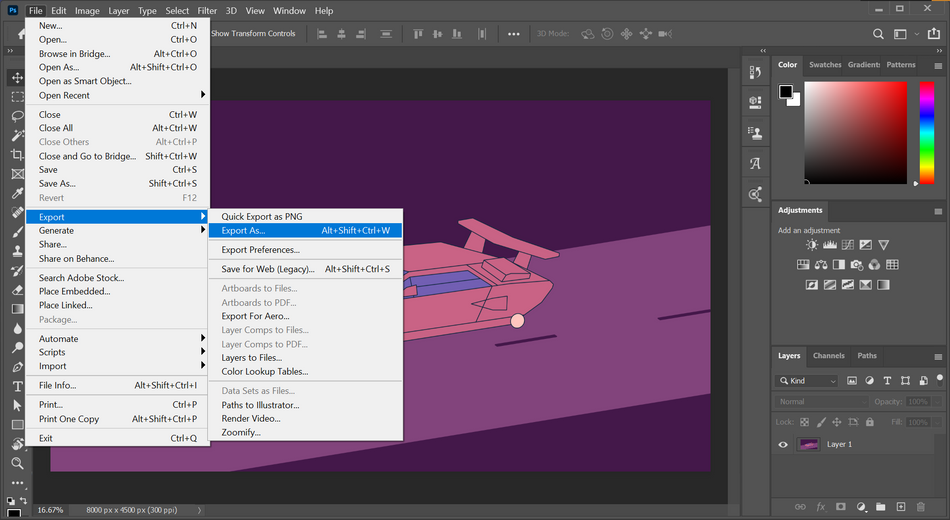
The reason Export As is my go-to for exporting documents is because of the great controls it offers. You can quickly export to a variety of formats, change the exported image size, crop the canvas and even export multiple sizes of the same document at once. On top of that, if you’re using artboards, you can even export multiple artboards at once.

The ability to export a document with so much control is why I use Export As so often. I especially love the instant visual feedback of the quality slider when exporting a JPG. This way I’ll know just how far I can push the compression without it turning to crushed pixels.
One thing to remember: if you’re using artboards, the exports will be named based on the artboard names. Otherwise, you can choose the exported filename after you click Export.
Export > Save For Web (Legacy) in Photoshop
Another way to export? But I thought Export As was the best choice? And it’s Legacy? Doesn’t that mean “old way”? Well, there’s still a very important use for this legacy command: animated GIFs.
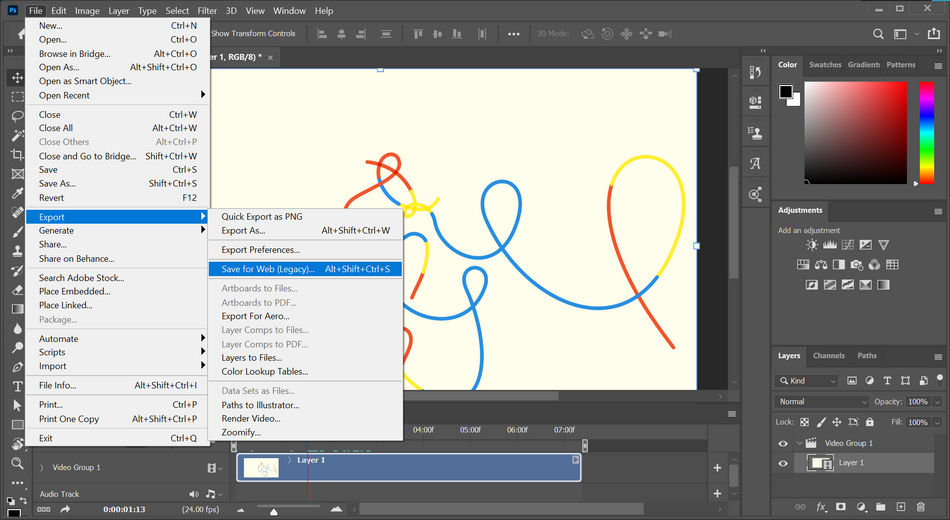
There are a plethora of methods for compressing GIFs, but the OG is Photoshop’s Save For Web dialog. And while many of the new techniques are often much quicker and more convenient, none of them have quite the same level of control for compression as Photoshop.
Open up a video or image sequence in Photoshop, then head to File > Export > Save For Web (Legacy). In the top right corner, choose one of the GIF presets, and then customize the compression settings to your heart’s content. Here’s an excellent tutorial explaining how to use this dialog.
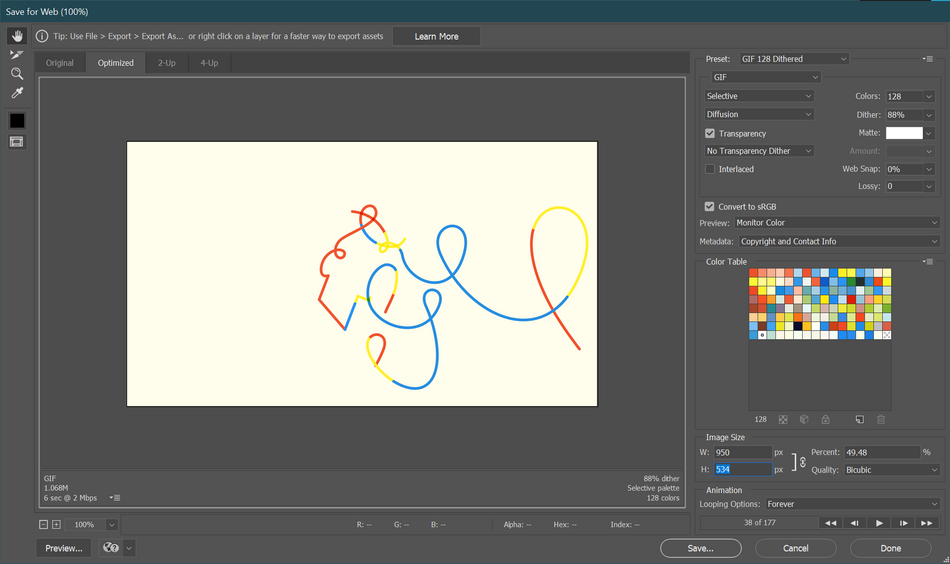
Hot tip: make sure you change the Looping Options dropdown option to Forever just before clicking the Save button.
Scripts > Image Processor in Photoshop
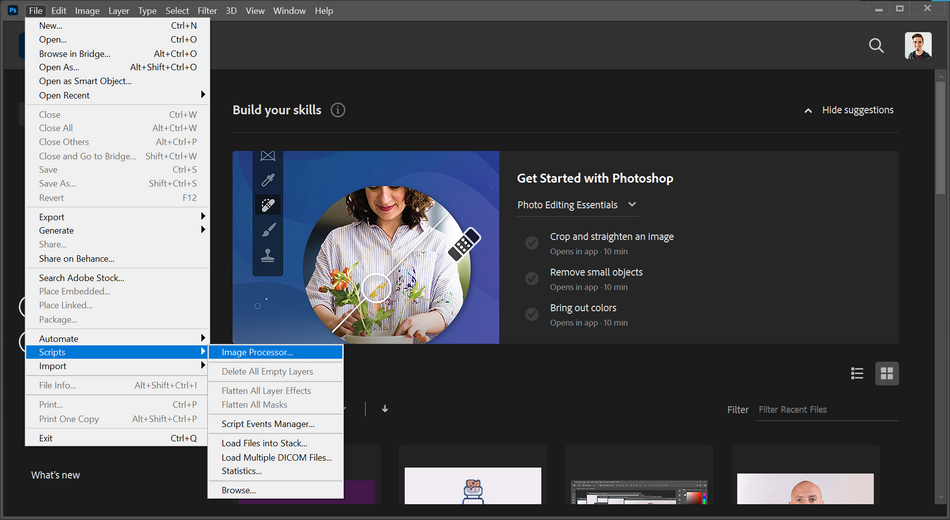
Who knew Photoshop had Scripts too? Fun fact: scripts can be created for any Adobe application. The Image Processor comes bundled with Photoshop and has some really great time saving functionality.
If you ever needed to resize and convert a whole bunch of photos and opened them one at a time, resized and saved each one individually, you’ll be glad to know you never have to do things the hard way again. Go up to File > Scripts > Image Processor.
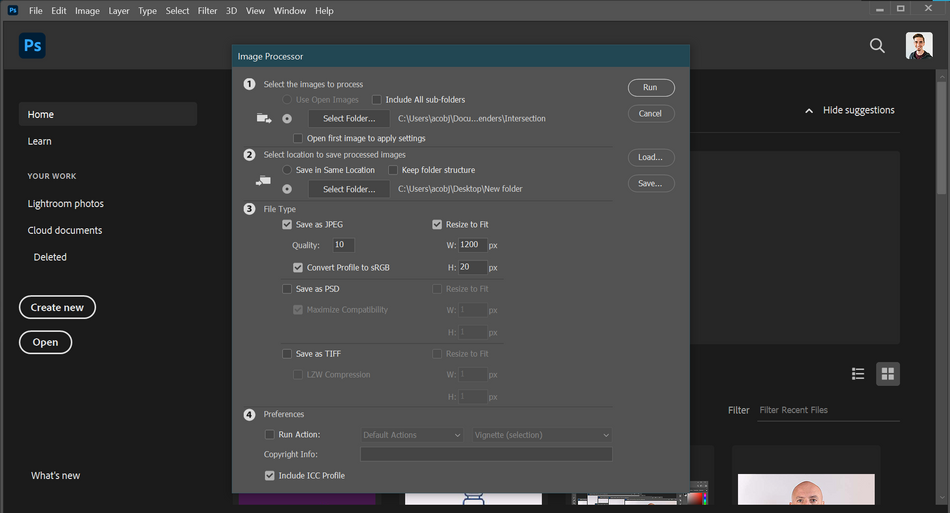
The Image Processor script allows you to convert and save a folder of images to JPG, PSD or TIFF formats. Start by choosing the source folder. Then you can choose to save the new images in the same directory, or in a new folder. After that, choose a file type (you can choose more than one). You can also choose to resize the converted images at this step.
Finally, you can choose to run any Photoshop Action as the image is converted. This is a super handy way to batch process many photos automatically, while also choosing the exported file type, size and compression.
So there you go. There’s a lot more to the File menu than you probably ever imagined, and taking the time to familiarize yourself with the commands in this menu can add a surprising amount of efficiency to your daily workflow. Get used to these three commands to be able to easily export assets, save animated GIFs, and batch process folders of images.
Ready to learn more?
If this article only roused your appetite for Photoshop knowledge, it seems like you'll need a five-course shmorgesborg to bed it back down. That's why we developed Photoshop & Illustrator Unleashed!
Photoshop and Illustrator are two very essential programs that every Motion Designer needs to know. By the end of this course, you'll be able to create your own artwork from scratch with tools and workflows used by professional designers every day.
ENROLL NOW!
Acidbite ➔
50% off everything

ActionVFX ➔
30% off all plans and credit packs - starts 11/26

Adobe ➔
50% off all apps and plans through 11/29

aescripts ➔
25% off everything through 12/6
Affinity ➔
50% off all products

Battleaxe ➔
30% off from 11/29-12/7
Boom Library ➔
30% off Boom One, their 48,000+ file audio library
BorisFX ➔
25% off everything, 11/25-12/1

Cavalry ➔
33% off pro subscriptions (11/29 - 12/4)

FXFactory ➔
25% off with code BLACKFRIDAY until 12/3

Goodboyninja ➔
20% off everything

Happy Editing ➔
50% off with code BLACKFRIDAY

Huion ➔
Up to 50% off affordable, high-quality pen display tablets

Insydium ➔
50% off through 12/4
JangaFX ➔
30% off an indie annual license
Kitbash 3D ➔
$200 off Cargo Pro, their entire library
Knights of the Editing Table ➔
Up to 20% off Premiere Pro Extensions
Maxon ➔
25% off Maxon One, ZBrush, & Redshift - Annual Subscriptions (11/29 - 12/8)
Mode Designs ➔
Deals on premium keyboards and accessories
Motion Array ➔
10% off the Everything plan
Motion Hatch ➔
Perfect Your Pricing Toolkit - 50% off (11/29 - 12/2)

MotionVFX ➔
30% off Design/CineStudio, and PPro Resolve packs with code: BW30

Rocket Lasso ➔
50% off all plug-ins (11/29 - 12/2)

Rokoko ➔
45% off the indie creator bundle with code: RKK_SchoolOfMotion (revenue must be under $100K a year)

Shapefest ➔
80% off a Shapefest Pro annual subscription for life (11/29 - 12/2)

The Pixel Lab ➔
30% off everything
Toolfarm ➔
Various plugins and tools on sale

True Grit Texture ➔
50-70% off (starts Wednesday, runs for about a week)

Vincent Schwenk ➔
50% discount with code RENDERSALE

Wacom ➔
Up to $120 off new tablets + deals on refurbished items


