Master After Effects Expressions
Go from copy-pasting code to writing your own expressions with confidence. Enroll in All-Access to unlock Expression Session and 50+ other courses.

Learn how to use expressions to set your Anchor Point in After Effects.
As you've been using expressions, you may not have paid much attention to the anchor point property in After Effects. What can you do with it anyways?
Well, if you're looking to add .MOGRT files to your skill set, learning how to pin down the anchor point can become a huge help. Let's jump in and show you how to dynamically set a layers anchor point that will stay put no matter the layer's scale, position, or type.

Anchor Point Expressions in After Effects
The anchor point in After Effects is the point in which all transformations are manipulated from. In a practical sense the anchor point is the point in which your layer will scale and rotate around.
Let's show you how to set an anchor point to a desired corner of your layer. This can come in handy when you're working with type template or a .MOGRT file and you need the anchor point to stay fixed in a specific spot.
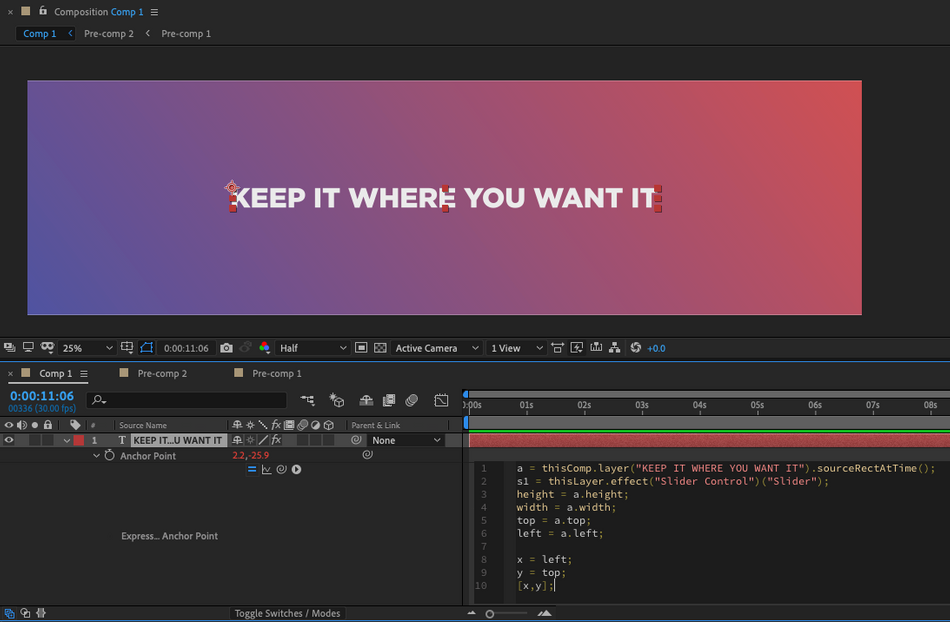
To kick things off we need to have After Effects figure out just how big the text layer is. To accomplish this task we're going to utilize the super awesome After Effects expression, sourceRectAtTime. By harnessing this expression we can place the anchor point where we want, but first there is a little bit of set up.
Let's start by informing After Effects of which layer is going to need to be measured.
a = thisComp.layer("Text1").sourceRectAtTime();
There are four attributes that come with the sourceRectAtTime expression that we need to know. They are top, left, width, and height. Now, I don't know about you, but I wish there was a bottom and right as well. You'll know what I mean in a moment. Even thought we don't have those attributes available, we can use a little bit of logic as a work around. But first, let's define a few new variables that will help us create a cleaner code.
a = thisComp.layer("Text1").sourceRectAtTime();
height = a.height;
width = a.width;
top = a.top;
left = a.left;
SETTING THE ANCHOR POINT WHERE WE WANT
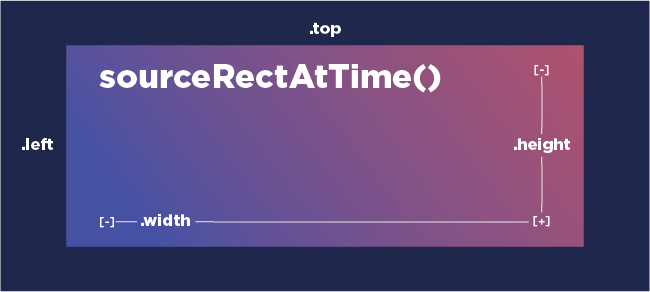
Now, let's think this through for just a moment. We have four attributes available; two being positional and two being dimensional. After Effects starts with X at zero on the left and Y at zero on the top of the composition. Check out this graph to help better understand what I mean:

To get the right side or bottom positions we can see we need to use addition. But which ones come into play to make sure it works properly? I'm going to give you expressions for each corner. Check out what I'm adding and how they correlate to each specific corner.
Expressions for Placing the Anchor Point in Layer Corners
Using the image above helps us to better understand how we can be sure we are placing the anchor point correctly. Feel free to copy and paste the expressions below, and practice changing them and re-ordering the code to get a firm grasp on the logic.
HOW TO PLACE THE ANCHOR POINT IN THE BOTTOM LEFT:
When attempting to lock the anchor point to the bottom of your layer, it's important to remember your Y axis is positive going downward. This is important because it tells us to add when we need to move our point downward. To set the anchor point on the bottom left we want to set the X axis using the .left attribute, and set the Y by adding the attributes .top and .height.
a = thisComp.layer("Text1").sourceRectAtTime();
height = a.height;
width = a.width;
top = a.top;
left = a.left;
x = left;
y = top + height;
[x,y];
HOW TO PLACE THE ANCHOR POINT IN THE BOTTOM RIGHT:
The right side anchor point is similar, but we need to now add more pixels on the X axis. To set the anchor point on the bottom right we want to set the X axis by adding the .left and .width attribute, and set the Y by adding the attributes .top and .height.
a = thisComp.layer("Text1").sourceRectAtTime();
height = a.height;
width = a.width;
top = a.top;
left = a.left;
x = left + width;
y = top + height;
[x,y];
HOW TO PLACE THE ANCHOR POINT IN THE TOP RIGHT:
To set the anchor point on the top right we want to set the X axis by adding the .left and .width attribute, and set the Y by only using the .top attribute.
a = thisComp.layer("Text1").sourceRectAtTime();
height = a.height;
width = a.width;
top = a.top;
left = a.left;
x = left + width;
y = top;
[x,y];
HOW TO PLACE THE ANCHOR POINT IN THE TOP LEFT:
To set the Anchor point on the top left we want to set the X by using the .left attribute, and then setting the Y by only using the .top attribute.
a = thisComp.layer("Text1").sourceRectAtTime();
height = a.height;
width = a.width;
top = a.top;
left = a.left;
x = left;
y = top;
[x,y];
HOW TO PLACE THE ANCHOR POINT IN THE CENTER:
Now, if you wanted to keep that anchor point in the very center, you just need to use a little division. This code is similar to placing the anchor point in the bottom right, but we're going to divide the width and height by two.
To set the anchor point on the center of your layer we want to set the X axis by adding the .left and .width/2 attribute, and set the Y by adding the attributes .top and .height/2.
a = thisComp.layer("Text1").sourceRectAtTime();
height = a.height;
width = a.width;
top = a.top;
left = a.left;
x = left + width/2;
y = top + height/2;
[x,y];
How to Offset the Anchor Point:
If you're looking for a little bit of control for offsetting the anchor point, you can use a slider to do so. Let's dive into some simple code additions that can help set this up.
First things first, add a slider from the effects and presets window to your layer. Next, we'll set up a variable that will call back to the slider for easy to read code.
a = thisComp.layer("Text1").sourceRectAtTime();
s = thisLayer.effect("Slider Control")("Slider");
height = a.height;
width = a.width;
top = a.top;
left = a.left;
x = left;
y = top + height;
[x,y];
Now all we have to do is pick which dimension we want to add to and use some simple addition.
a = thisComp.layer("Text1").sourceRectAtTime();
s = thisLayer.effect("Slider Control")("Slider");
height = a.height;
width = a.width;
top = a.top;
left = a.left;
x = left + s;
y = top + height;
[x,y];
Once I've added our slider variable s to X then we can start using the expression controller to move our anchor point.

If you wanted to, you can utilize offsetting your anchor point and rotating your layer while doing so. Try experimenting with this even outside of using typography. You can probably get some super cool looks!
Here's some pre-comping and offsetting anchor points with a few other properties thrown into the mix.

By using some pre-comps we can get a little wacky. Moving this really slow could make for some cool stage visuals.

Anchor your skills with solid teaching!
There are a lot of use cases outside of what I went over in this article! If you want to learn more about using expressions in After Effects we have a ton of other great expression content here on School of Motion. Here are a few of our favorite tutorials:
- Amazing Expressions in After Effects
- After Effects Expressions 101
- How to Use the Loop Expression
- Getting Started with the Wiggle Expression in After Effects
- How to Use the Random Expression in After Effects
Expression Session
And if you've been looking to add Expressions to your MoGraph tool kit, your search is over! In Expression Sessions, you'll learn how to write your own code to expedite and enhance your work.
ENROLL NOW!
Acidbite ➔
50% off everything

ActionVFX ➔
30% off all plans and credit packs - starts 11/26

Adobe ➔
50% off all apps and plans through 11/29

aescripts ➔
25% off everything through 12/6
Affinity ➔
50% off all products

Battleaxe ➔
30% off from 11/29-12/7
Boom Library ➔
30% off Boom One, their 48,000+ file audio library
BorisFX ➔
25% off everything, 11/25-12/1

Cavalry ➔
33% off pro subscriptions (11/29 - 12/4)

FXFactory ➔
25% off with code BLACKFRIDAY until 12/3

Goodboyninja ➔
20% off everything

Happy Editing ➔
50% off with code BLACKFRIDAY

Huion ➔
Up to 50% off affordable, high-quality pen display tablets

Insydium ➔
50% off through 12/4
JangaFX ➔
30% off an indie annual license
Kitbash 3D ➔
$200 off Cargo Pro, their entire library
Knights of the Editing Table ➔
Up to 20% off Premiere Pro Extensions
Maxon ➔
25% off Maxon One, ZBrush, & Redshift - Annual Subscriptions (11/29 - 12/8)
Mode Designs ➔
Deals on premium keyboards and accessories
Motion Array ➔
10% off the Everything plan
Motion Hatch ➔
Perfect Your Pricing Toolkit - 50% off (11/29 - 12/2)

MotionVFX ➔
30% off Design/CineStudio, and PPro Resolve packs with code: BW30

Rocket Lasso ➔
50% off all plug-ins (11/29 - 12/2)

Rokoko ➔
45% off the indie creator bundle with code: RKK_SchoolOfMotion (revenue must be under $100K a year)

Shapefest ➔
80% off a Shapefest Pro annual subscription for life (11/29 - 12/2)

The Pixel Lab ➔
30% off everything
Toolfarm ➔
Various plugins and tools on sale

True Grit Texture ➔
50-70% off (starts Wednesday, runs for about a week)

Vincent Schwenk ➔
50% discount with code RENDERSALE

Wacom ➔
Up to $120 off new tablets + deals on refurbished items


Master After Effects Expressions

Go from copy-pasting code to writing your own expressions with confidence. Enroll in All-Access to unlock Expression Session and 50+ other courses.


