Check Out Five Great Lesser-Known After Effects Tools
There are so many tools, plugins, and scripts out there for After Effects, it can be hard to decide what to focus on first. Overwhelmed with choices? You are not alone!
If you find yourself paralyzed with indecision about which tool, technique, or trick to try next, fear not! School of Motion is here to help! In this article, I’ll share with you five tools that you probably never use, but should. The best part is that these are all part of After Effects, no plugins required.
Time to learn some new tricks!

5 After Effects Tools You Never Use...But You Should
A Free eBook for the Road
If you need inspiration, we've compiled some awesome information from the top-performing professionals in the industry. These are answers to commonly asked questions from artists you may never get to meet in person, and we combined them in one freaking sweet book.
Download Experiment. Fail. Repeat and discover the secrets of the universe! Or, you know, just get encouraged, which ever you most prefer is totally fine.
thisLayer.name
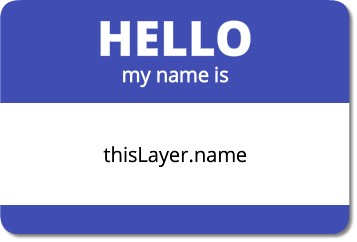
Not an expressions guru? Don’t worry, this one is super easy and will save you time! It’s as enlightening and life changing as the Wiggler, and just as easy to use.
- Expand the layer in the timeline
- Expand the Text category
- ALT + CLICK (OPTION + CLICK on a Mac) the stopwatch next to Source Text to create an expression
- Paste or type “thisLayer.name” in to the expression editor to the right.
Now, whatever you name that layer will be the source text for the type. The font, size, and other properties from the Character panel will be retained and applied to whatever you name the layer.
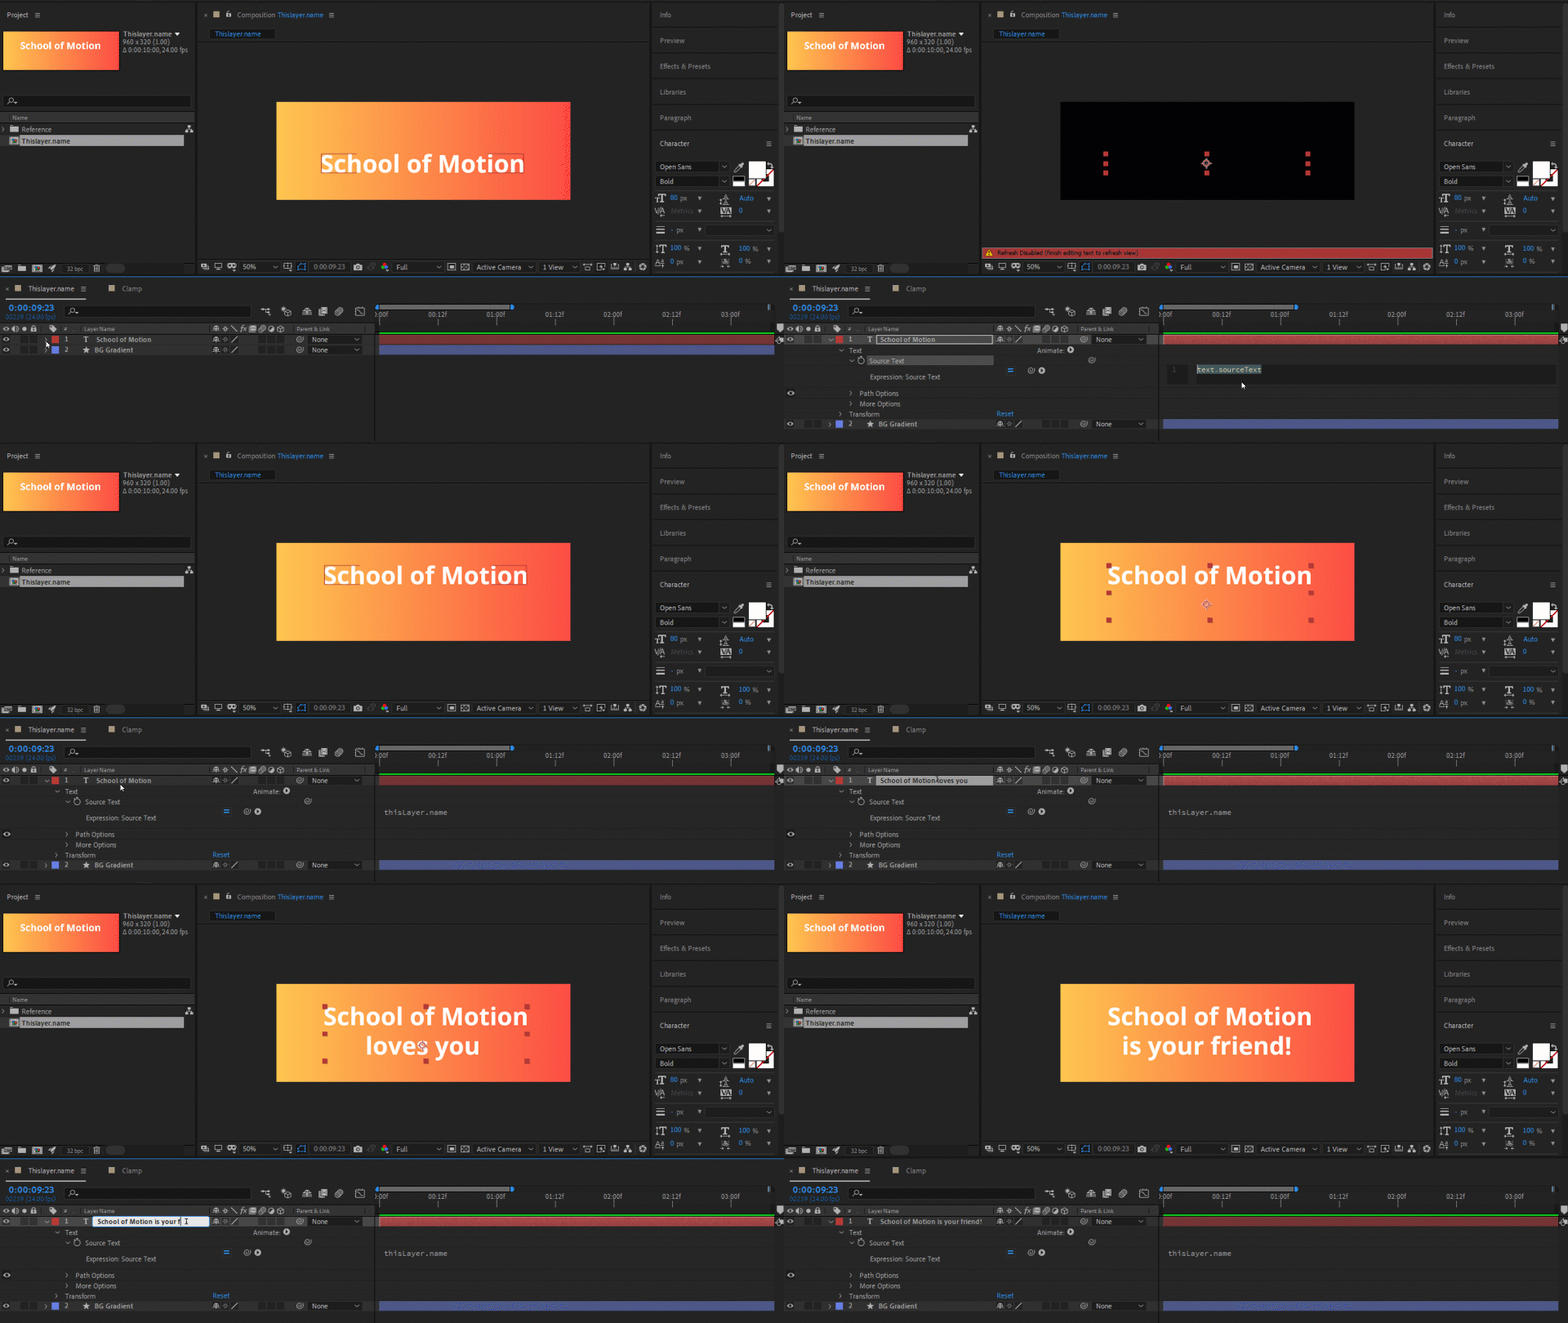
This little trick eliminates the need to rename your layers separately from editing text every time your client or creative director comes to you with new copy. Once you start using this trick, you will find the time you save adds up quickly. To learn more ways expressions can save you tons of time, check out our Expression Session.
Motion Sketch & the Smoother

Want to make a complex motion path without setting a bunch of keyframes?
Motion Sketch to the rescue! Motion sketch records your movements as you draw a path on the screen using your mouse or Wacom. This two-step process is going to change the way you make motion paths forever:
- Open up the Motion Sketch Panel with Window --> Motion Sketch
- Select the layer you want to animate
- In the Motion Sketch Panel, hit the Start Capture button
- Press and hold the left mouse button while you draw the animation path (or use your Wacom pen)
- Voila! You have an animation path!
- Now to make it supa-smooth, go to Window Smoother to open up the Smoother Panel
- Increase the tolerance level. Higher tolerance is smoother but less detailed. Lower tolerance is more detailed but less smooth.
- With the animated layer still selected, hit the Apply button
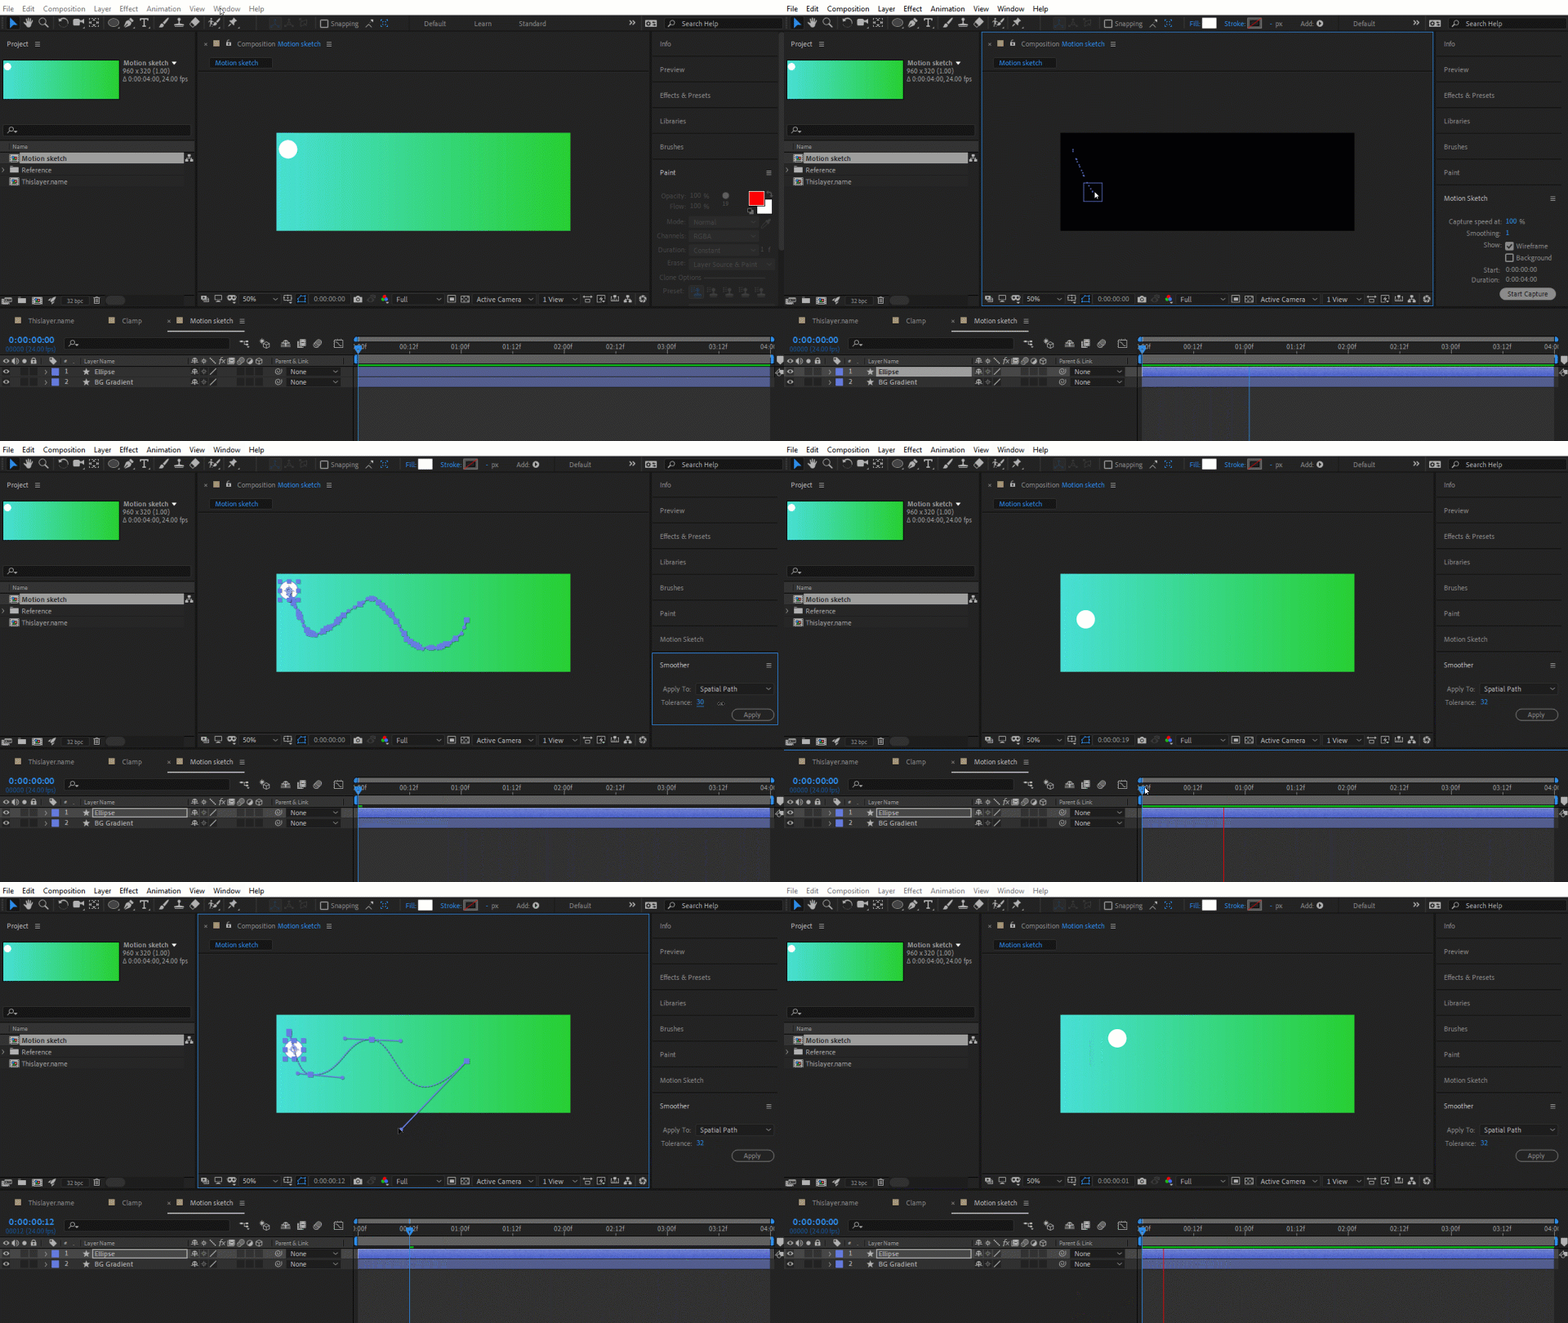
BOOM! You just drew a perfectly smooth awesome path. This smoother trick is especially for drawing nice smooth lines after that 11th cup of coffee.
To make this process even faster, increase the tolerance setting in the Motion Sketch Panel before you draw your path and skip the Smoother steps.
Paths as Motion Keyframes

Do you love drawing nice smooth flowy curves with the pen tool and rotobezier? I do. Why not use that fun process to animate something?
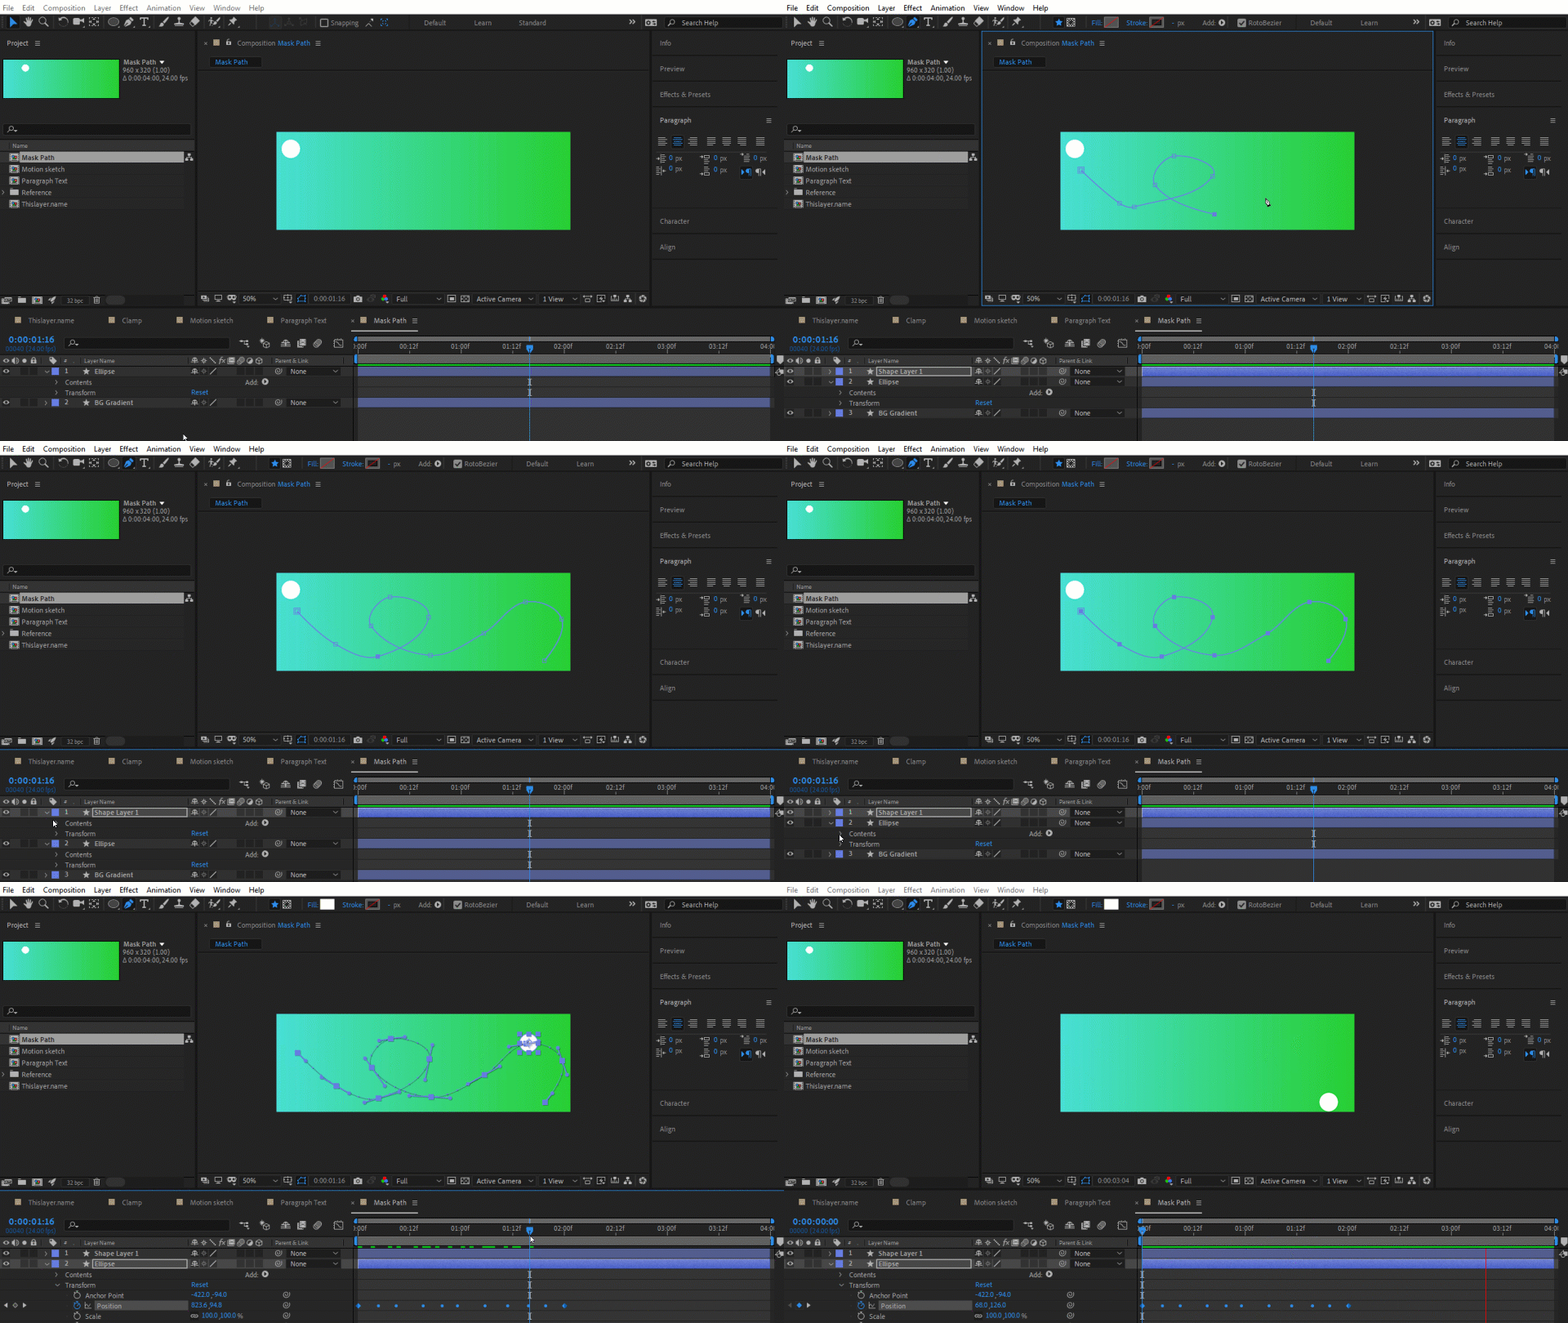
- Draw your path either in a shape layer or as a mask.
- Drill down to the path in the layer contents.
- Select the path and copy it with CTRL + C (CMD + C on a Mac)
- Go to the object’s Transform Position property and CTRL + V that pretty path to the position
Voila, you have instant path animation! You can also continue to adjust the path animation by moving the keys and adjusting the points and bezier handles.
Compositing Options for Effects

This one is a real hidden gem. For those of you who mostly use the Effects Panel when working with effects, this one may be a nice surprise. In the timeline panel, you can use masks to control where an effect works on a layer as well as animate the opacity of the effect.
- Add any effect to your layer
- Select the layer and draw or create a mask
- Expand the effect until you see Compositing Options
- Click the + symbol next to Compositing Options
- Select your mask in the Mask Reference dropdown
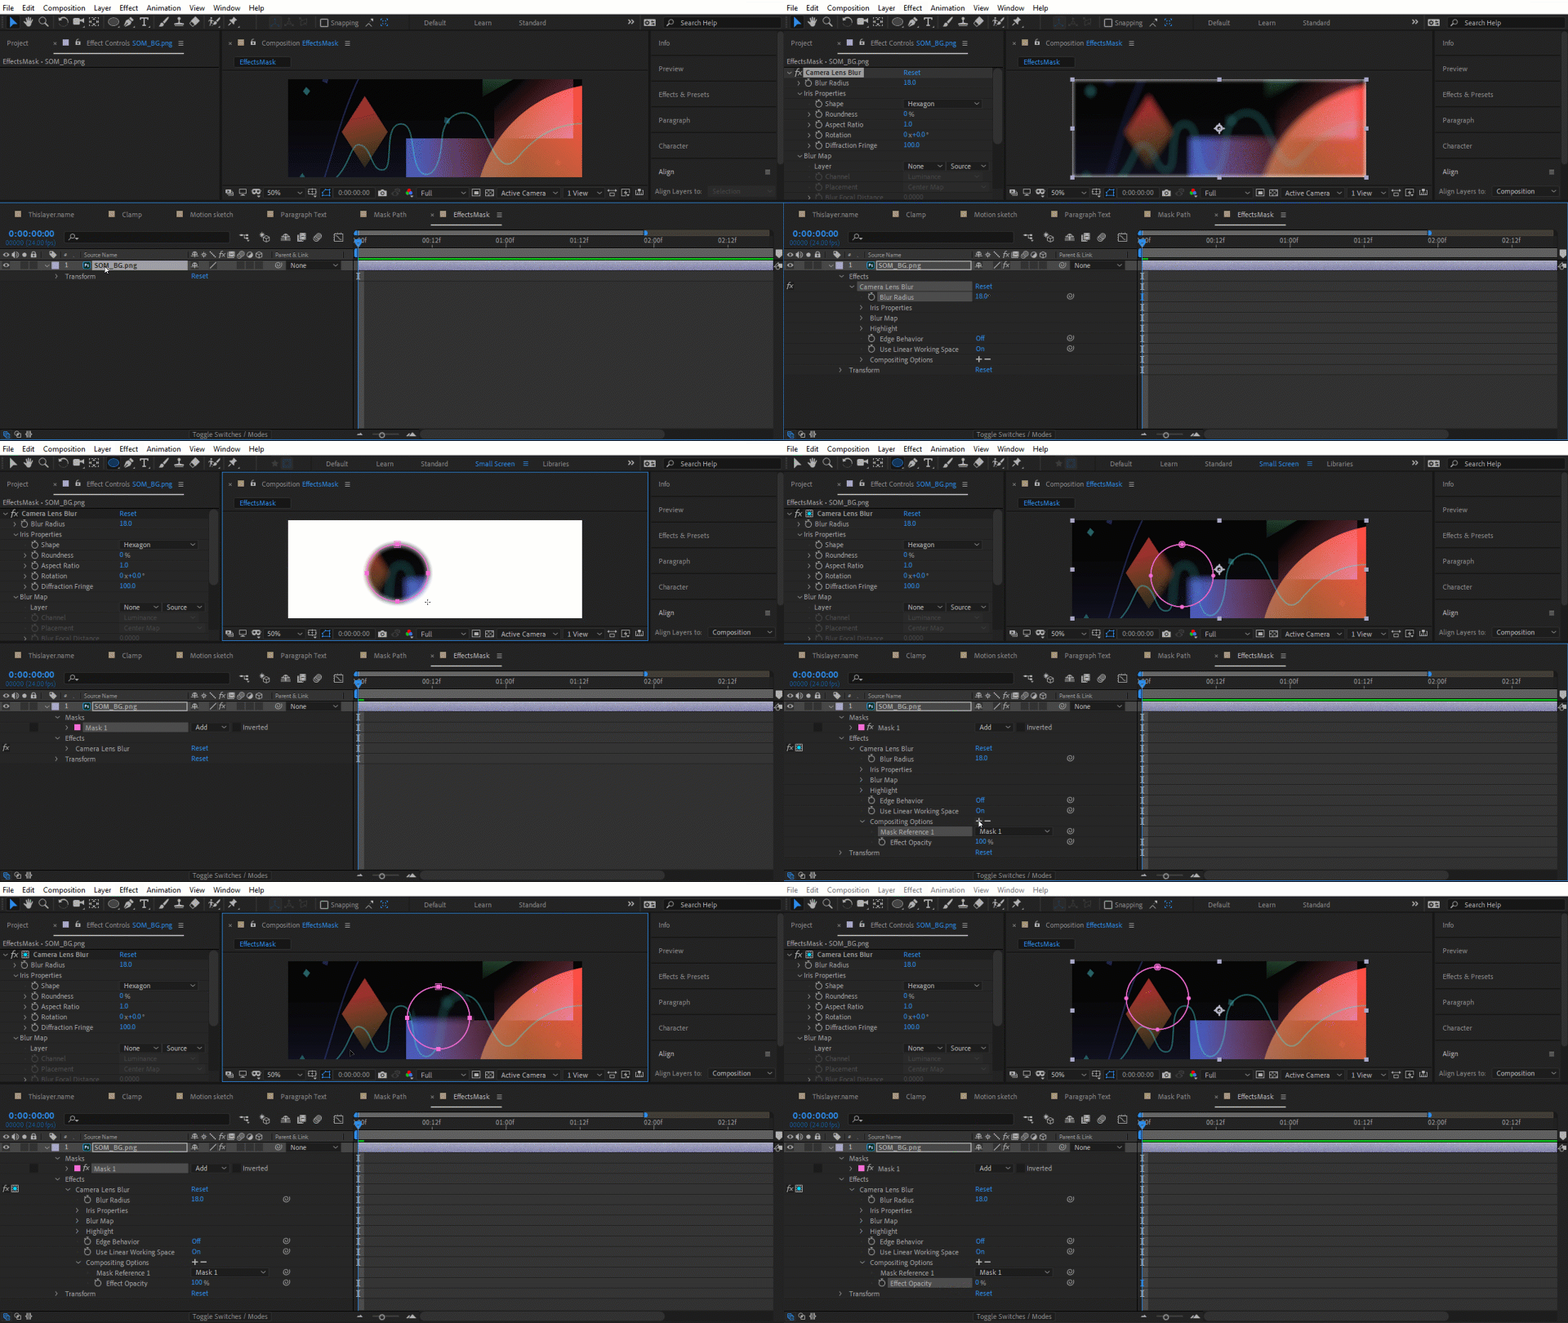
BOOM! You can now control your effect with a mask. You can also control the opacity of the effect using the Effect Opacity setting in the Compositing Options.
- This works with all of the effects. A few things to note:
- You can only choose masks that are on the same layer as the effect.
- You can add as many mask references as you like.
This one is so powerful, we wondered why it was hidden away. You’re welcome!
Converting to Paragraph Text
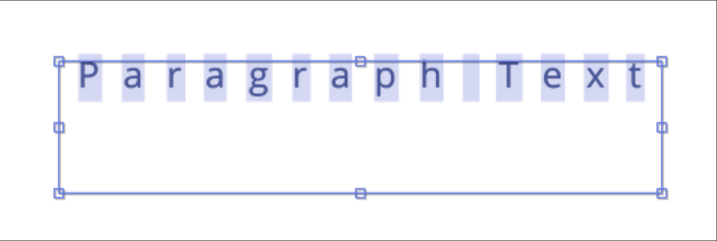
This is another hidden but super useful tool. AE doesn’t seem to have any paragraph text tool which is a huge bummer, until you know where to find it.
- With some text written, keep the text tool active but don’t select any text.
- Right click (CTRL + click for Mac lovin’ peeps)
- Select “Convert to Paragraph Text”
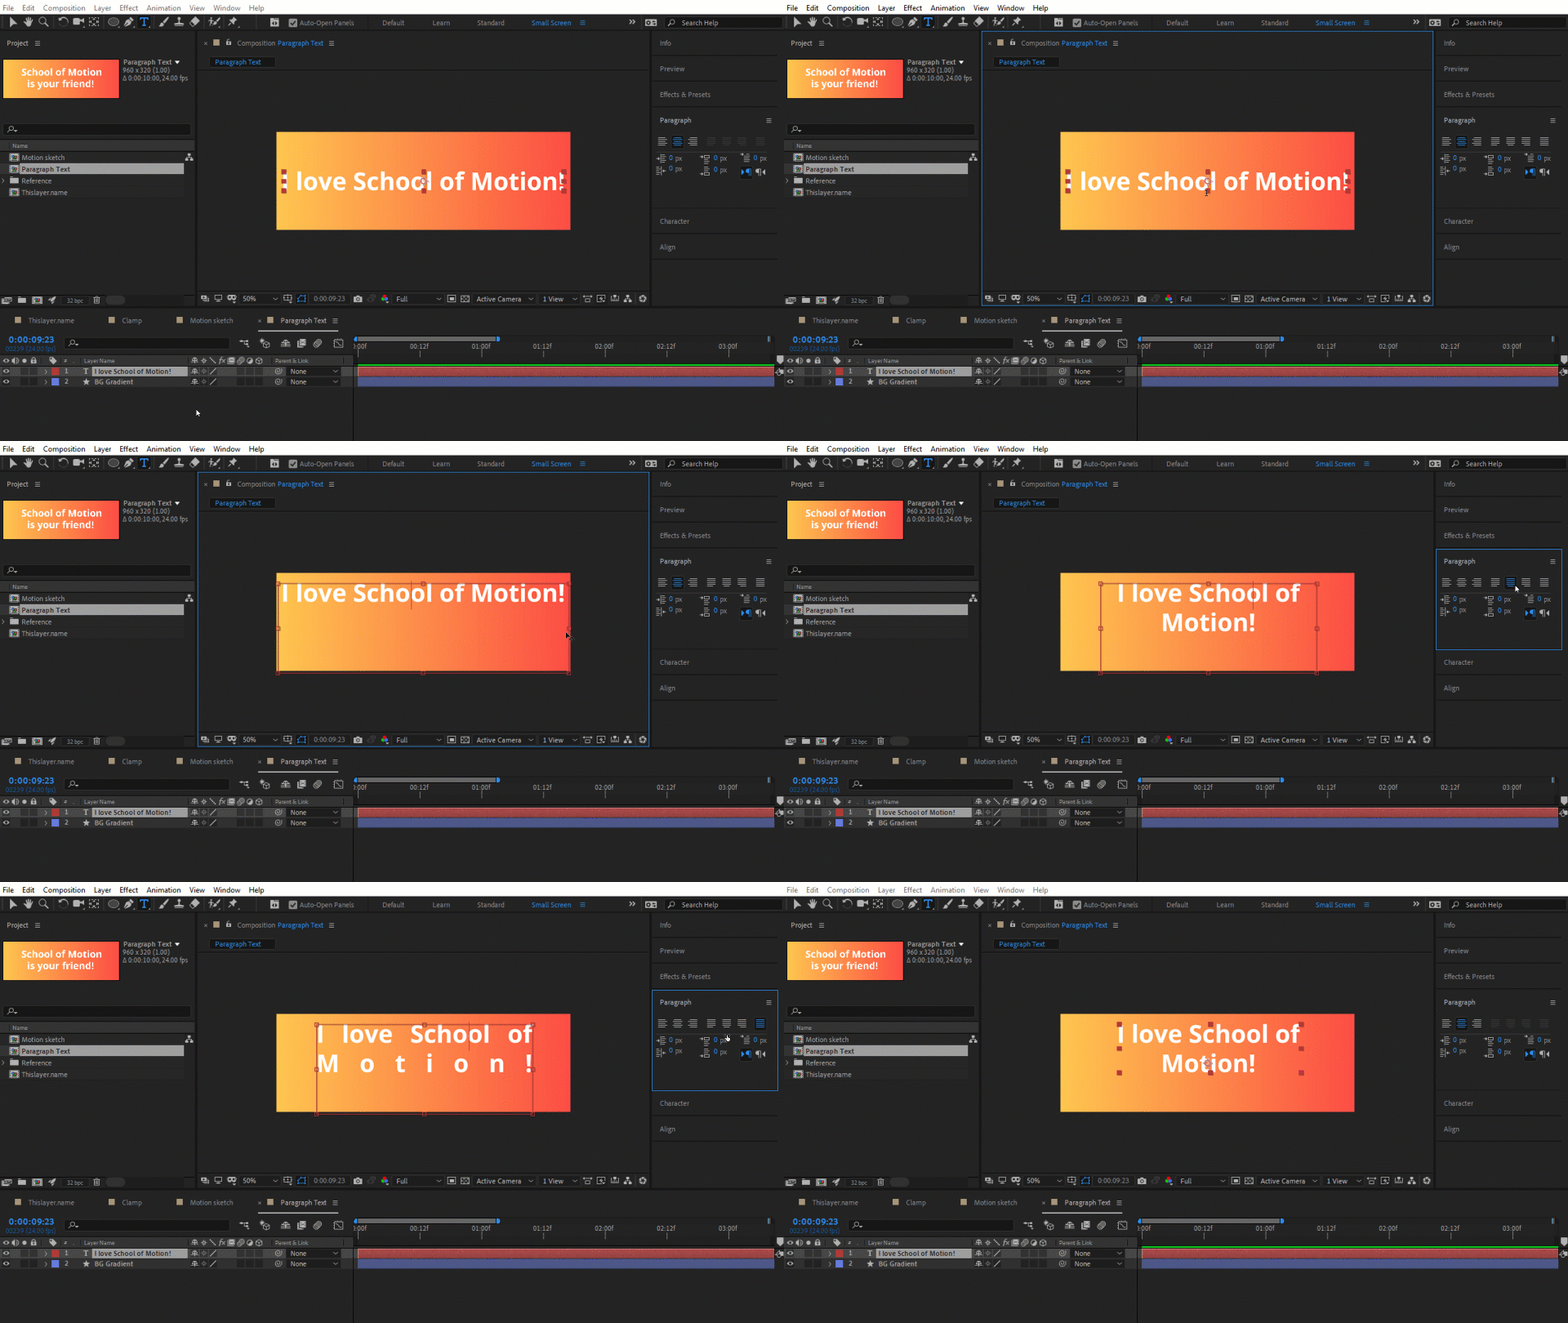
BOOM! Now you have a text box and all the fancy paragraph text capabilities that come with it like making that box the perfect shape, auto-wrap, and the paragraph justification tools.
Want to go back to the way things were? I get it. Sometimes you just want straight up text. Follow the same steps but select “Convert to Point Text” and you are right back to where you started.
If you really love paragraph text and want to create it right off the bat, select the text tool and drag in the comp window to define a box from the corner. To define a box around a center point, you can use ALT + DRAG (OPTION + DRAG on a Mac).
Those are some of our favorite After Effects Tools, no plugins required. Enjoy your new super powers!
Want to Learn More?
We have some amazing courses for every experience level from the complete newbie to the advanced motion artist.
- Want to speed up your workflows and achieve more with scripting? Check out Expression Session!
- Looking to up your animation game? Try Animation Bootcamp or Advanced Motion Methods.
- Want to learn more compositing tricks? VFX for Motion to the rescue!
That's not all we have to offer. If you want to learn even more cool motion design processes, tips, and tricks; check out our courses page for the full curriculum.
Tag us on social media (#schoolofmotion) with your fun new experiments using these tricks. Now go make something awesome!
-----------------------------------------------------------------------------------------------------------------------------------
Tutorial Full Transcript Below 👇:
Sara Wade (00:00): After effects has a wide range of built-in tools that can quickly become overwhelming. Let's narrow your focus with these five tips that can help save time. Hey everybody, Sara Wade here to talk about five built-in after effects tools that you really should be using, but you probably aren't by the end of this video, your workflow should feel more streamlined. So let's check these out
Sara Wade (00:35): First. We're going to take a look at something called this layer dot name. Even if you're not an expressions guru, this one's going to be super useful. Maybe even more useful than our good old friend, the wiggle expression. First, I'm going to twirl open this text layer, named school of motion. I'm going to twirl. Open the text and alt click the stopwatch to add an expression. Then I'm going to just type in this layer.name, lowercase, this capital L and layer. This is called camel case, and it's really important that you get the capitalization, right? You see how after effects is trying to fill it in for me, I'm going to type in a semi-colon there. Now, whatever I named this layer is going to show up as the text there right now, it says school of motion. But if I select the layer and hit enter, I can rename this layer to say, school of motion loves you. So this is going to be super useful, especially if you end up with projects with a ton of text and a client that likes to change things on you at the last minute, this is going to make what would have been a two to three step process. Just one step.
Sara Wade (01:45): The next tool I want to show you is actually two tools when used in combination that are really, really powerful. The first one is the motion sketch panel, and I can get to that by going to window and right down here to motion sketch, which opens up this panel. Let's go ahead and make a circle that we can animate hit control alt home to center the anchor point there. And now that start capture is active. I'm going to leave it at the default settings capture speed at 100 smoothing at one. Now in the motion sketch panel, I'm going to hit start capture. And then I'm just going to left click and drag this shape layer to create a path. So now I've got this really cool motion path. And all I had to do was draw it with my mouse. So you may notice this path has a ton of points.
Sara Wade (02:32): It's not quite as smooth as I wanted. So I'm going to use the smoother to smooth that out. I can get to the smoother tool by again, going to the window menu, going down here to smoother. You can see it pops up over here. Now I've still got this layer with the past selected. So what I'm going to do is leave spatial path as the selection. And I'm going to type in as an example, 25 and hit apply. Now look at that beautiful, smooth animation. I can go in there now and grab those Bezier handles. If I want to drag it out and edit the path, we made that path rather quickly, but we can adjust the path with these Bezier handles and even move the key frames around. Then you can play with the timing by holding Alton. Left-click, all the capabilities are still there making this a really powerful tool.
Sara Wade (03:20): There is a way to shorten this process, but it depends on how you like to work. I personally like to draw the very detailed path and then use the smoother tool to smooth it out. But in this motion sketch panel, there is this smoothing value. If I were to draw the path with the smoothing up higher, say at 24 or 25, then it would smooth that path out as we were capturing it personally, I like to capture more detail and then smooth it out so that I can go back and forth. But you may find that you want to compress that process and do it all at once. So that is motion path and the smoother, speaking of motion paths, let's say I don't want to draw my motion path and that super smooth, fun, easy way using the mouse, because maybe I don't like using the mouse or a stylist say, you want to use the pen tool because Bezier handles are fun and they give us so much control and power.
Sara Wade (04:18): Let's see how we can do that. To animate this ellipse here, I'm going to select the pen tool up here at the top, or you can hit G on the keyboard. I'm going to make sure that I have no fill selected. I'll keep Rodo. Bezier enabled there, right to the right of my fill and stroke options. And I'm just going to go ahead and draw a few funds will be points. I'm not going to connect it because I don't want it to loop just yet. So I've got a shape layer now with a path. And then I've got my ellipse that I want to animate if I want this ellipse to move along that path. And I don't want to take the time to create all these keys and do all of the smoothing out of the keys and trying to get it to move just right.
Sara Wade (04:58): Here's what I'll do. I can twirl open this layer, reveal the path I just made and copy that past data with control. See, next I'll reveal the ellipsis position by hitting P and just paste with control V. And what it did is basically pasted keys for that ellipse to go along that whole path. If I hit the space bar to play magic, right? It's super magic. And then I can even move that whole animation. I can move the path around, adjust the handles, all the different things. Again, I can grab those keys and stretch them out. I can go into the graph editor to do all the things I would normally do in the speed graph and automatically I've just got all that animation. I've got all those keys generated, just like that. Again, you draw the path, copy the path data, go to the position, property of the layer. You're animating and control the pace that path into the position. And you will get auto magic animation.
Sara Wade (06:00): This next trick is more of a hidden feature than a trick. If you're coming to after effects from Photoshop or any number of other design tools, you're probably wondering why can't I just draw a box for the text? Why does the text always have to come up in this way? If I write school of motion and I'm in that layer, I can't drag it around. I can't make a box for it. If I go into these paragraph options, they're all great out. Super frustrating, right? So there's a fixed for this. It's just in a super secret location. So let's get this tech centered. Well, roughly centered, okay. I'm going to select my text tool and the layer and the timeline. Then without selecting the text, then I'm going to right. Click check this out, convert to paragraph text. And now when I click in there, I have all the tools I can shape the box.
Sara Wade (06:50): I can make it skinnier. The text will automatically wrap and I can come over here and I can use force justify and all of those fun things that were grayed out before. Oh, so this looks a little terrible. I'm going to go back to centered. But the important thing is you can access all the paragraph text tools that you know, and love for Photoshop or InDesign or every other application in the world is just hidden in that super secret place. So let's say you want to go back to the other kinds of texts. I'm going to, again, select the layer, select the text tool, but don't select any of the texts in it, right? Click over it and choose convert to point text. And then it's back to the old way you can't access any of this stuff anymore, but maybe that's what you want because not all texts needs to be paragraph texts. Hopefully that's helpful. Super secret. Don't know why it's so hidden, but now that you know where it is, you will never, ever forget,
Sara Wade (07:49): Okay, this next workflow tip is really flexible and really powerful. You're probably going to find a hundred different ways to use it. So I'm going to select this layer and I'm going to add a blur effect to it. So let's go to the effect, menu blur and sharpen, and let's just pick camera lens blur. And let's say, I want to localize or focus this effect to a specific part of the layer right now it's blurring the whole layer. I don't want that. Well, here's the super magic trick. I can use a mask and a little known compositing feature in the effect we just applied. So let's go ahead and keep the ellipse tool selected. And with the layer selected, I'm going to draw a mask. Now, if I reveal the blur effects, I'll show you this magical compositing option. If I click this plus button, every mask I have in this layer is going to come up and I can select them.
Sara Wade (08:41): I only have one in this layer. So it's automatically selected. Now the blur will only show up where the mask is. So if I were to grab this mask and say, change the feather of it changed the opacity of it, I can move it around, whatever I do to this mask, that effect is localized to it. So let's try adjusting that feather. Now that I'm using this compositing option, I can also change the opacity of that effect down here. We've got this blur. So let's really amp up the blur so that we can see where it's affecting. That's better. It's clearly inside of that mask circle. And let's say, I want to just tone it down or animated coming on and off. I can change this effects, opacity and the compositing options. And if I want to, I can set key frames to turn that effect on and off.
Sara Wade (09:29): I could set key frames to move that mask around so I can control the opacity as well as where that effect is localized. I can make that mask expand, contract animate, all those things. So this is super powerful. It works for any effect. And what's great is you can use these compositing options for every single effect and after effects, you can select any mask in the layer to have that level of control. Again, that's by hitting this plus button. So if I wanted to have a second mask, I could select a second mask, or maybe I'm going to have both go to, to again, effect opacity is going to be right here and that's going to control how visible that effect is. It's a super powerful tool. This may not be the most exciting way to use this compositing feature like we did here today, but you can already see where this can be useful and that's it. So those were five tools and after effects, you probably never use, but you really should. If you want to stay on top of the latest and greatest emotion design, make sure to hit the subscribe button and click the bell icon. So you're notified whenever we post new content. And if you want to learn more school of motion has courses for everyone from the complete new beat to the advanced motion artists, head to our course page and the description for more information.
ENROLL NOW!
Acidbite ➔
50% off everything

ActionVFX ➔
30% off all plans and credit packs - starts 11/26

Adobe ➔
50% off all apps and plans through 11/29

aescripts ➔
25% off everything through 12/6
Affinity ➔
50% off all products

Battleaxe ➔
30% off from 11/29-12/7
Boom Library ➔
30% off Boom One, their 48,000+ file audio library
BorisFX ➔
25% off everything, 11/25-12/1

Cavalry ➔
33% off pro subscriptions (11/29 - 12/4)

FXFactory ➔
25% off with code BLACKFRIDAY until 12/3

Goodboyninja ➔
20% off everything

Happy Editing ➔
50% off with code BLACKFRIDAY

Huion ➔
Up to 50% off affordable, high-quality pen display tablets

Insydium ➔
50% off through 12/4
JangaFX ➔
30% off an indie annual license
Kitbash 3D ➔
$200 off Cargo Pro, their entire library
Knights of the Editing Table ➔
Up to 20% off Premiere Pro Extensions
Maxon ➔
25% off Maxon One, ZBrush, & Redshift - Annual Subscriptions (11/29 - 12/8)
Mode Designs ➔
Deals on premium keyboards and accessories
Motion Array ➔
10% off the Everything plan
Motion Hatch ➔
Perfect Your Pricing Toolkit - 50% off (11/29 - 12/2)

MotionVFX ➔
30% off Design/CineStudio, and PPro Resolve packs with code: BW30

Rocket Lasso ➔
50% off all plug-ins (11/29 - 12/2)

Rokoko ➔
45% off the indie creator bundle with code: RKK_SchoolOfMotion (revenue must be under $100K a year)

Shapefest ➔
80% off a Shapefest Pro annual subscription for life (11/29 - 12/2)

The Pixel Lab ➔
30% off everything
Toolfarm ➔
Various plugins and tools on sale

True Grit Texture ➔
50-70% off (starts Wednesday, runs for about a week)

Vincent Schwenk ➔
50% discount with code RENDERSALE

Wacom ➔
Up to $120 off new tablets + deals on refurbished items


