Create Stunning Visual Effects in AE
Learn compositing, tracking, keying, and rotoscoping in After Effects. Enroll in All-Access to unlock VFX for Motion and 50+ other courses.
After Effects Tutorial: Tracking Video Footage and Then Placing and Aligning Text
We've shared popular how-to guides on tracking and replacing screens as well as creatively animating text in After Effects. Today, with the help of Birmingham-based motion designer, director and SOM alum Jacob Richardson, we'll show you how to use the 3D Camera Tracker to track footage and then integrate a text layer into that footage.
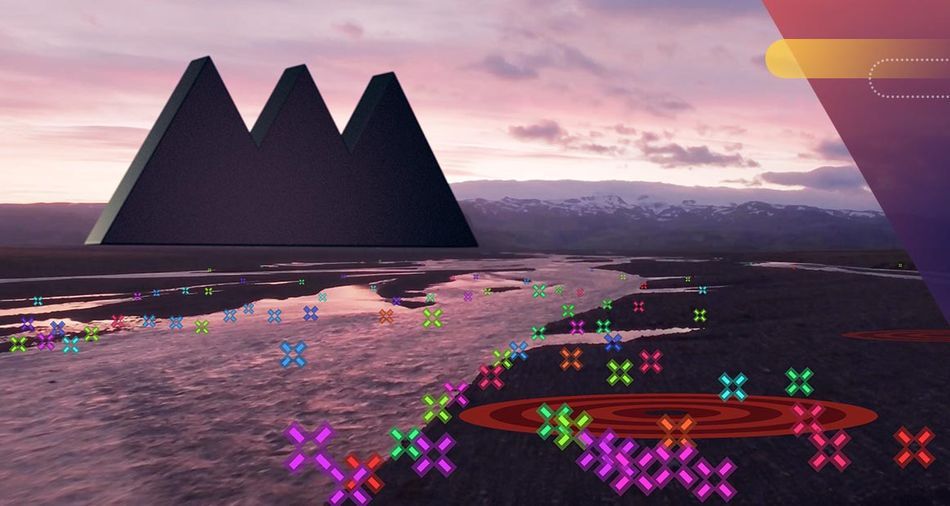
For those looking to expand their After Effects video editing and VFX skill set, this latest Quick Tip Tutorial will surely serve as a helpful resource.
How to use the Camera Tracker: Quick Tip Tutorial Video
{{lead-magnet}}
How to use the Camera Tracker: Explained
Once your footage is uploaded to your timeline, and you're ready to start tracking, navigate to the top of After Effects and click the Window menu. Then, scroll down, and click Tracker.
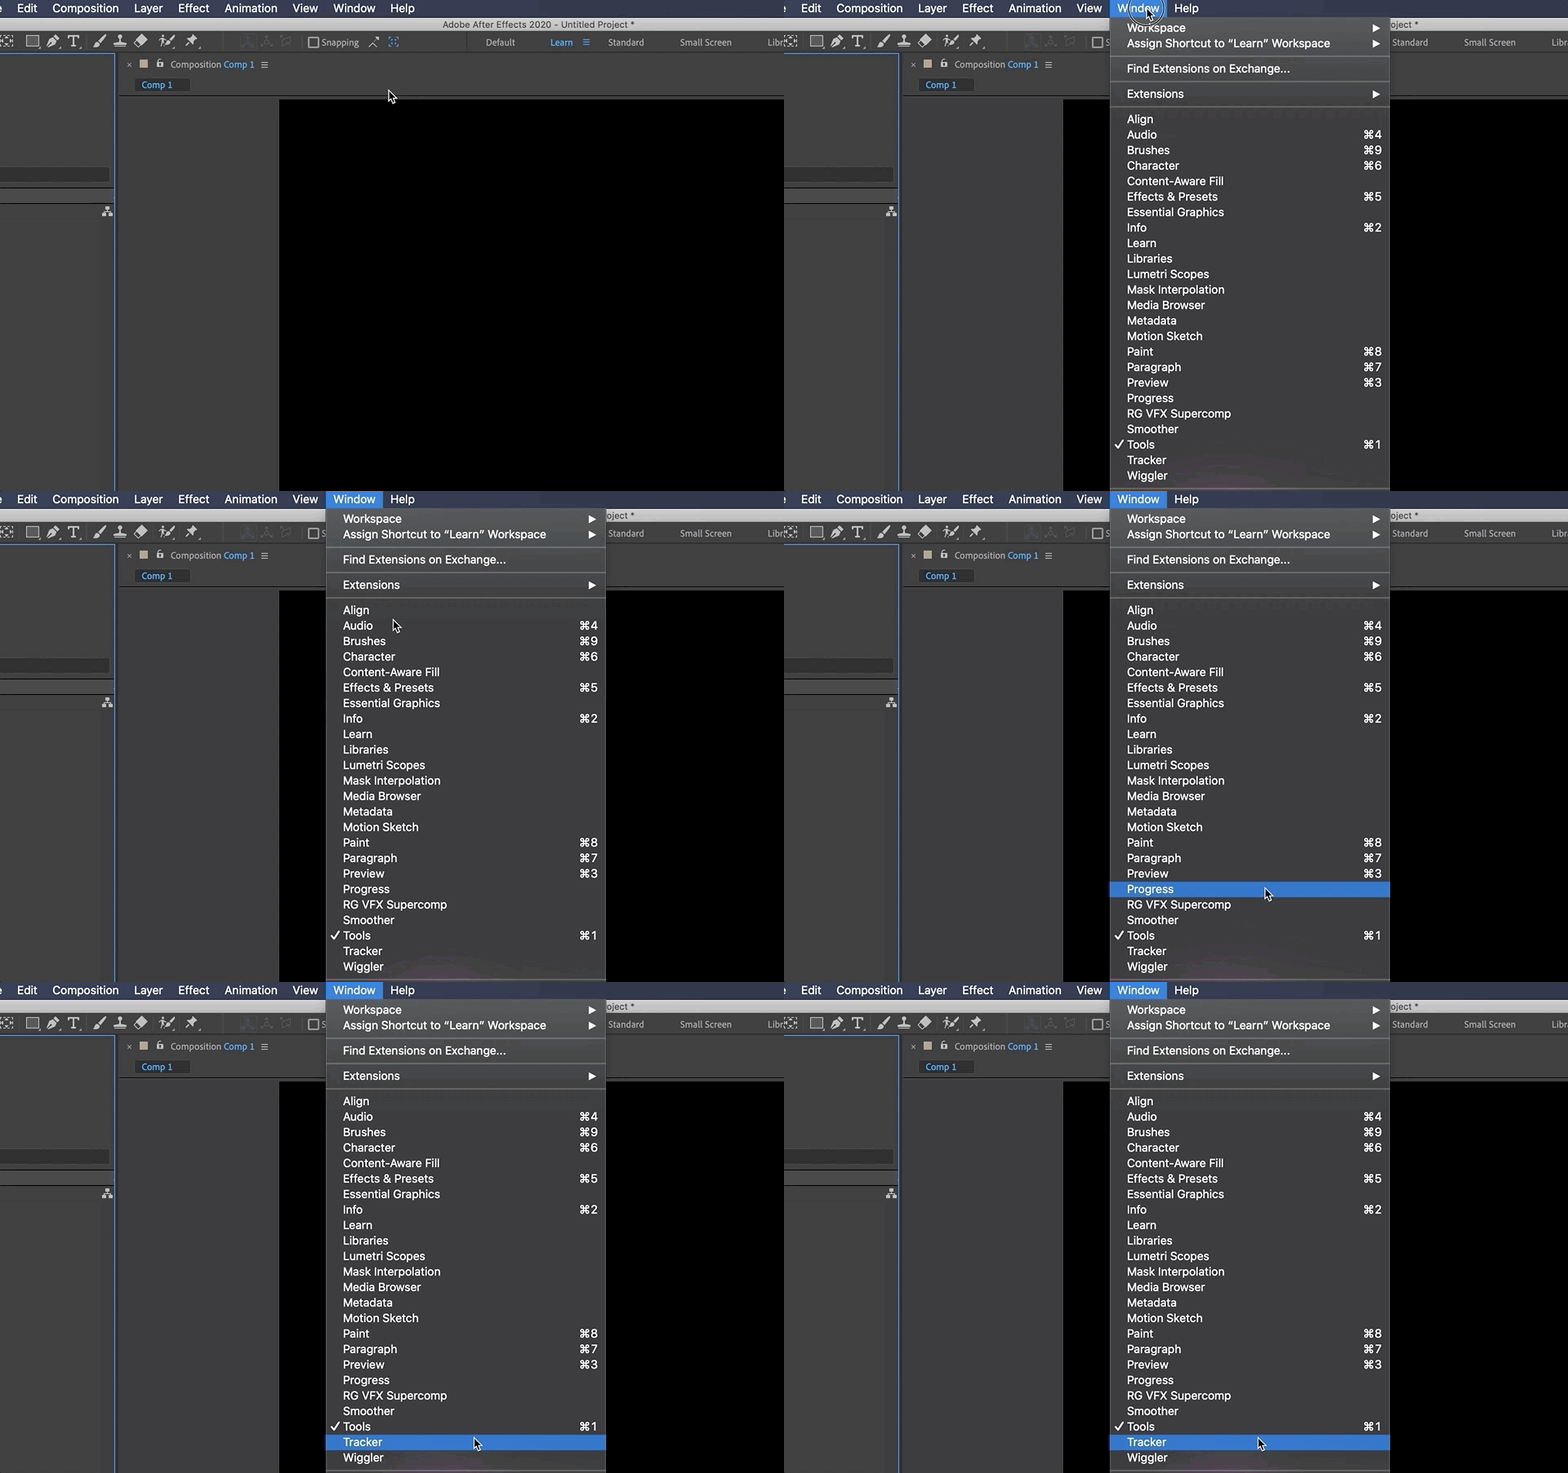
TRACKING FOOTAGE IN AFTER EFFECTS
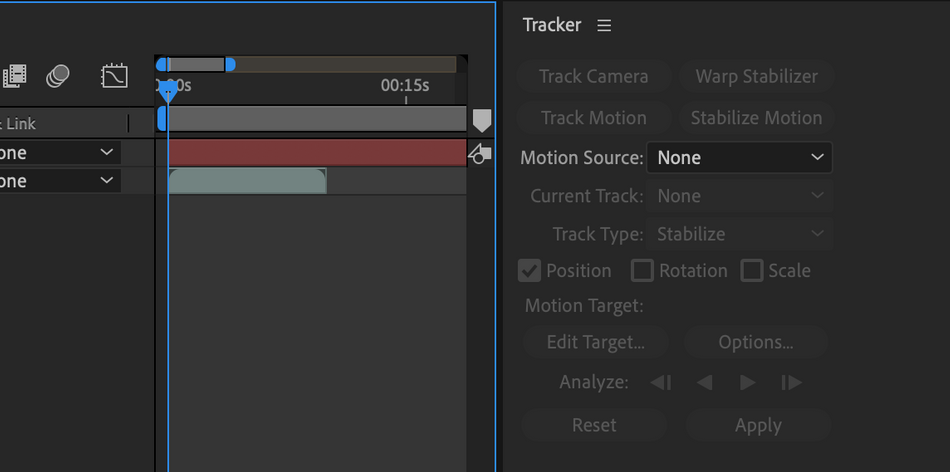
There are four tracking options that available in the tracker window that appears when you click Tracker in the After Effects Window menu:
- Track Camera
- Warp Stabilizer
- Track Motion
- Stabilize Motion
Once you click Track Camera, the 3D Camera Tracker effects will be added to your previously selected layer, and After Effects will begin analyzing this layer, counting the percentage of the clip tracked and total number of tracked frames.

Please note: little dots will appear across your footage; these are strictly referential and will not be rendered out.
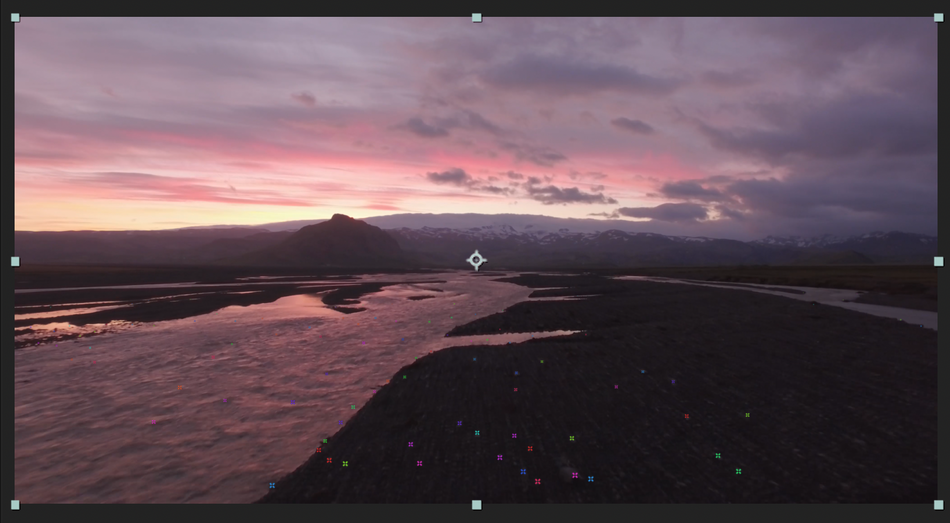
For a visual guide, check the Render Track Points box in the 3D Camera Tracker effects menu.
SETTING A TRACKED FLOOR PLANE IN AFTER EFFECTS
Once your footage is analyzed, you'll need to establish: the tracking points; and the plane to which they should be tracked.
To begin, hover your mouse over the tracking point references in the composition window. A triangle will form between the three tracking points you're referencing, and a red 'target' will appear to help you visualize the plane.
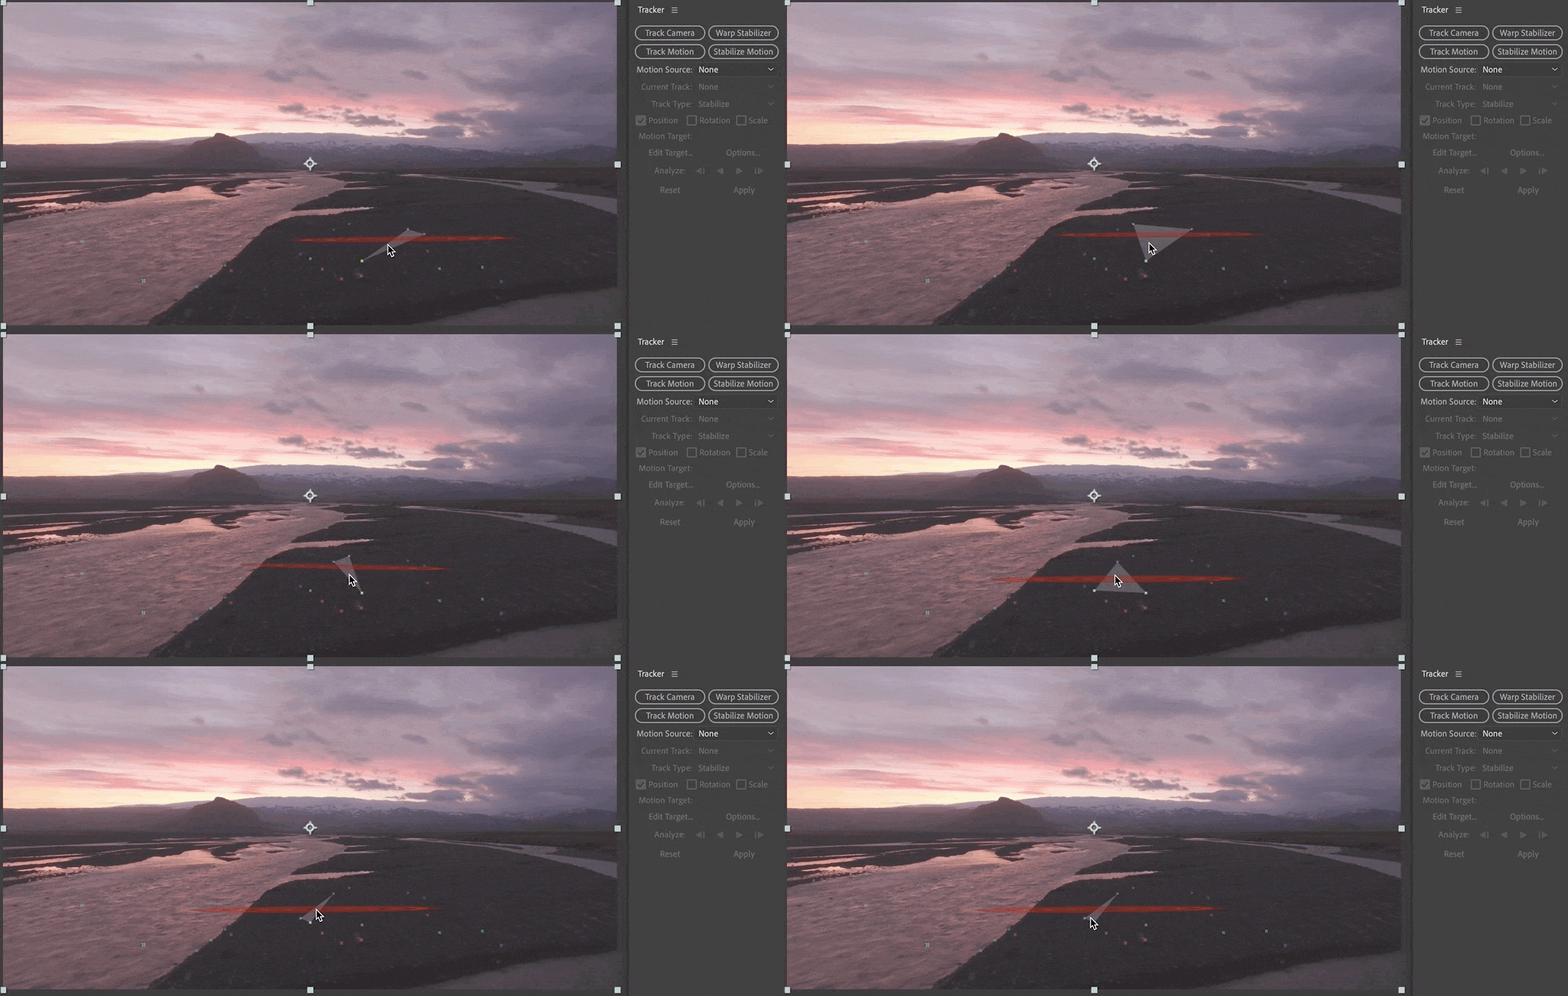
The goal is to find tracking points that lay the red target parallel to the plane to which you're tracking.
To set the plane, left-click the triangle that lines up best for your surface. Once you move your arrow away, the picker should disable and the red 'target' will stop moving.
ADDING TEXT TO TRACKED FOOTAGE IN AFTER EFFECTS
Once your plane is defined, you can add text to your footage.
Hover over the recently set triangle and right-click the mouse. A window will appear with several options for creating new layers
To place text on your tracked footage, click Create Text.
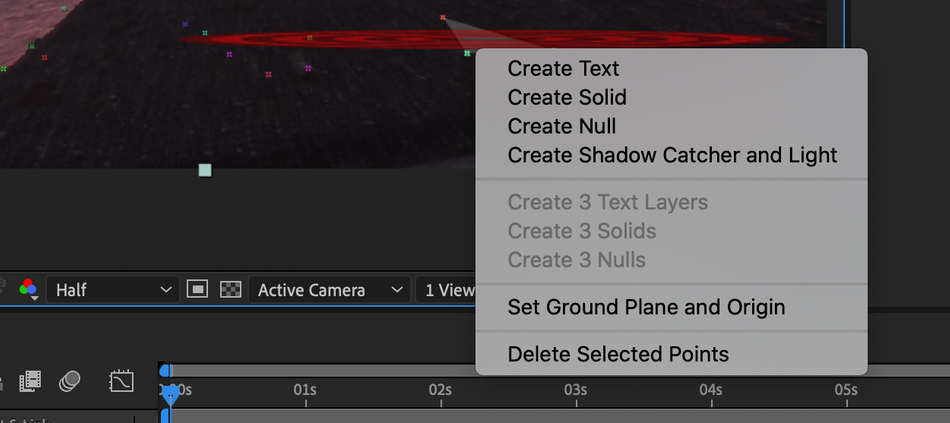
After Effects will use the tracking data to place a new text layer in the scene, but you'll still need to align it.
ALIGNING TEXT ON TRACKED FOOTAGE IN AFTER EFFECTS
To align your text layer to your tracked footage, find the tracked text layer in the timeline and click the arrow to the left. This will reveal all of the editable properties for the layer. Next click Transform to reveal the all the transform options.
Now you can adjust the X, Y and Scale values until the layer lines up.

To expedite your workflow, select your layer and press:
- S for scale
- P for position
- R for rotation
If you want to use more than one transform property, select your first one and then press and hold shift when selecting any additional properties.

Working Professionally in After Effects
Looking to get your foot in the door as a motion designer?
Our mission is to break the down barriers standing in your way, and equip you for the work ahead.
We reached out to the top motion design studios across the country and asked their leaders what it takes to get hired. Then we compiled the answers into a free ebook.
For key insights from the likes of Black Math, Buck, Digital Kitchen, Framestore, Gentleman Scholar, Giant Ant, Google Design, IV, Ordinary Folk, Possible, Ranger & Fox, Sarofsky, Slanted Studios, Spillt and Wednesday Studio, download How to Get Hired: Insights from 15 World-Class Studios:
How to Get Hired: Insights from 15 World-Class Studios
Standing Out Among Your Peers
No matter what role you're hoping to fill, you can enhance your value as a candidate by investing in yourself through continuing education.
While we (and others) do offer a ton of free content (e.g., tutorials like this), to truly take advantage of everything SOM has to offer, you'll want to enroll in one of our courses, taught by the top motion designers in the world.
We know this isn't a decision to be made lightly. Our classes aren't easy, and they're not free. They're interactive and intensive, and that's why they're effective.
In fact, 99% of our alumni recommend School of Motion as a great way to learn motion design. (Makes sense: many of them go on to work for the biggest brands and best studios on earth!)
Want to make moves in the motion design industry? Pick the course that's right for you — and you'll gain access to our private student groups; receive personalized, comprehensive critiques from professional artists; and grow faster than you ever thought possible.
- Need a jumpstart in After Effects? Try After Effects Kickstart with Nol Honig.
- Ready to master the art and science of animation in Adobe AE? Opt for Animation Bootcamp with Joey Korenman.
- Want to focus more on working with video footage and visual effects? VFX for Motion with Mark Christiansen is for you.
- Looking to get more creative with your text, or particularly interested in coding for animation? We recommend Expression Session with Zack Lovatt and Nol Honig.
ENROLL NOW!
Acidbite ➔
50% off everything

ActionVFX ➔
30% off all plans and credit packs - starts 11/26

Adobe ➔
50% off all apps and plans through 11/29

aescripts ➔
25% off everything through 12/6
Affinity ➔
50% off all products

Battleaxe ➔
30% off from 11/29-12/7
Boom Library ➔
30% off Boom One, their 48,000+ file audio library
BorisFX ➔
25% off everything, 11/25-12/1

Cavalry ➔
33% off pro subscriptions (11/29 - 12/4)

FXFactory ➔
25% off with code BLACKFRIDAY until 12/3

Goodboyninja ➔
20% off everything

Happy Editing ➔
50% off with code BLACKFRIDAY

Huion ➔
Up to 50% off affordable, high-quality pen display tablets

Insydium ➔
50% off through 12/4
JangaFX ➔
30% off an indie annual license
Kitbash 3D ➔
$200 off Cargo Pro, their entire library
Knights of the Editing Table ➔
Up to 20% off Premiere Pro Extensions
Maxon ➔
25% off Maxon One, ZBrush, & Redshift - Annual Subscriptions (11/29 - 12/8)
Mode Designs ➔
Deals on premium keyboards and accessories
Motion Array ➔
10% off the Everything plan
Motion Hatch ➔
Perfect Your Pricing Toolkit - 50% off (11/29 - 12/2)

MotionVFX ➔
30% off Design/CineStudio, and PPro Resolve packs with code: BW30

Rocket Lasso ➔
50% off all plug-ins (11/29 - 12/2)

Rokoko ➔
45% off the indie creator bundle with code: RKK_SchoolOfMotion (revenue must be under $100K a year)

Shapefest ➔
80% off a Shapefest Pro annual subscription for life (11/29 - 12/2)

The Pixel Lab ➔
30% off everything
Toolfarm ➔
Various plugins and tools on sale

True Grit Texture ➔
50-70% off (starts Wednesday, runs for about a week)

Vincent Schwenk ➔
50% discount with code RENDERSALE

Wacom ➔
Up to $120 off new tablets + deals on refurbished items


Create Stunning Visual Effects in AE

Learn compositing, tracking, keying, and rotoscoping in After Effects. Enroll in All-Access to unlock VFX for Motion and 50+ other courses.