Masks are an essential tool in After Effects....but how do you use them effectively?
One of the most powerful tools in your design belt is the Mask, and using it effectively is key to creating sharp, interesting, and effective compositions. If you're working in After Effects for any reason, you need to learn to love the mask, and we're here to show you how.
Masks are a fundamental After Effects feature that allow you to cut out and combine different elements together, build quick & easy transitions, and are the basis of visual effects and compositing work in motion design.
Today, we're going to take a look at:
- What masks are and what they do
- How to create them
- The properties of masks and what each of them do
- Working with, transforming, and animating masks
If the possibilities of compositing using these kinds of tools has really piques your interest, you should take a look at VFX for Motion, taught by industry legend Mark Christiansen. If you still need to master more of the fundamental After Effects skills, you should check out After Effects Kickstart, where Nol Honig gives you the ultimate intro to After Effects.
If you want to follow along, snag the project files below. Now let's get started!
ENROLL NOW!
Acidbite ➔
50% off everything

ActionVFX ➔
30% off all plans and credit packs - starts 11/26

Adobe ➔
50% off all apps and plans through 11/29

aescripts ➔
25% off everything through 12/6
Affinity ➔
50% off all products

Battleaxe ➔
30% off from 11/29-12/7
Boom Library ➔
30% off Boom One, their 48,000+ file audio library
BorisFX ➔
25% off everything, 11/25-12/1

Cavalry ➔
33% off pro subscriptions (11/29 - 12/4)

FXFactory ➔
25% off with code BLACKFRIDAY until 12/3

Goodboyninja ➔
20% off everything

Happy Editing ➔
50% off with code BLACKFRIDAY

Huion ➔
Up to 50% off affordable, high-quality pen display tablets

Insydium ➔
50% off through 12/4
JangaFX ➔
30% off an indie annual license
Kitbash 3D ➔
$200 off Cargo Pro, their entire library
Knights of the Editing Table ➔
Up to 20% off Premiere Pro Extensions
Maxon ➔
25% off Maxon One, ZBrush, & Redshift - Annual Subscriptions (11/29 - 12/8)
Mode Designs ➔
Deals on premium keyboards and accessories
Motion Array ➔
10% off the Everything plan
Motion Hatch ➔
Perfect Your Pricing Toolkit - 50% off (11/29 - 12/2)

MotionVFX ➔
30% off Design/CineStudio, and PPro Resolve packs with code: BW30

Rocket Lasso ➔
50% off all plug-ins (11/29 - 12/2)

Rokoko ➔
45% off the indie creator bundle with code: RKK_SchoolOfMotion (revenue must be under $100K a year)

Shapefest ➔
80% off a Shapefest Pro annual subscription for life (11/29 - 12/2)

The Pixel Lab ➔
30% off everything
Toolfarm ➔
Various plugins and tools on sale

True Grit Texture ➔
50-70% off (starts Wednesday, runs for about a week)

Vincent Schwenk ➔
50% discount with code RENDERSALE

Wacom ➔
Up to $120 off new tablets + deals on refurbished items


Download the project file and jump in the tutorial!
Masks in After Effects allow you to determine the visibility of specific parts of a layer, similar to features that may already be familiar if you use Photoshop, Illustrator, or other image editing apps. You can isolate an object in a photo or video, create a cutout, make shapes, or even insert your friends into their favorite music videos!
.gif)
Masks are created by drawing paths on any layer with a visual component; that is, anything you can create or import into After Effects that you can actually see in a composition.
.gif)
It’s possible to create what are called open paths, which are just kind of a line you’re drawing on the layer, and those don’t do anything by themselves. But when you close up that path, or draw a complete shape, you’re creating a closed path, which will cut out a portion of the layer.
.gif)
When you do this, you’re affecting what’s known as the layer’s alpha channel, which is an additional channel that defines transparency in the clip or image.This is the basis of what’s called compositing: when you combine different elements together to create a new cohesive image or video.
To create a mask, you first need to select the layer you want to apply it to. Then grab a shape tools from the toolbar, which you can also cycle through quickly by pressing Q. Simply click and drag in your Composition viewer, and congrats, you’ve made a mask!
One important note: if you start using these drawing tools without a layer selected, you’ll be creating what’s called a shape layer, which I love, but that’s a whole other topic.
Your mask will draw from the top-left corner—unless you hold CMD or CTRL, in which case it’ll draw from the center. If you’re drawing a rectangle or ellipse, holding SHIFT will keep all the sides equal, allowing you to make perfect squares or circles.
.gif)
Many times you’ll need to draw something more organic, though, and that’s where the Pen tool comes in. You may recognize this tool from Photoshop or Illustrator, and it works very much the same way here.
.gif)
To create rounded corners, I’ll click and drag when creating these points. There are some variant Pen tools up here for adding, subtracting and modifying these path points. Pressing G repeatedly will cycle through these different modes.
.gif)
I’ve shown how to create masks, now let’s see how they actually work!
You can see I already have a mask on this layer, so I’ll press the M key to reveal it on the timeline.
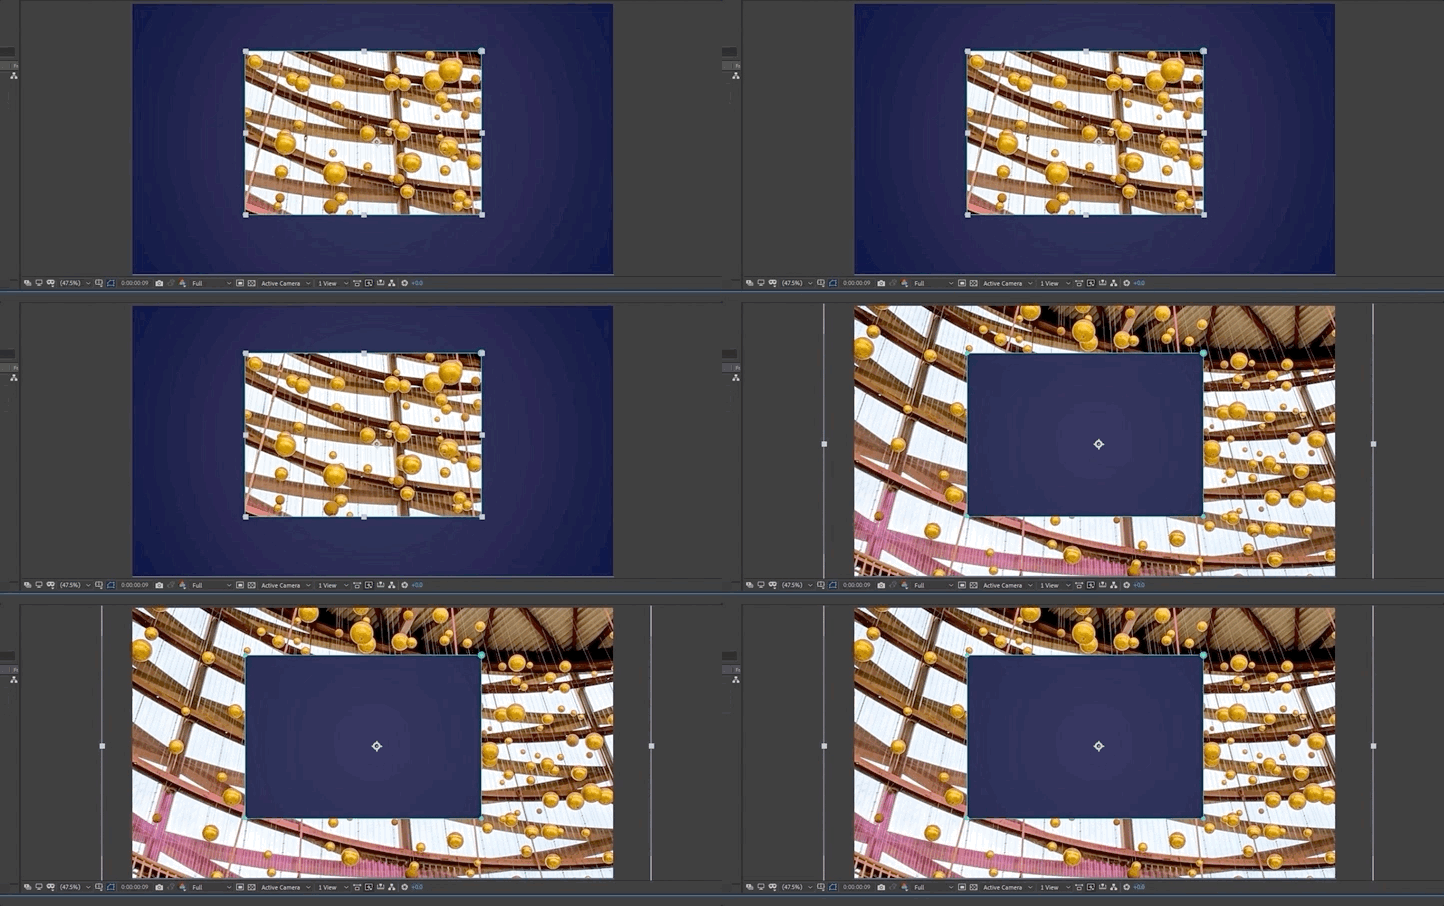
The first property you’ll see on a mask is the Mode. This determines what the mask actually does - Add means you’re seeing only what’s within the mask. Subtract means you’re seeing everything that’s not within the mask. None is a useful mode for when you’re working with a mask, but still need to be able to see the rest of the layer. These other modes really only come into play once you add multiple masks to a layer.
.gif)
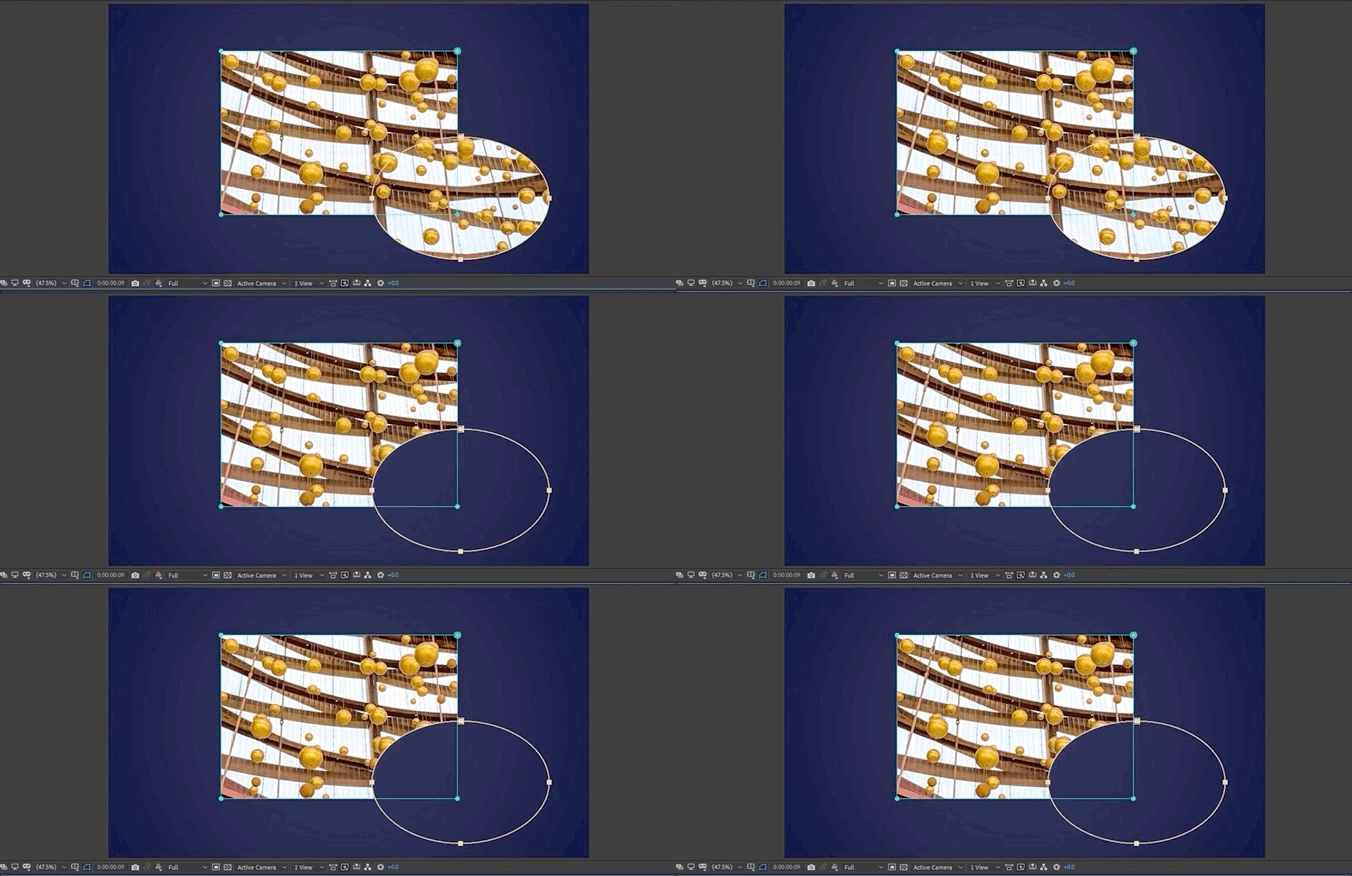
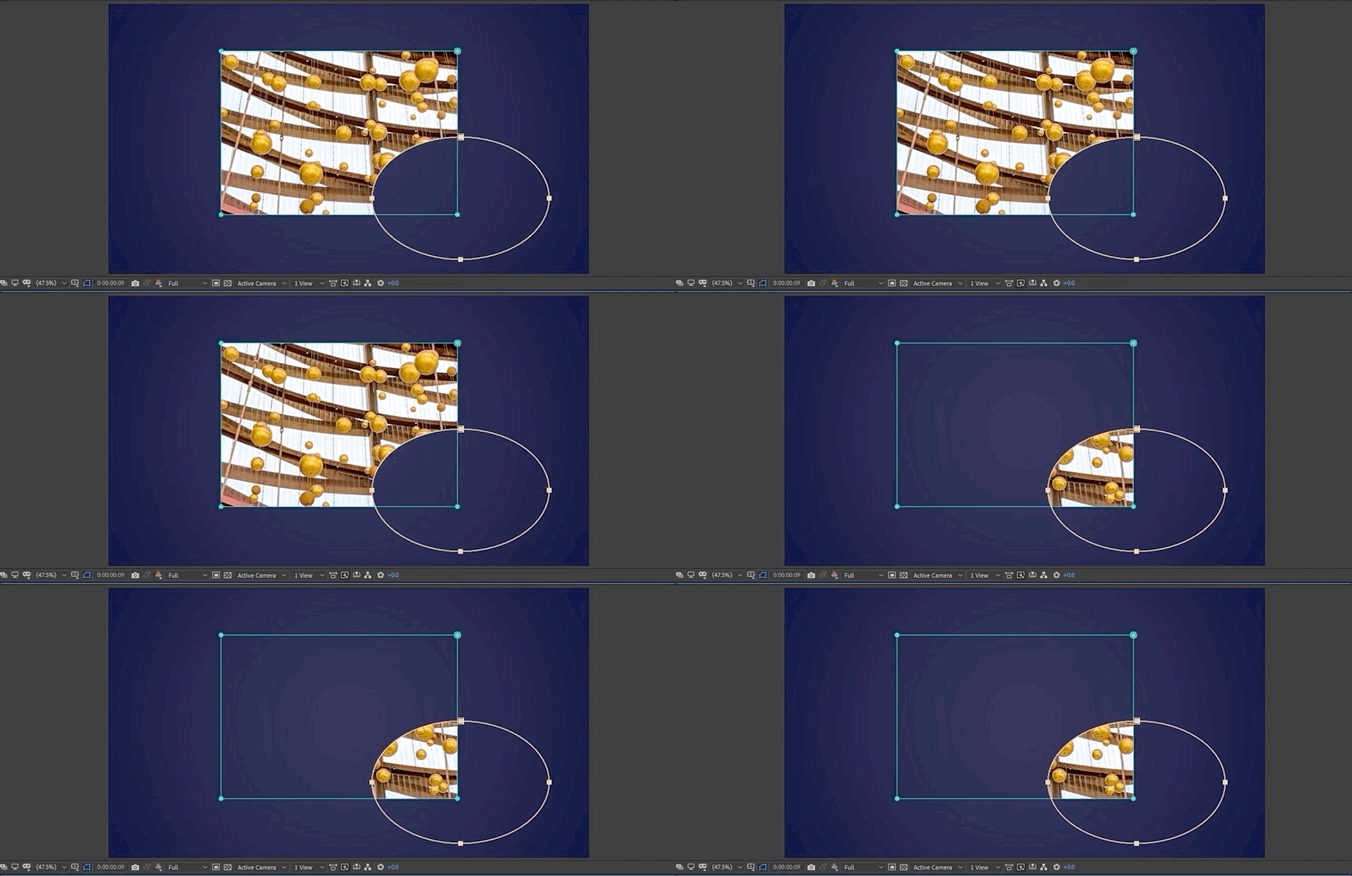
Cool pro-tip: You can actually set these modes as you’re drawing the mask by pressing the corresponding key before releasing your mouse click.
.gif)
Just like layers and effects, the stacking order matters. I’d encourage you to just grab an image, draw a couple masks, and explore this functionality to get more comfortable with it.
If you are adding multiple masks to a layer, it's important to stay organized. You can rename any mask by clicking on the name and pressing Enter … and you can manually choose the color of each mask by clicking on its little color chip.
Next we have Mask Feather, which adjusts how hard or soft the mask edges are. This is measured in pixels and is centered on the path, so if I set this to 100, it’s feathering 50 pixels inside the mask, and 50 pixels outside.
.gif)
Mask Opacity adjusts how opaque or transparent this individual mask is.
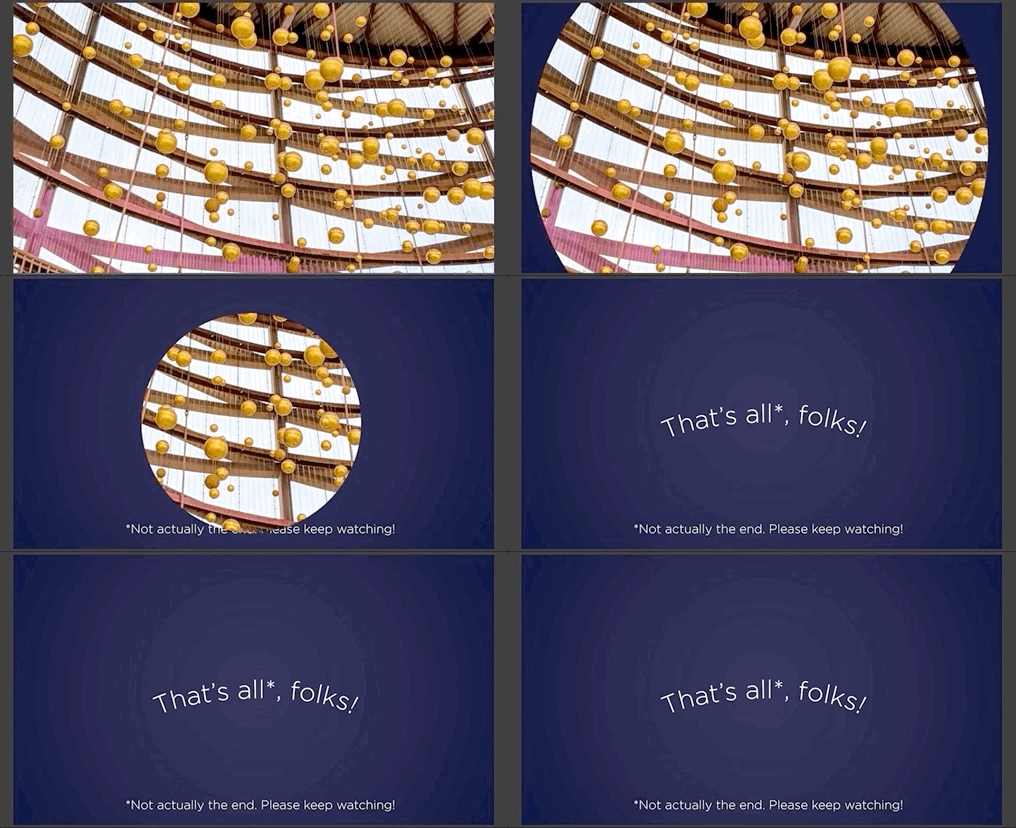
Mask Expansion lets you either shrink or grow a mask - this is also measured in pixels - without actually having to change the path itself. Animating this property can be a very easy way to create an iris reveal, for example:
One very important thing about masks is that they always move and transform with the layer they’re on.If you want to move the layer around on screen, but keep the mask in the same position relative to the rest of the composition, you can actually use the Pan Behind tool to do that.
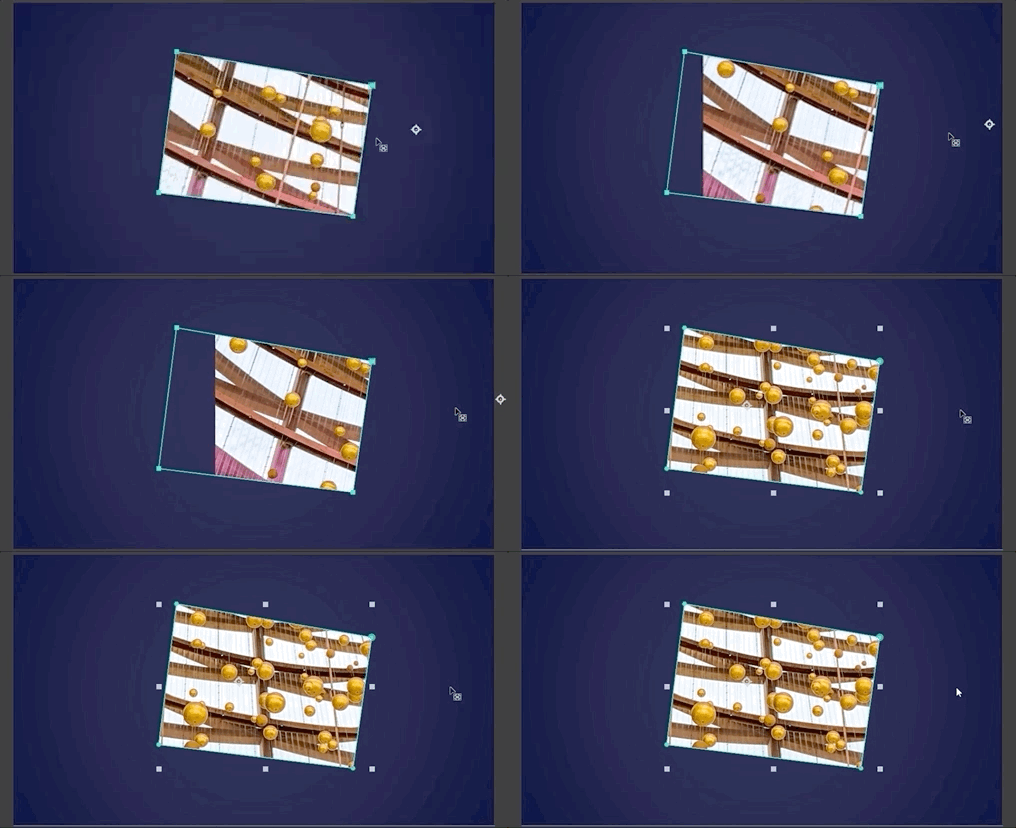
What if I want to keep the layer in place but move the mask? I can click on either the Mask’s name or the Mask Path property in the timeline. We’ll just move this around a little bit...

To free transform the entire mask, you can double-click directly on the path. Now you’ll be able to move it around, as well as scale and rotate it. To close that out, double-click again, either directly on the path or anywhere outside of it.
Often, you’ll want individual control over one or more of these points, which After Effects calls vertexes. To select multiple points at once, you can either hold Shift and click more points, you can grab any straight path segment to move both of those points at once, or you can actually drag a box around all the points you’d like to control, and move them all at once.
.gif)
Since After Effects is an animation program, we can of course be making our mask change over time, which I can do by activating the stopwatch here on the Math Path property, to start creating keyframes. So, maybe I’ll start with this shape here, go forward a little bit here, and then change a few points.
.gif)
I know maybe that’s not the most exciting thing ever yet, but it’s the basis of all the other masking work you’ll do in the future, so it’s good to get a handle on how all of this works.
Examples
Before we wrap up, let’s take a look at a few quick examples of using masks in your everyday work.
.gif)
A vignette is a nice finishing step for many compositions and can help you direct the viewer’s eye to a specific part of the frame. Let's go up to Layer … New … Solid … or you can press Control or Command-Y. Choose a color from our image, maybe like this very dark purple.

Now we have a solid covering the whole frame, which is obviously not what we want, but if we come up here to our shape tools, choose our ellipse and double click on it … it will actually create an elliptical mask exactly the size of our layer.

This still isn’t quite what we’re going for, so let's come down here, and we can either set this to Subtract, or there's also this little invert button that will quickly invert your mask.
Let's twirl this open, crank this feather up to about 350, and turn up the expansion a little bit, just to nudge this into a sweet spot.
That looks pretty good. I could probably stop there, but sometimes it's nice to make your vignettes look a little bit more organic. You can just tweak these points a little bit, play with these tangent handles, and fiddle with this until you're happy.
Another easy way to put masks to work for us is creating a quick little revealer with our image. We start by drawing two rectangles: one over the left half, and one over the right.
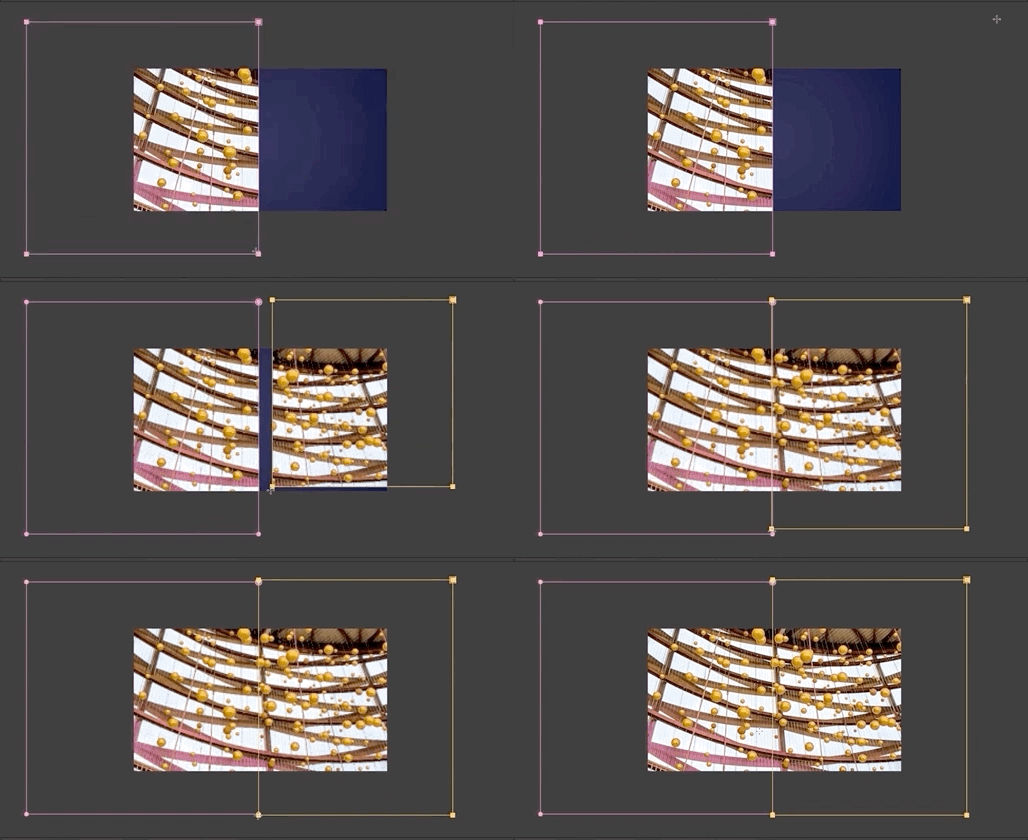
I didn't get them perfect, but that's easy to fix. I hit the quote (") key to bring up my safe zone display, which has this handy crosshair at the center of the composition. Grab the edges and move them into place. Let’s maybe go to about frame 10, open both of these up, keyframe these mask paths, move forward, and either move the entire mask, or just grab one piece and slide it off to the edge.
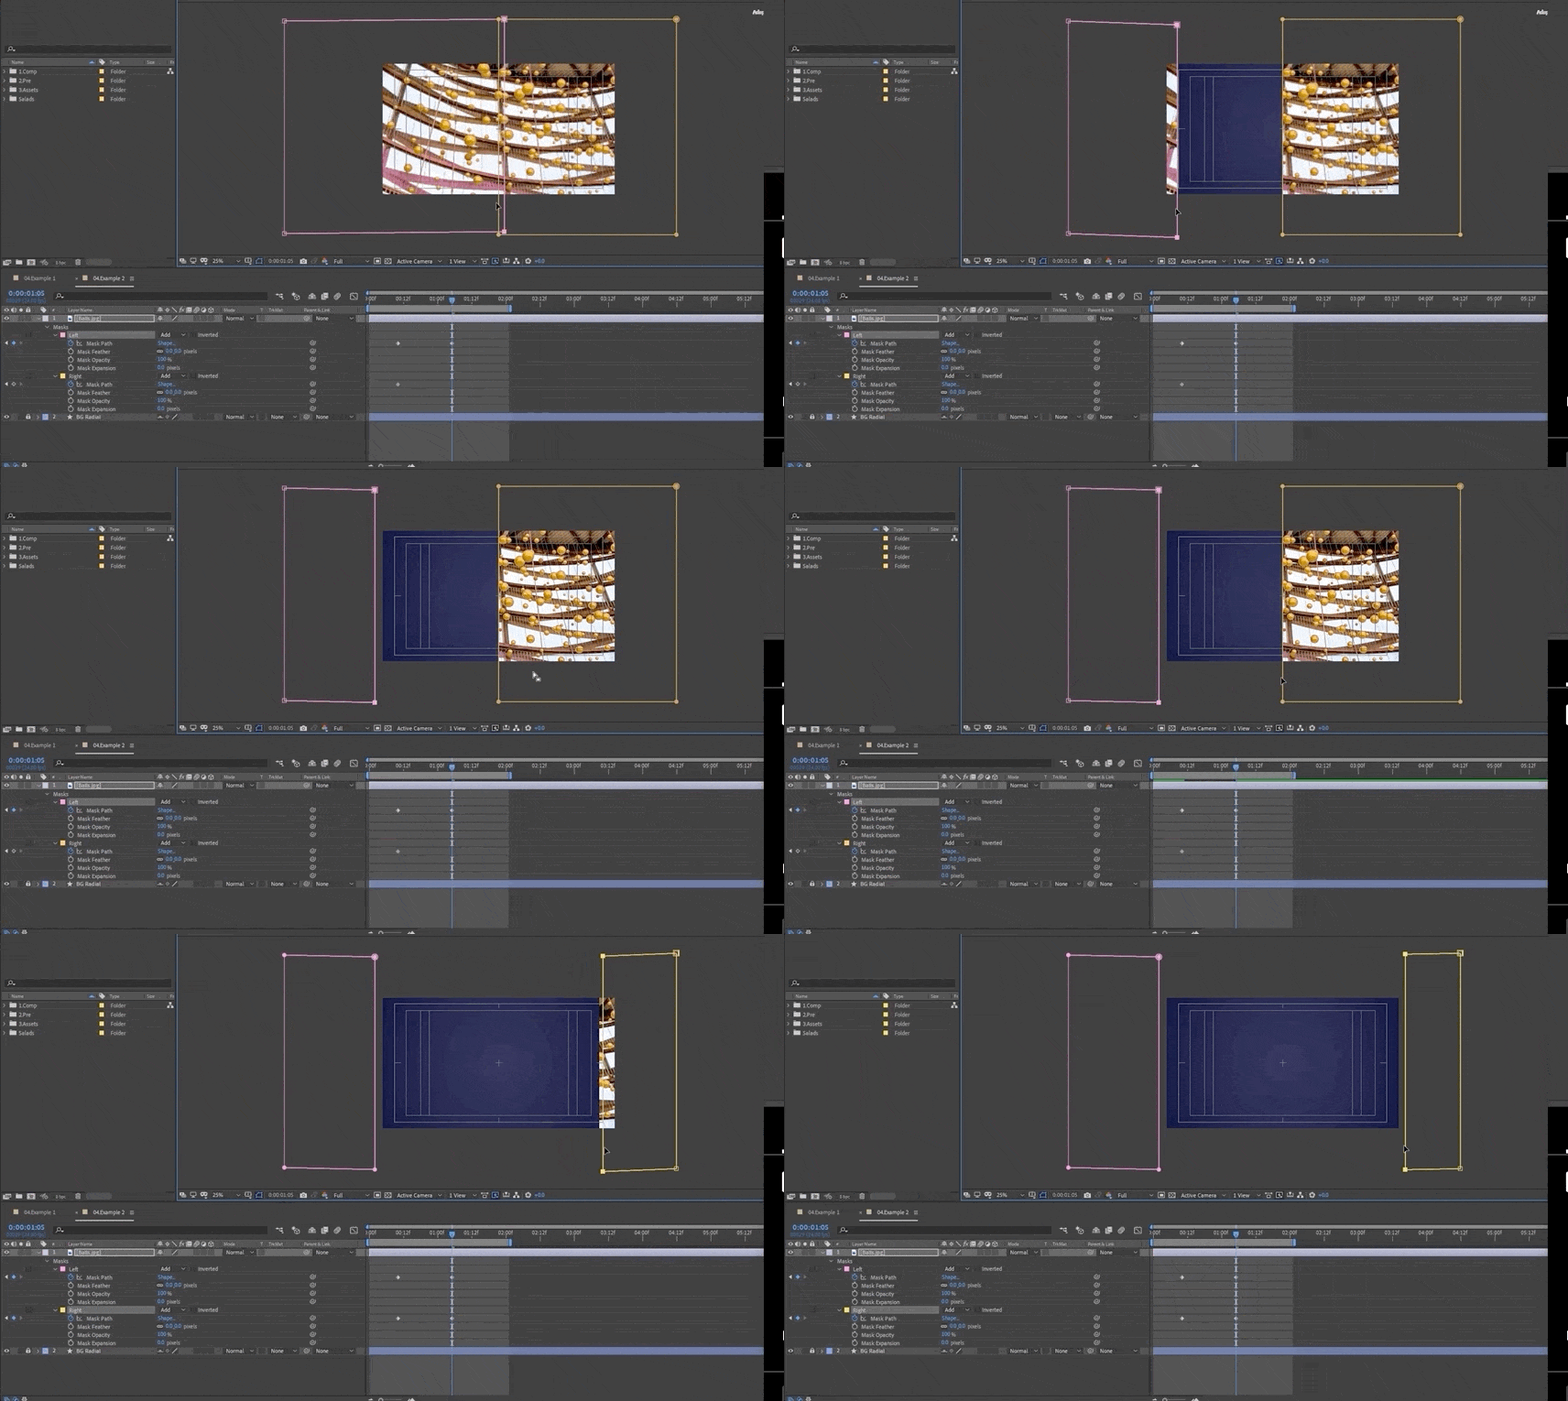
There we go, we have a nice, quick little revealer.

It is important to remember that these masks will move with the layer, so you wouldn't want to do this until your layer is definitely set in place … but this is a nice quick and easy way to wipe off the layer like this. Just by drawing your masks differently, you could make this angled, make it a little more complex, whatever works for your project.
Wrap Up
So that’s the basics of Masks in After Effects. Understanding how they work is an essential skill for any After Effects artist, and this is just the beginning.
Get to creating, and we'll see you next time.

-----------------------------------------------------------------------------------------------------------------------------------
Tutorial Full Transcript Below 👇:
Kyle Hamrick (00:00): Masks are an essential tool in after effects. Professionals use them in motion design and visual effects all the time. Learn how to start using them in your workflow with the short and easy tutorial.
Kyle Hamrick (00:18): Hey, this is Kyle Hamrick senior motion designer at school of motion. Today I'll cover how to create masks and after effects and show you all about their individual properties. And the best ways to work with them masks are a fundamental after effects feature that allow you to cut out and combine different elements together, build quick and easy transitions and are the basis of visual effects and compositing work in after effects. Let's take a look at what masks are and what they do, how to create them, the properties of masks and what each of them do working with transforming and animating masks. And then I'll show you a few useful examples. If you want to follow along, check the link in the description and go snag the project file. So I'll be using in this tutorial, let's get started
Kyle Hamrick (01:03): Masks and after-effects allow you to determine the visibility of specific parts of a layer. This is similar to features that may already be familiar. If you use Photoshop, illustrator or other image, editing apps, you can isolate an object in a photo or video, create a cut-out make shapes or even insert your friends into their favorite music. Videos. Masks are created by drawing paths like I'm doing right here on any layer with a visual component that is anything you can create or import into after effects that you can actually see in a composition it's possible to create what are called open pads, which are just kind of like a line you're drawing on the layer. And those don't do anything by themselves. But when you close up that path or draw a complete shape, you're creating a closed path, which will cut out a portion of the layer like this. When you do this, you're effecting, what's known as the layers alpha channel, which is kind of a secret invisible channel that determines the visibility of different portions of the layer, depending on what you do with them. This is the basis of what's called compositing. When you combine different elements together to create a new cohesive image or video,
Kyle Hamrick (02:13): To create a mask, you first need to select the layer. You want to apply it to then grab one of these shake tools from the toolbar right up here, which you can also cycle through quickly by pressing cue, simply click and drag here in your composition, viewer and congrats. You've made a mask. One important note. If you start using these drawing tools without a layer selected, you'll be creating, what's called a shape layer, which I love, but that's a whole other topic. As you can see, your mask will draw from the top left corner, unless you hold command or control. In which case it will draw from the center. If you're drawing a rectangle or a lips holding shift, we'll keep all the sides equal, allowing you to make perfect squares or circles. Many times you'll need to draw something more organic though. And that's where the pen tool comes in. You may recognize this tool from Photoshop or illustrator, and it works very much the same way here. Again, I need to make sure I select the layer and then just click, click, click, click to make a shape here, to create rounded corners, I'll click and drag while creating these points.
Kyle Hamrick (03:19): There are some variant pen tools up here for adding, subtracting, and modifying these path points. Pressing G repeatedly we'll cycle through these different modes.
Kyle Hamrick (03:32): I've shown you how to create masks. Now let's see how they actually work. You can see, I already have a mask on this layer, so I'll press the M key to reveal it on the timeline. The first property you'll see on the mask is the mode. This determines what the mask actually does ad means. You're seeing only what's within the mask. Subtract means you're seeing everything that's not within the mask. None is a useful mode for when you're working with a mask, but still need to be able to see the rest of the layer. These other modes really only come into play. Once you add multiple masks to a layer. So let's try that. But first here's a cool pro tip. You can actually set these modes as you're drawing the mask by pressing the corresponding key before releasing your mouse. Click. If I draw a second mask on my layer, I'll make this one in the lips.
Kyle Hamrick (04:18): Notice that after effects adds a new mask right here in the timeline as mask too, since these modes are both set to add, I can see what's inside both of them. If I set the mode for mask two to subtract, now, it's actually cutting away from my other mask. If I set the mode to intersect. Now, it only shows the area where these two overlap much like layers and effects here in AAE. The stacking order matters. I'd encourage you to just grab an image, draw a couple of masks and explore this functionality to get more comfortable with it. If you are adding multiple masks to a layer, you're definitely going to want to keep them straight, right? You can rename any mask by clicking on the name and pressing enter, and you can manually choose the color of each mask by clicking on this little color chip here, I'm going to delete the second mask and twirl open the remaining one.
Kyle Hamrick (05:09): So we can look at some of the other properties inside here. First is the path itself, which I'll talk more about in a minute. Next, we have mask feather, which adjusts, how hard or soft the mask edges are. This is measured in pixels and is centered on the path. So if I set this to 100, it's feathering 50 pixels inside the mask and 50 pixels outside. If you need to get really specific here, there's a special mask feathering tool that allows you to finesse this as much as you like mask opacity, adjust how opaque or transparent this individual mask is. Mask expansion lets you either shrink or grow a mask. This is also measured in pixels without actually having to change the path itself. Animating this property can be a very easy way to create an Irish reveal. For example,
Kyle Hamrick (05:58): One very important thing about masks is that they always move and transform with the layer they're on. If you want to move the layer around on screen, but keep them asking the same position relative to the rest of the composition. You can actually use the pan behind tool up here to do that pretty cool, right? In this case though, I want to keep the layer itself in the same place, but move the mask around to move the entire mask at once you can click on either the masks name or the mask path property here in the timeline. Notice how the points changed from round. When they're unselected to little squares, when they're selected, we'll just move this around a little bit and then to free transform the entire mask. You can double click directly on the path here. Oops, I missed the path and that actually opened this up in the layer viewer, which can be useful sometimes.
Kyle Hamrick (06:46): But right now that's not what I want. Let's go back to our composition viewer and being very careful here. I'll double click right on the path itself. Now you'll be able to move it around as well as scale and rotate it to close that out. Double-click again, either directly on the path or anywhere outside of it often you'll want individual control over one or more of these points, which after effects, calls. Vertexes. If I single click anywhere just to de-select these notice that they've gone back to round dots. Now I can individually select and manipulate a single point to select multiple points at once. You can either hold shift and click more. You can grab any straight path segment to move both of those points at once. Or you can actually drag a box around all the points you'd like to control and move them all at once. Since after effects is an animation program, we can of course be making our mask change over time, which I can do by activating the stopwatch here on the mask path, property to start creating key frames. So maybe I'll start with this shape here, go forward a little bit and then change a few points. I know maybe that's not the most exciting thing ever yet, but it's the basis of all the other masking work you'll do in the future. So it's good to get a handle on how all of this works
Kyle Hamrick (08:06): Before we wrap up. Let's take a look at a few quick examples of using masks in your everyday work. The vignette is a nice use case for a mask. They're a nice finishing step for many compositions and can help you direct the viewer's eye to a specific part of the frame. Let's go up to layer new solid, or you could press control or command. Y I'm going to name this vignette and let's choose a color from our image. Maybe like this very dark purple here. As you can see, it's not quite black. Now we have a solid covering the whole frame, which is obviously not what we want, but if we come up here to our shape tools, choose our lips and double click on it. It will actually create an elliptical mask, exactly the size of our layer. This still isn't quite what we're going for.
Kyle Hamrick (08:51):So let's come down here and we can either set this to subtract, or there's also this little invert button that will quickly invert your mask. Let's twirl this open, crank this feather up to about three 50 or so that looks nice. And maybe turn up the expansion just to nudge this out a little bit. That looks pretty good. I might open up the layers of capacity and turn this down just to maybe 80 or so. I could probably stop there, but sometimes it's nice to make your vignettes look a little bit more organic so you can tweak these points a little bit.
Kyle Hamrick (09:27): Play with these tangent handles. Just kind of fiddle with this until you're happy there. I think that looks lovely. Another easy way to put masks to work for us is creating a quick little revealer with our image. Let's start off by just drawing a rectangle. I'm going to go ahead and zoom out a little bit so I can see more. And I'm just going to draw this one right here on the left half. And then this one over here on the right. I didn't get them perfect yet, but I will in just a second. Let's zoom back in and I'll hit the quote key to bring up my safe zone display, which also has this handy little crosshair right at the center of the composition. I'll just grab these edges and move them into place. It doesn't have to be perfect. Just make sure that you can't see any seams. Let's zoom back out and come down here and let's name these appropriately. So we have left and we have right. Great. Let's maybe go to frame 10 open both of these up key frame, the mask paths move forward a bit and you could either move the entire mask or you could just grab one piece and slide it off to the edge.
Kyle Hamrick (10:37): There we go. Again. You don't have to be super precise with this. Let's highlight our key frames, press F nine to easy ease and just take a look. There we go. We have a nice, quick little revealer. It is important to remember that these masks will move with the layer. So you wouldn't want to do this until your layer is definitely set in place, but this is a nice, quick and easy way to wipe off the layer like this, just by drawing your masks differently, you could make this angled, make it a little more complex, whatever works for your project. So that's the basics of masks. Then after effects, understanding how they work is an essential skill for any after effects artists. And this is really just the beginning. They can actually do so much more than we have time for today. If the possibilities of compositing using these kinds of tools has really piqued your interest. You should take a look at VFX for motion taught by industry legend of mark Christianson. If you still need to master more of the fundamental after effects skills, like what we covered today, you should check out after effects, kickstart where Nol Honig gives you the ultimate intro to after effects. Don't forget to hit subscribe, to get more tips like what we covered today and make sure to check the description. If you'd like to download the project files from this video. Thanks for watching and happy masking

