Start Your 3D Journey in Cinema 4D
Master the essentials of 3D modeling, lighting, and animation in C4D. Enroll in All-Access to unlock C4D Basecamp and 50+ other courses.

How to rig, add motion capture data, and apply extra hand keyframed animation to your 3D character with Cinema 4D & Mixamo.
Whether you are a Cinema 4D veteran, character animation kungfu master, or animation newbie you will always have a wave of obstacles facing you. Whether it's time restrictions or lack of character animation & rigging skills.
Nobody has ever said that character animation is easy. Whether you're a C4D veteran or animation newbie you will always find new challenges when working on 3D character animation. However, I recently found a tool that can make the 3D animation process in Cinema 4D much easier... Mixamo!
What is Mixamo?
Mixamo is a 3D company based out of San Francisco. In 2015 Mixamo was acquired by Adobe and has since been integrated (in part) with the Creative Cloud. In the context of this article we will be looking specifically at Mixamo's online database of 3D motion tracking animation data. Mixamo has over 3,000+ motion tracked animations that you can quickly use for 3D projects. This data can be easily applied into humanoid biped characters for quick animations.
Will this data completely replace the need for kefyramed character animation? Absolutely not! But, Mixamo does have the power to save your a ton of time and give you quick data that can be manipulated in post. It is especially helpful for background characters or any character movement where custom-movement isn't essential for storytelling. Depending on the project this workflow could save you dozens, if not hundreds, of hours.
So you can hold off on renting the ping-pong ball suit, for now...
Animating a 3D Character with Mixamo
In this breakdown, I will show you how to use Mixamo data to quickly create a character animation in Cinema 4D. First, download the project file to follow along!
{{lead-magnet}}
Now that the project file is downloaded, let's take a look at our finished animation.

Starting Your 3D Animation Project in Mixamo
Before we get started with animating your 3D animation project in Mixamo, you will first need a character to map your motion capture onto. Your options are:
1. Use Mixamo's existing character library
2. Use Adobe Fuse CC (beta) to custom build your character
3. Model your own in character in Cinema 4D
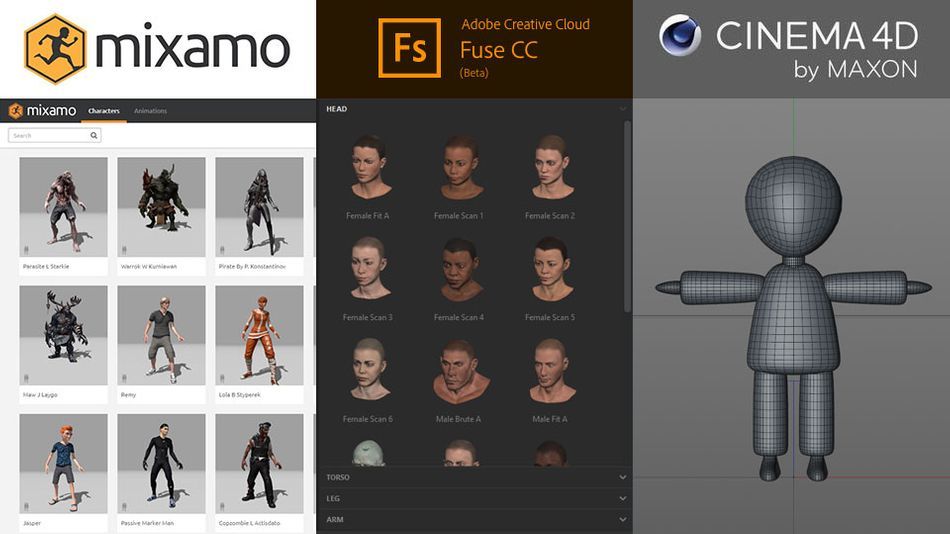
Modeling Your Own Character in Cinema 4D
We will be going with option 3. Why? Because the beauty of Mixamo is that even if you are very bad at modeling in C4D, Mixamo more than makes up for this. In conventional 3D modeling you would need to build a character with one single mesh. With Mixamo you are able to draw separate body parts, line them up and boom, Mixamo applies an individual weight map to each body part. Your only requirement is to design your character as a humanoid biped and to allow for enough segments, so that the limbs can bend and pose your character in a T-pose. Arms & fingers straight apart and spread out. Legs straight and unbent too.
I'VE MODELED MY OWN CHARACTER, NOW WHAT?
After you've modeled your 3D character you can follow the process below.
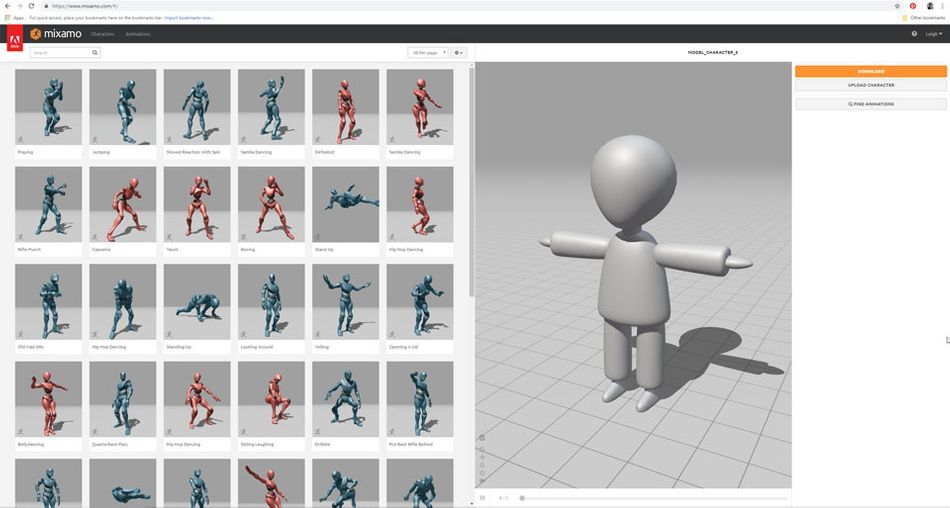
- Save your character.c4d file as an .obj file - File/Export/Wavefront OBJ (*obj)
- Open Mixamo from your web browser.
- Sign in FREE with either your Adobe Subscription or create an account.
- Click "upload character" and upload your character.obj file
- If Mixamo accepts your character, you will be able to click "next".
- Follow the instructions and place markers where instructed. Floating markers will result in an error and Mixamo will reject it and you will start again. If your character is fingerless, click on the dropdown menu labelled standard skeleton (65) and choose No Fingers (25)
- Click next and it should take 2mins to rig your character
- Click Animations and choose animation. For this exercise we will animate a skaterboy who runs, jumps, skateboards and then falls flat on his face.
- Search each action individually, click on it and customise your animations to suit your requirements.
- Download each action individually.
- Running.fbx
- Jump.fbx
- Skateboarding.fbx
- Fall Flat.fbx
How to Import from Mixamo into Cinema 4D
Now it's time to take all of that data into Cinema 4D!
- File/Merge and locate your Running.fbx
- Click ok on the FBX import setting panel
- Click mixamorig:Hips in your objects panel. It's the layer with the green joint symbol
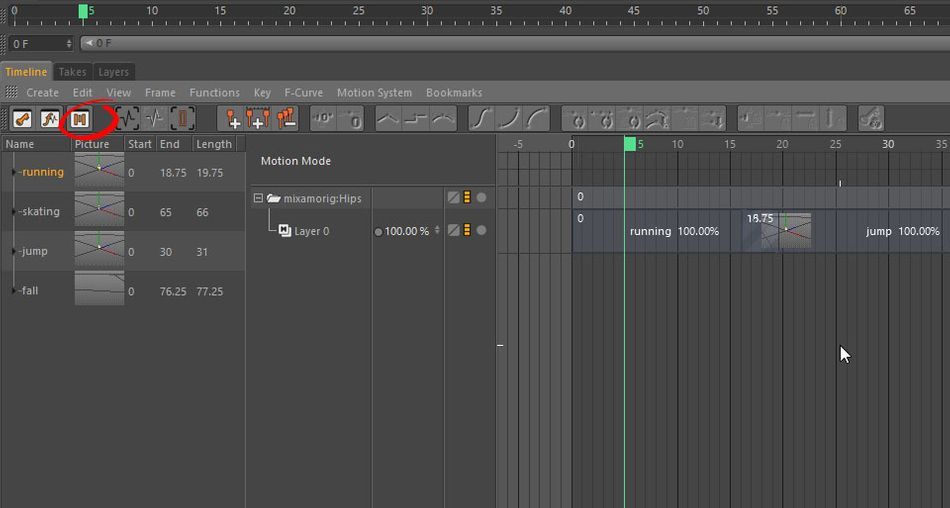
- Click Menu/Add Motion Clip and label it Running and then click Ok. This will bake your keyframes into a Motion Clip.
- Press Shift F3 to open your Timeline (Dope Sheet)
- Click View/Motion Mode.
- On the left there will be a library with a single bake animation labeled Running. It's already also on your timeline. If you can't see anything on your timeline press View/Automatic Mode (Alt+A)
- By baking the animation to a Motion Clip you have unlocked a whole new set of options to editing your animation. Now in the motion clip's attribute panel you will have the option to add loops to your animation and even decide where to start and end your animation without even touching a keyframe!
- If you intend to load in more than one animation you will need to first save your running bake by right clicking running in your library and choosing Copy Motion Source. Be sure to create a MotionSource folder to save it into. It will save out as running.c4dsrc
- Next select all your layers in the object menu and group them in a null (ALT+G) and label it character.
- Repeat and load in the other FBX files individually, baking the animate as before and saving out skating.c4dsrc, jump.c4dsrc, skatingboarding.c4dsrc & fallflat.c4dsrc. Each time you import .fbx files in, it will load in the full character. Once you have exported out all your .c4dsrc files you can delete all the extra character layers. You only need the original rig in the null labeled character.
Animating in Cinema 4D
Right! Now you have all the baked animations, just drag them onto the timeline in the order you would like them to animate in.
- Drag one animation over the top of another animation and you will notice it it frame blends the ending of the 1st animation into the beginning of the 2nd animation another. OOOoooo! You can change blending interpolation to linear on the Attributes panel under Basic on the Blending dropdown menu. Change from Easy Ease to Linear.
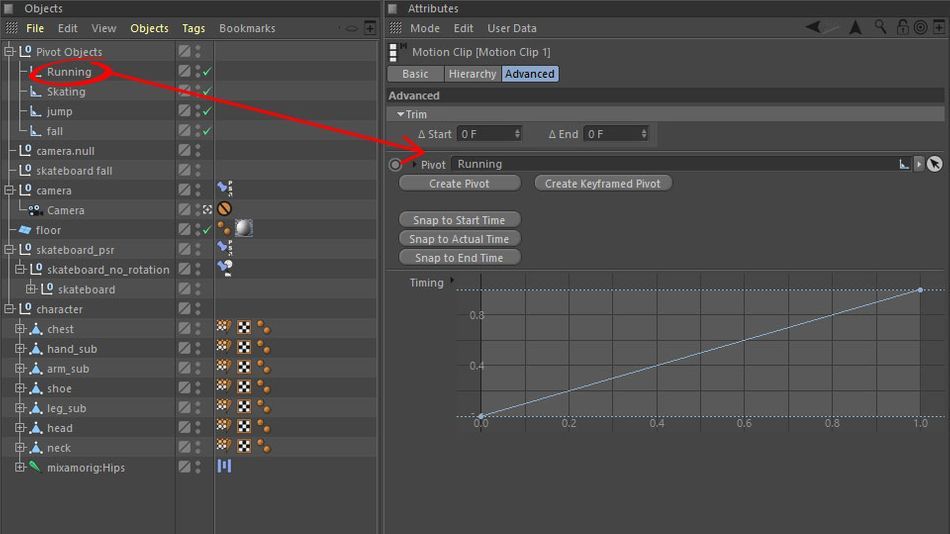
- To move each animation individually into position you need to create Pivot Objects and parent it to the animations.
- Press Animate/Pivot Object. Label it Running. Select the running motion clip on your timeline. Under Attributes/Basic drag the new Pivot Object from your Objects layer in the Source field. Create a pivot object for each animation and parent them. Group (Alt+G) all pivot objects in a folder named Pivot Objects.
Adding Props to Your Character
I created two props for our skaterboy. A helmet and a skateboard. How we parent these props to our character depends on how we are going to use them.
1. Parenting the helmet
- untwirl mixamorig:Hips on the object panel
- untwirl mixamorig:Head
- untwirl mixamorig:HeadTop_End
- Drag the helmet layer below mixamorig:HeadTop_En in the hierarchy
- Select helmet layer. Then go to the attributes and select Coord. tab and zero out all the values. Now the helmet will share the exact space as the head rig. If it's not totally in-line, just position the helmet until it fits the head perfectly.
2. Parenting the skateboard
- Now I intend to move the skateboard from the boys hand, to the floor when he jumps and then to his foot when he skates and then back to the floor when he falls. (animated gif joke)
- You will need to use constraint tag to achieve this
- Create floor a primitive plan
- Select the skateboard group it (alt+G) and call it skateboard_no_rotation. Select skateboard_psr and go to the Objects menu and select Tag/Character Tags/Constraint
- A pin symbol will appear on skateboard_psr layer.
- Double click the pin.
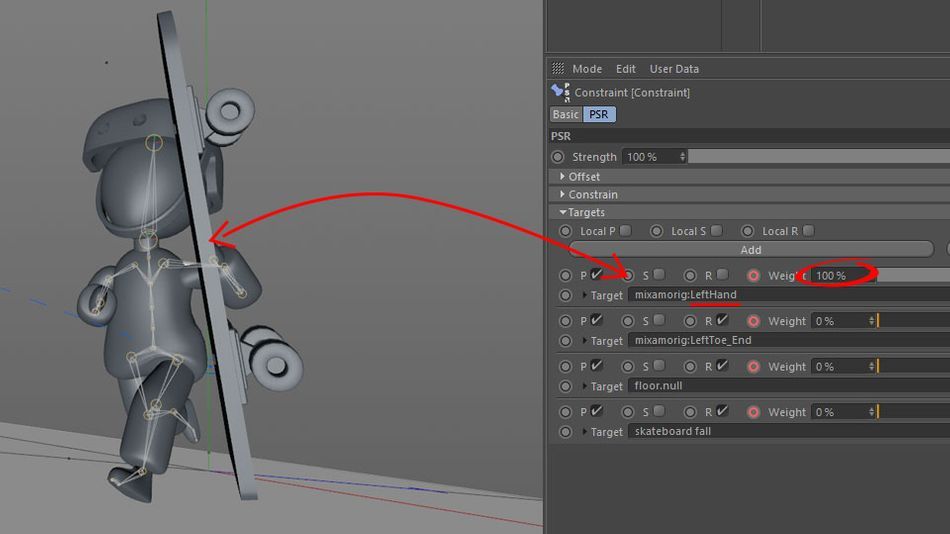
- The skateboard will wiggle at all angles of the character's joints. So we want to constraint any rotations from happening. So under the basic's tab you will check the box parent. Then under the parent tab you will check the box R (rotation). Now since the floor is the only thing not moving, create a null and call it floor.null and position in the same y position as the floor. Lets use it as a target by dragging the floor.null object into the target field. Now the skateboard won't wiggle about.
- Then next step is to group it again (alt+G), name it skateboard_psr and add another constraint tag to the upper most null name skateboard_psr.
- Double click the pin, under the basic tab check the box PSR (position, scale, rotation).
- Under the PSR tab in the targets dropdown press add 4 times. (to create 4 target feilds)
- Drag mixmorig:LeftHand object into the 1st field (check box P & R)
- Drag mixmorig:LeftToe_End object into the 2nd field (check box P & R)
- Create a null called skateboard_on_floor a drag it into the 3rd field (check box P & R)
- Create a null called skateboard_fall drag it into the 4th field (check box P & R)
- Now to move the skateboard from the kid's hand, to the floor, then to the foot & back to the floor when he falls all you have to do is animate the weight radio button from 100-0 to unparent it, and from 100-0 on then animate at the same time the new parent from 0-100.
- If for any reason your psr tag is not sticking, set your priority number up to a value over 100. It could be something like a generator (ie subdivision surface. Anything with a green symbol) preventing it from sticking. If that is the case change the priority dropdown menu from Expression to Generators.
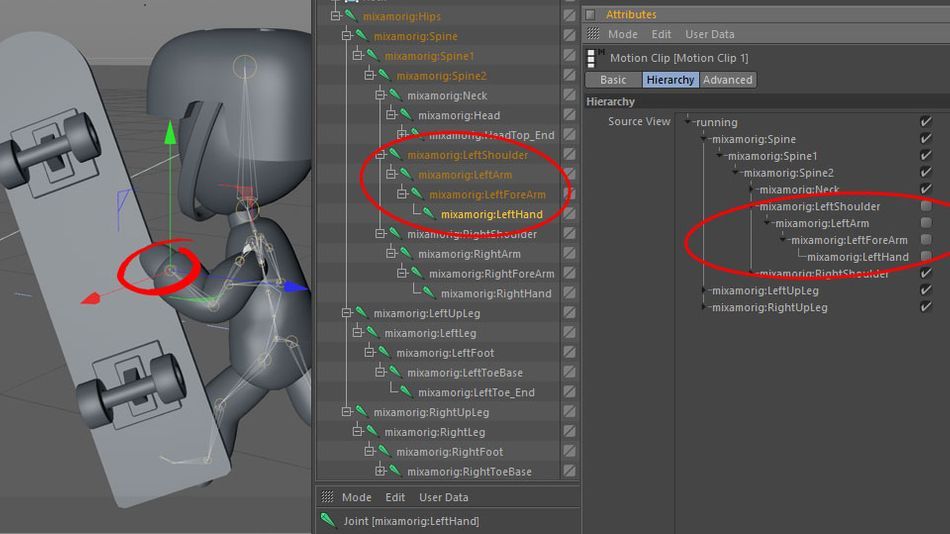
WHAT IF I DON'T WANT THE ARM TO MOVE WHILE RUNNING? I'D ALSO LIKE THE ARM TO HOLD THE SKATEBOARD.
Well aren't you being picky?... That's no problem at all.
1. Go back to motion mode in your animation timeline
2. Select the running clip in your timeline
3. Under the Hierarchy tab untwirl running in the source view
4. Uncheck all joints to do with the arm you want to edit. mixmorig:LeftShoulder, mixmorig:LeftArm, mixmorig:LeftForeArm & mixmorig:LeftHand.
5. Now under your Objects panel untwirl Mixamorig:Hips until you find the left arm and rotate the joints. Now that the joints are unparents from the pre-animated rig you can keyframe and animate the arm.
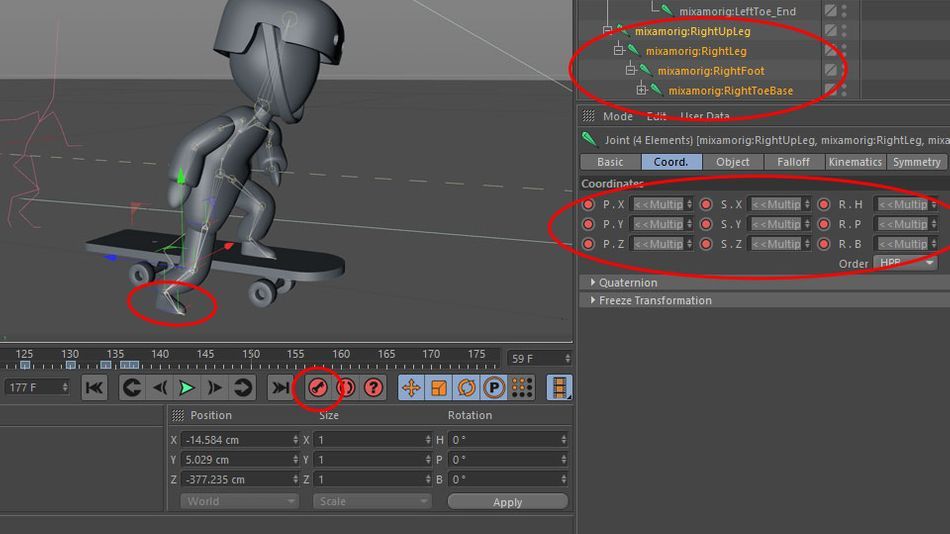
WHEN THE BOY PUSHES ON HIS SKATEBOARD HIS FOOT DOESN'T QUITE TOUCH THE GROUND. CAN I FIX THIS?
1. Untwirl the Mixamorig:Hip rigg again in the object panel.
2. Select RightUpLeg + RightLeg + RightFoot + RightToeBase
3. Go to the Coord. tab press F9 to record all the PSR (position, scales and rotation)
4. Move the foot to the floor. and press F9 again to drop another keyframe for it's new position. Beware that this foot is now forever in this new position you placed it in. So don't forget to scrub forward and drop a new keyframe and record it's new resting position too. To make life easier use F & G to strub back and forward on the timeline. You don't want to be an ass like me and keep pressing spacebar just to play the animation to move to the next keyframe.
WHEN MY CHARACTER'S BENDS THE MESH KINKS. HOW DO I FIX THIS?
There two factors to bear in mind when your mesh deformers incorrectly. Either there aren't enough segments for your character to bend. Or the weight map needs smoothing.
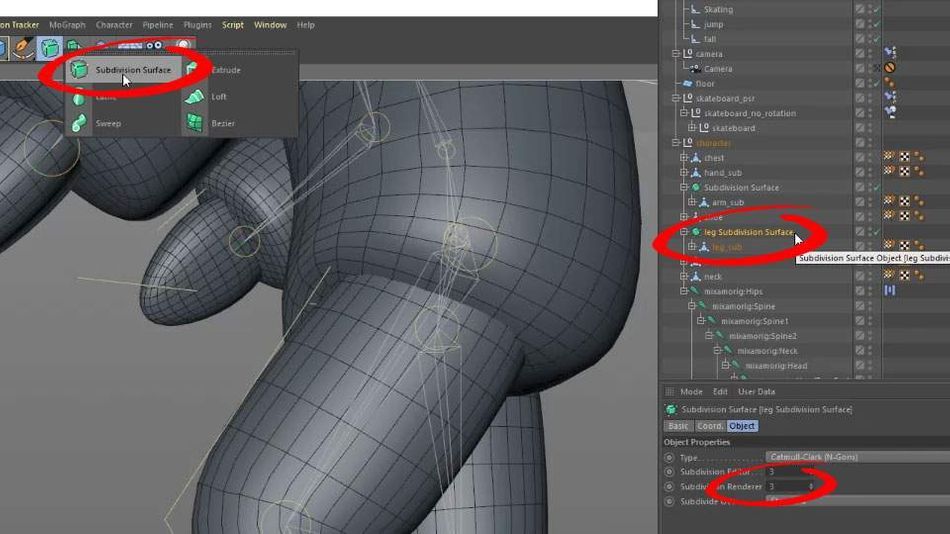
- To add more segments to the leg - select the leg in the objects layer, hold down ALT on the keyboard and select subdivision surface. In the subdivision surface attributes panel up the number of the subdivision editor & renderer to 2 or 3. The higher the number the more segments will be added.
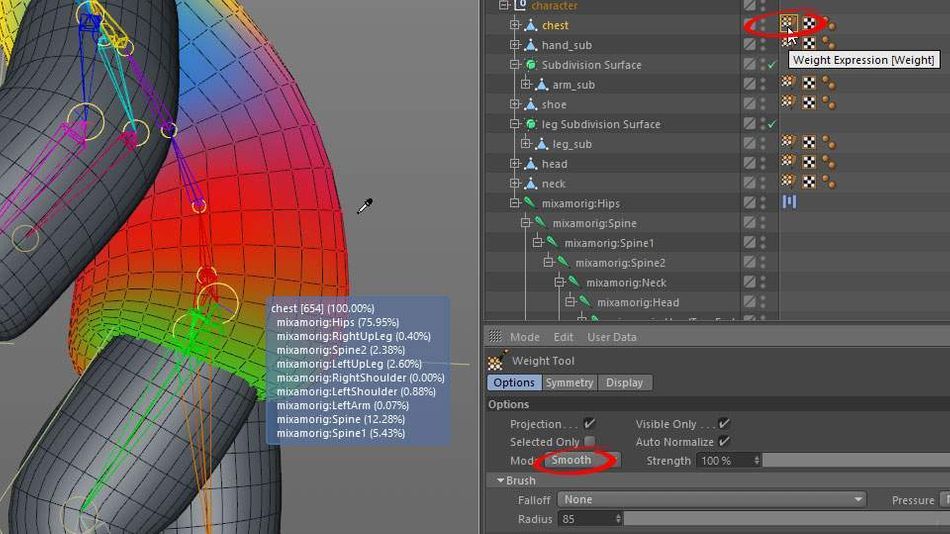
- To smooth the weightmap of the chest - double click the weight expression tag to the right of the chest layer in the objects panel. In the attributes panel of the weight map under the tab options change the mode to smooth and increase the radius of the brush to a higher value to make your brush bigger. You will notice the chest of your character is covered in colors. Each separate color represents where the character can bend. Just brush over the gradients and soften the harsh gradients. As the gradients softens, so will the mesh of the character's geometry.
BOOM! YOU'RE DONE!
This tutorial might have been tougher than you expected. If you are new to Cinema 4D I'd recommend doing Cinema 4D Basecamp by the awesomely talented EJ Hassenfratz. I have personally greatly benefitted from C4D Basecamp and in only 6 months I went from 3D newbie to creating online 3D education content! Imagine what you could do with your new found powers?
ENROLL NOW!
Acidbite ➔
50% off everything

ActionVFX ➔
30% off all plans and credit packs - starts 11/26

Adobe ➔
50% off all apps and plans through 11/29

aescripts ➔
25% off everything through 12/6
Affinity ➔
50% off all products

Battleaxe ➔
30% off from 11/29-12/7
Boom Library ➔
30% off Boom One, their 48,000+ file audio library
BorisFX ➔
25% off everything, 11/25-12/1

Cavalry ➔
33% off pro subscriptions (11/29 - 12/4)

FXFactory ➔
25% off with code BLACKFRIDAY until 12/3

Goodboyninja ➔
20% off everything

Happy Editing ➔
50% off with code BLACKFRIDAY

Huion ➔
Up to 50% off affordable, high-quality pen display tablets

Insydium ➔
50% off through 12/4
JangaFX ➔
30% off an indie annual license
Kitbash 3D ➔
$200 off Cargo Pro, their entire library
Knights of the Editing Table ➔
Up to 20% off Premiere Pro Extensions
Maxon ➔
25% off Maxon One, ZBrush, & Redshift - Annual Subscriptions (11/29 - 12/8)
Mode Designs ➔
Deals on premium keyboards and accessories
Motion Array ➔
10% off the Everything plan
Motion Hatch ➔
Perfect Your Pricing Toolkit - 50% off (11/29 - 12/2)

MotionVFX ➔
30% off Design/CineStudio, and PPro Resolve packs with code: BW30

Rocket Lasso ➔
50% off all plug-ins (11/29 - 12/2)

Rokoko ➔
45% off the indie creator bundle with code: RKK_SchoolOfMotion (revenue must be under $100K a year)

Shapefest ➔
80% off a Shapefest Pro annual subscription for life (11/29 - 12/2)

The Pixel Lab ➔
30% off everything
Toolfarm ➔
Various plugins and tools on sale

True Grit Texture ➔
50-70% off (starts Wednesday, runs for about a week)

Vincent Schwenk ➔
50% discount with code RENDERSALE

Wacom ➔
Up to $120 off new tablets + deals on refurbished items


Start Your 3D Journey in Cinema 4D

Master the essentials of 3D modeling, lighting, and animation in C4D. Enroll in All-Access to unlock C4D Basecamp and 50+ other courses.


