Cinema 4D R21 features enhanced Caps and Bevels
As we noted in our Cinema 4D R21 review, the new Caps and Bevels feature "is more than just fancy fonts and text."
With improved constraints and internal bevels, Delaunay cap skinning, a new bevel preset library and the ability to create your own bevel profiles, this release is all about flexibility and efficiency. Plus, caps and bevels are integrated on all the spline-based objects, like lathe, loft, and sweep — "for unlimited possibilities."
In our Cinema 4D R21 Caps and Bevels Tutorial, EJ Hassenfratz, our 3D Creative Director, guides you step by step through the tool's various uses, demonstrating why you can expect to speed up your workflow with Release 21.

Cinema 4D R21 Caps and Bevels Features, by Maxon
Cinema 4D R21 Caps and Bevels Tutorial, by EJ Hassenfratz
Inside EJ's Caps and Bevels Tutorial
As seen in the above video, in his tutorial EJ addresses a number of enhancements to Caps and Bevels in Cinema 4D R21. Below, we summarize the improvements in control and flexibility, illustrated with some animated gifs from within the Cinema 4D app.
Want to learn more about Cinema 4D? EJ teaches a course on it.

BEVEL OPTIONS IN CINEMA 4D R21
The options are significantly improved in Cinema 4D R21, using Caps and Bevels on extrudes, MoText, logos, sweeps, lofts, and lathes.
In the Caps tab, in addition to Solid, you can select:
- Round
- Curve
- Step
1. ROUND BEVEL OPTION IN CINEMA 4D R21
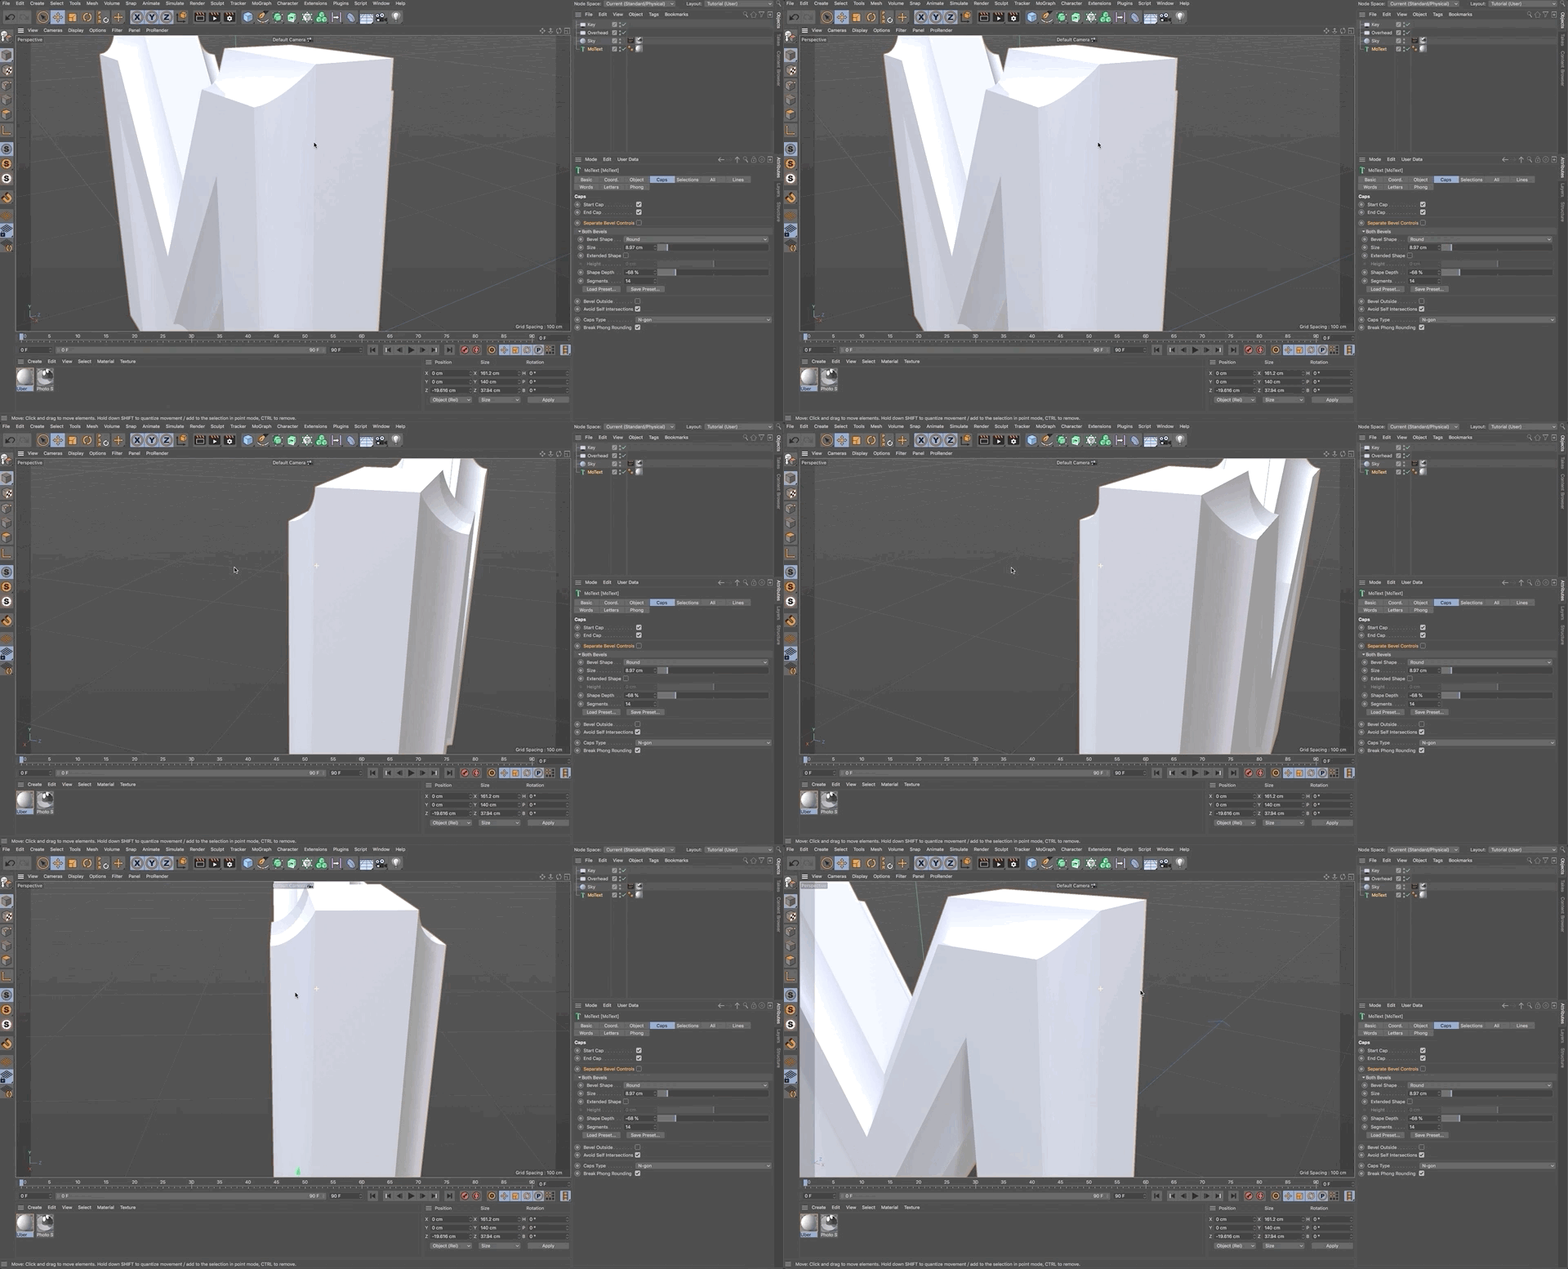
With the Round option, you can alter the Shape Depth parameter to create an inner or extruded bevel.
At first, your shape may appear a little rigid, but there's a simple fix: using the Segments parameter, simply increase or decrease the number of segments until you achieve your desired result.
The greater the amount of cap segments, the smoother the look.
Here's a front and back view of a letter M with a concave bevel:
2. CURVE BEVEL OPTION IN CINEMA 4D R21
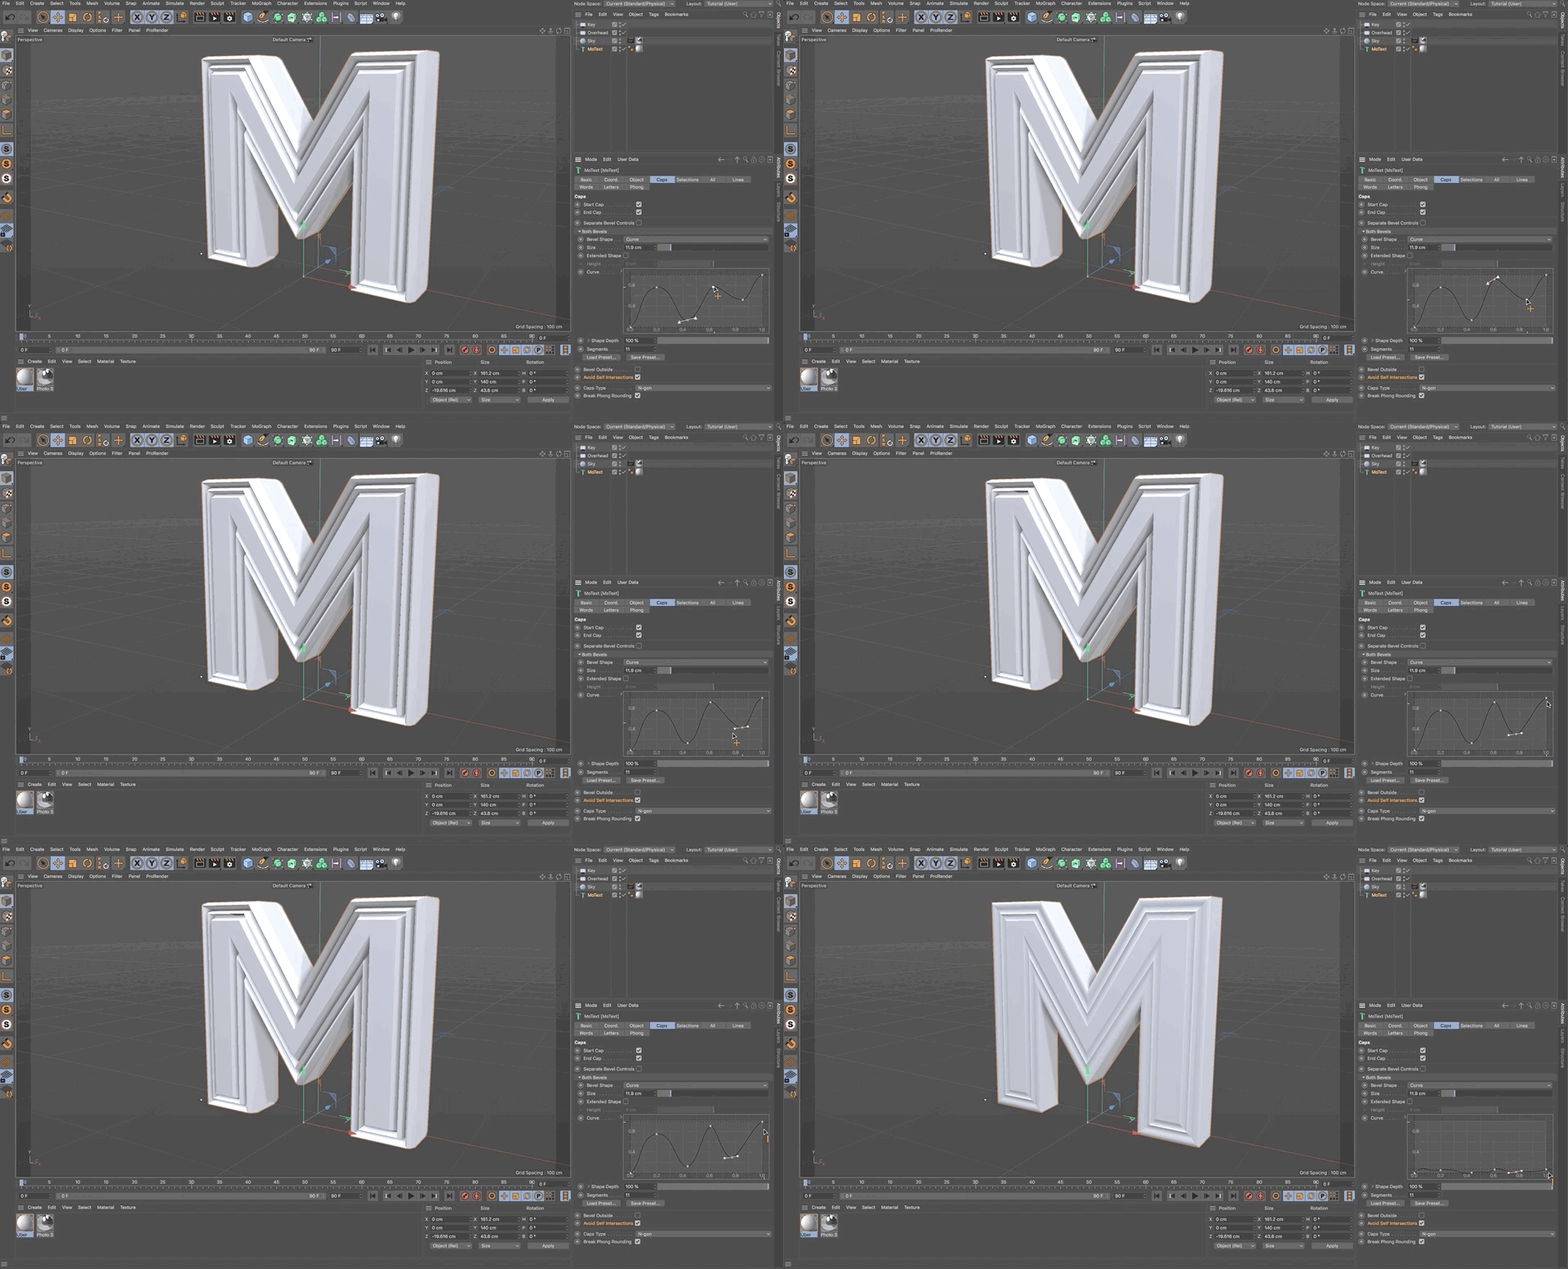
In earlier iterations of Cinema 4D, chiseled text had to be modeled; with the new Curve Bevel option, there's a spline editor that allows you to set points for your bevel, as well as bezier handles for controlling your bevel profile.
Create your own unique creation and save it as a preset, or start off with one of the pre-built curve bevel presets.
As EJ points out, this is one of the most powerful features in the new Caps and Bevels system:
Plus, if you right-click in the curve editor, you'll be presented with additional new options — Double and Symmetrize — to help you create more complex bevels.
Double extends the curve by doubling its original length, maintaining but repeating the same shape.
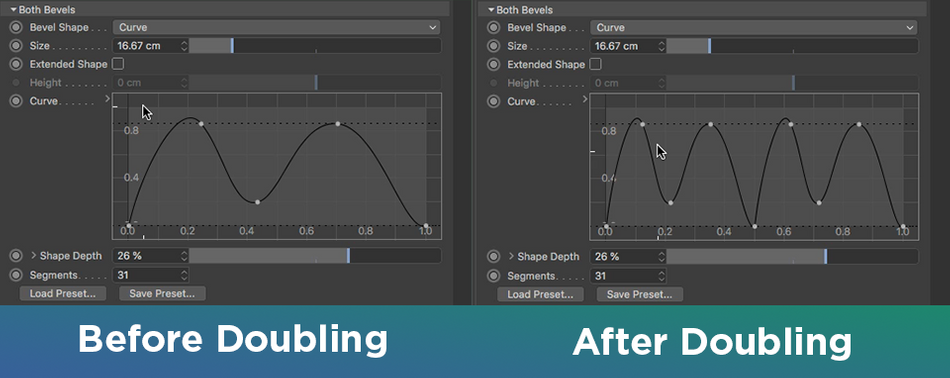
Symmetrize works in a similar fashion, doubling and mirroring your curve editor points.

3. STEP BEVEL OPTION IN CINEMA 4D R21
In prior versions of Cinema 4D, you were only able to add one or two steps to your bevel, unless you created a separate model — and, when increasing the size of the bevel, you had to watch for unwanted artifacts and low-quality edges.
Now, you can create as many steps as you want, without limitations:
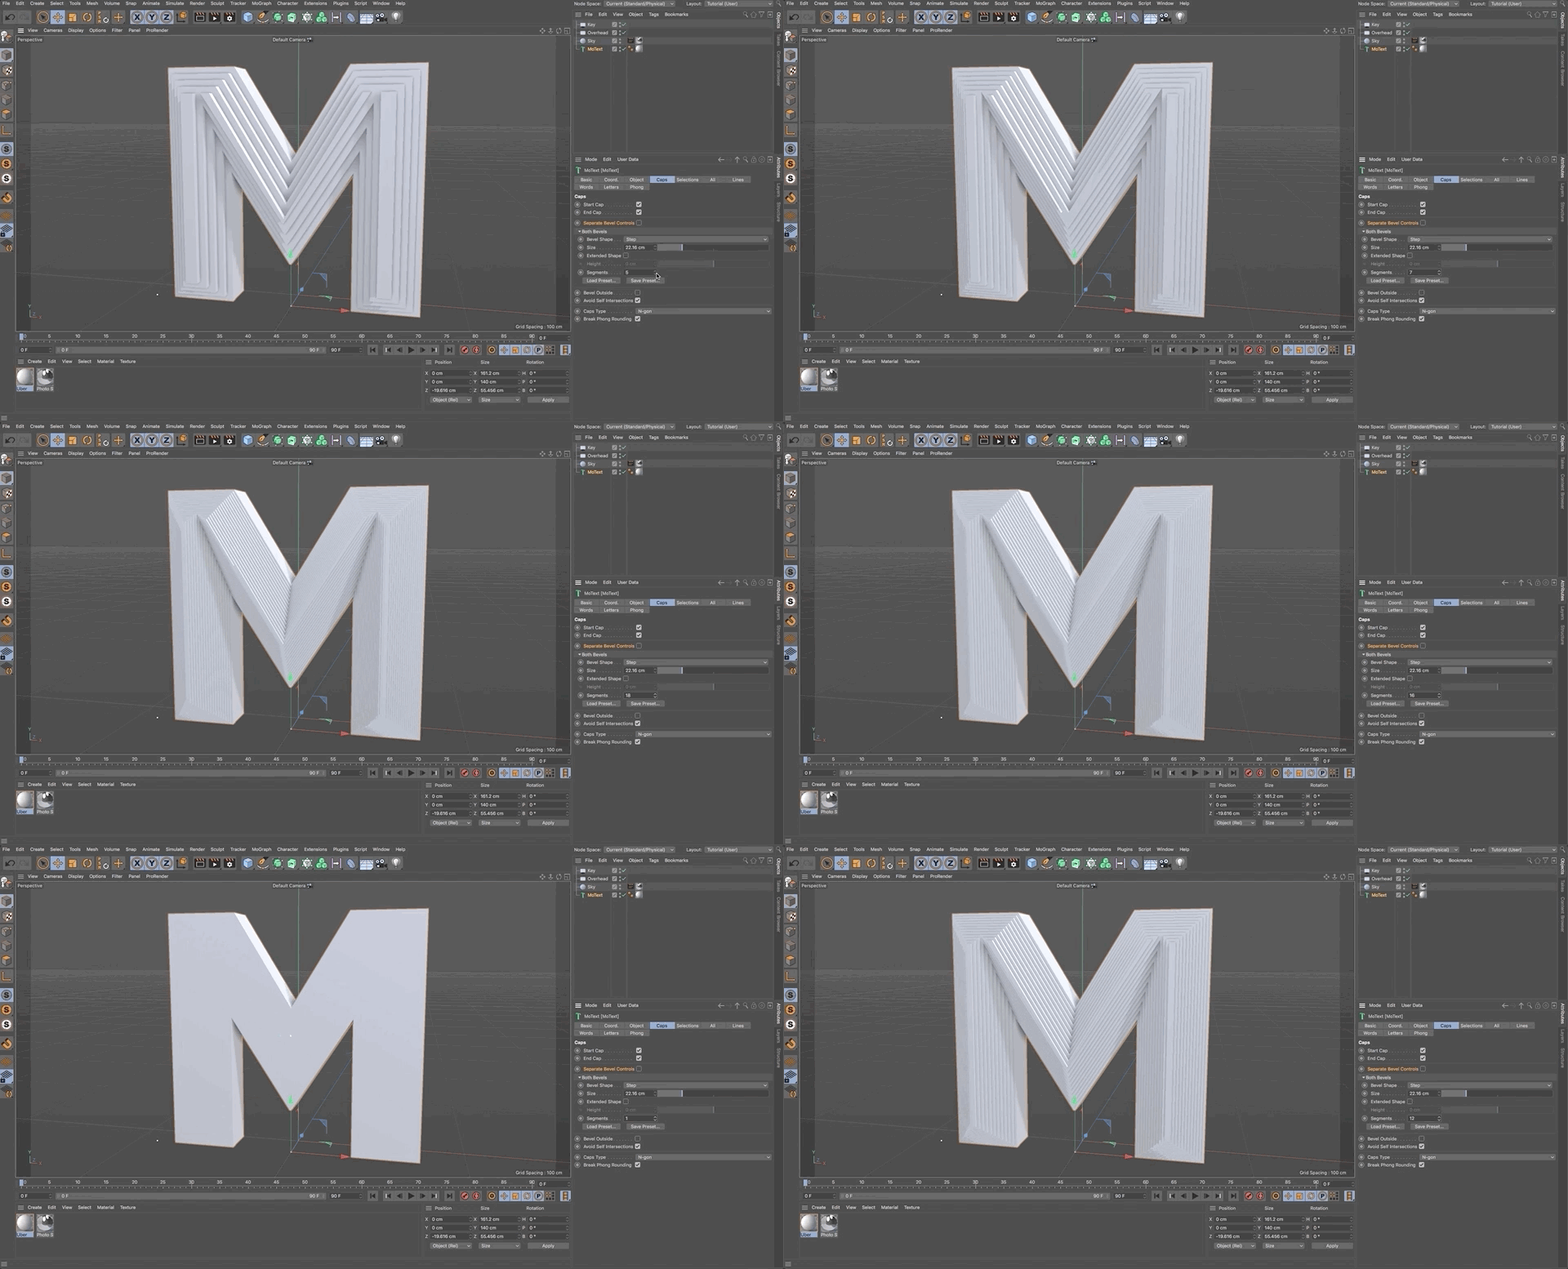
By selecting the Stair bevel option, you can generate a stair-stepped bevel; to increase your bevel's size, use the Size parameter to avoid self intersections.
Want self intersections? No problem — simply toggle it on.
SWEEP OBJECTS IN CINEMA 4D R21
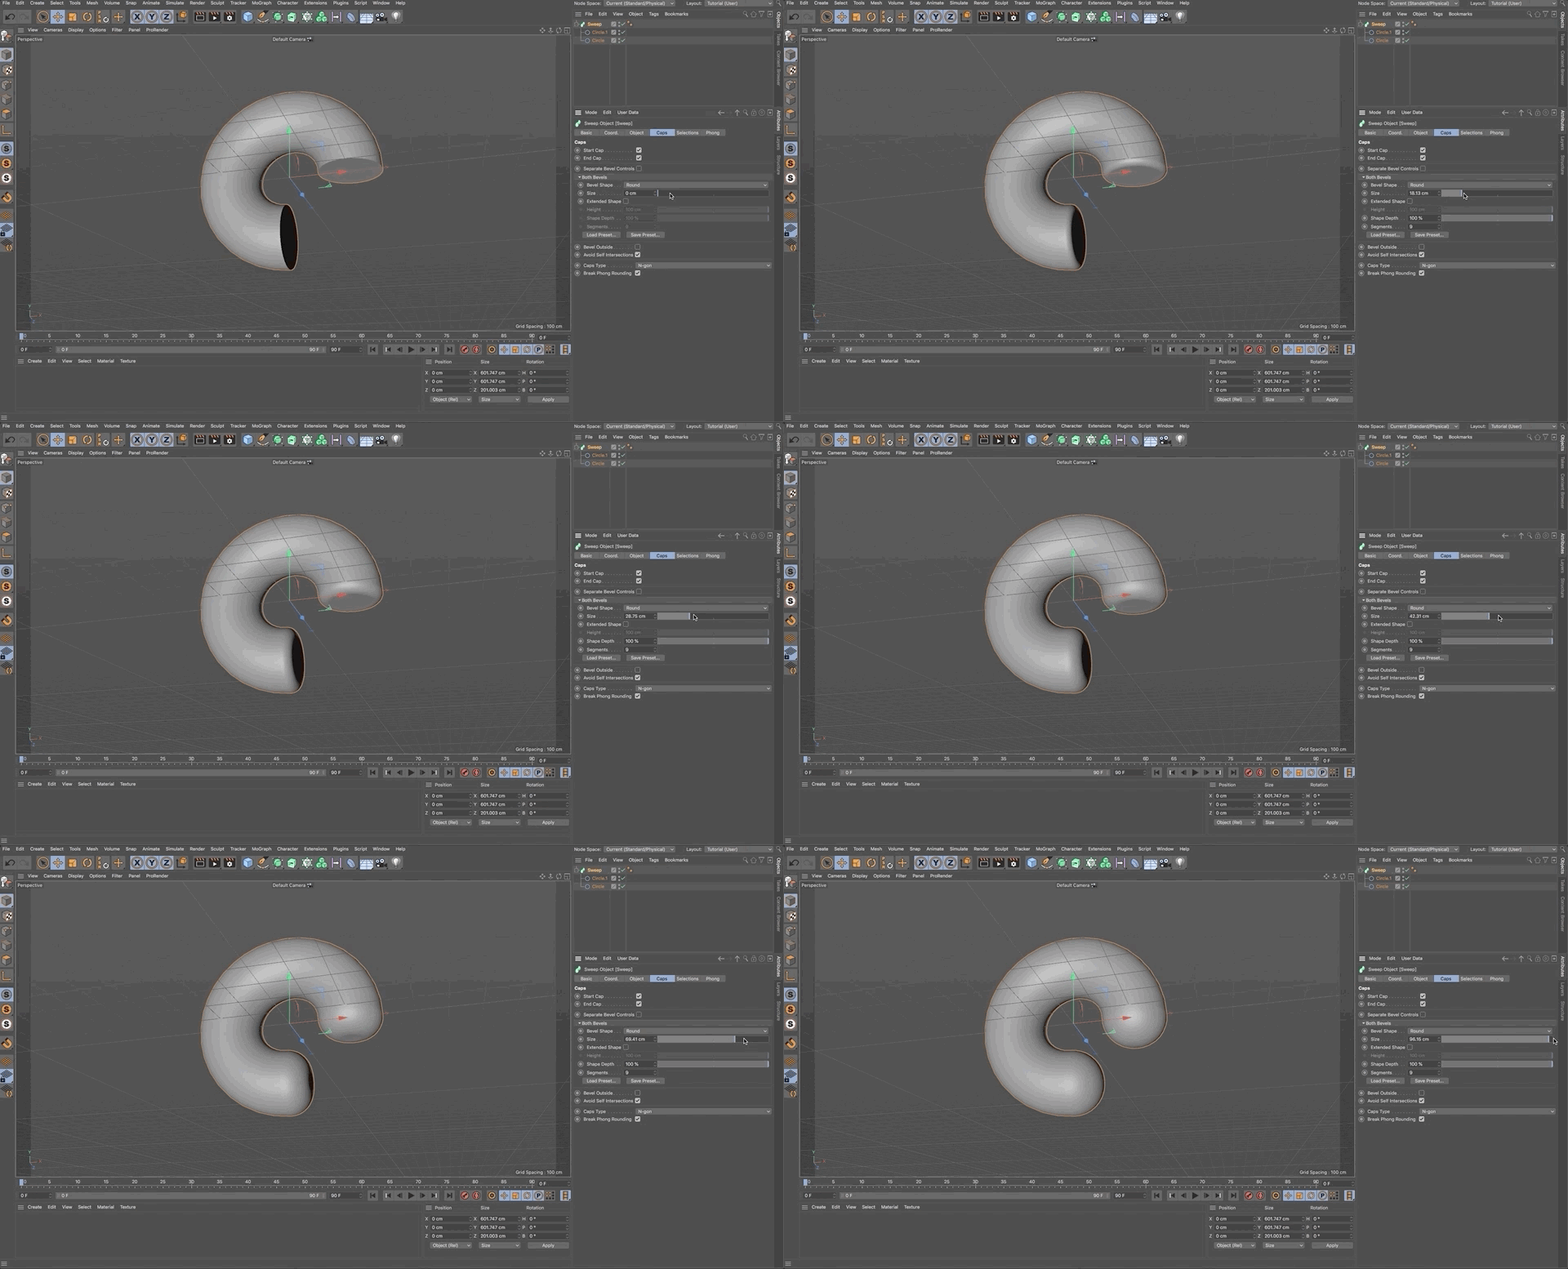
With Cinema 4D R21, it's never been easier to round the edges of your sweep object.
In the past, you had to add a fillet cap, guess the radius of your sweep's start and finish, and then crank to the radius of each end:

Additionally, if you changed the size of your sweep, you had to start from scratch.
In Cinema 4D R21, on the other hand, all you have to do is increase the size of your round cap:
CREATING FRONT AND BACK BEVELS IN CINEMA 4D R21
Creating front and back bevels was a laborious process in past Cinema 4D releases; not anymore.
In Cinema 4D R21, both sides receive the same bevel treatment by default, cutting your work load in half.
Also, if you want to separate the front and back bevels, you can — with a simple click of the Separate Bevel Controls checkbox.
CHANGING BEVEL FONTS IN CINEMA 4D R21
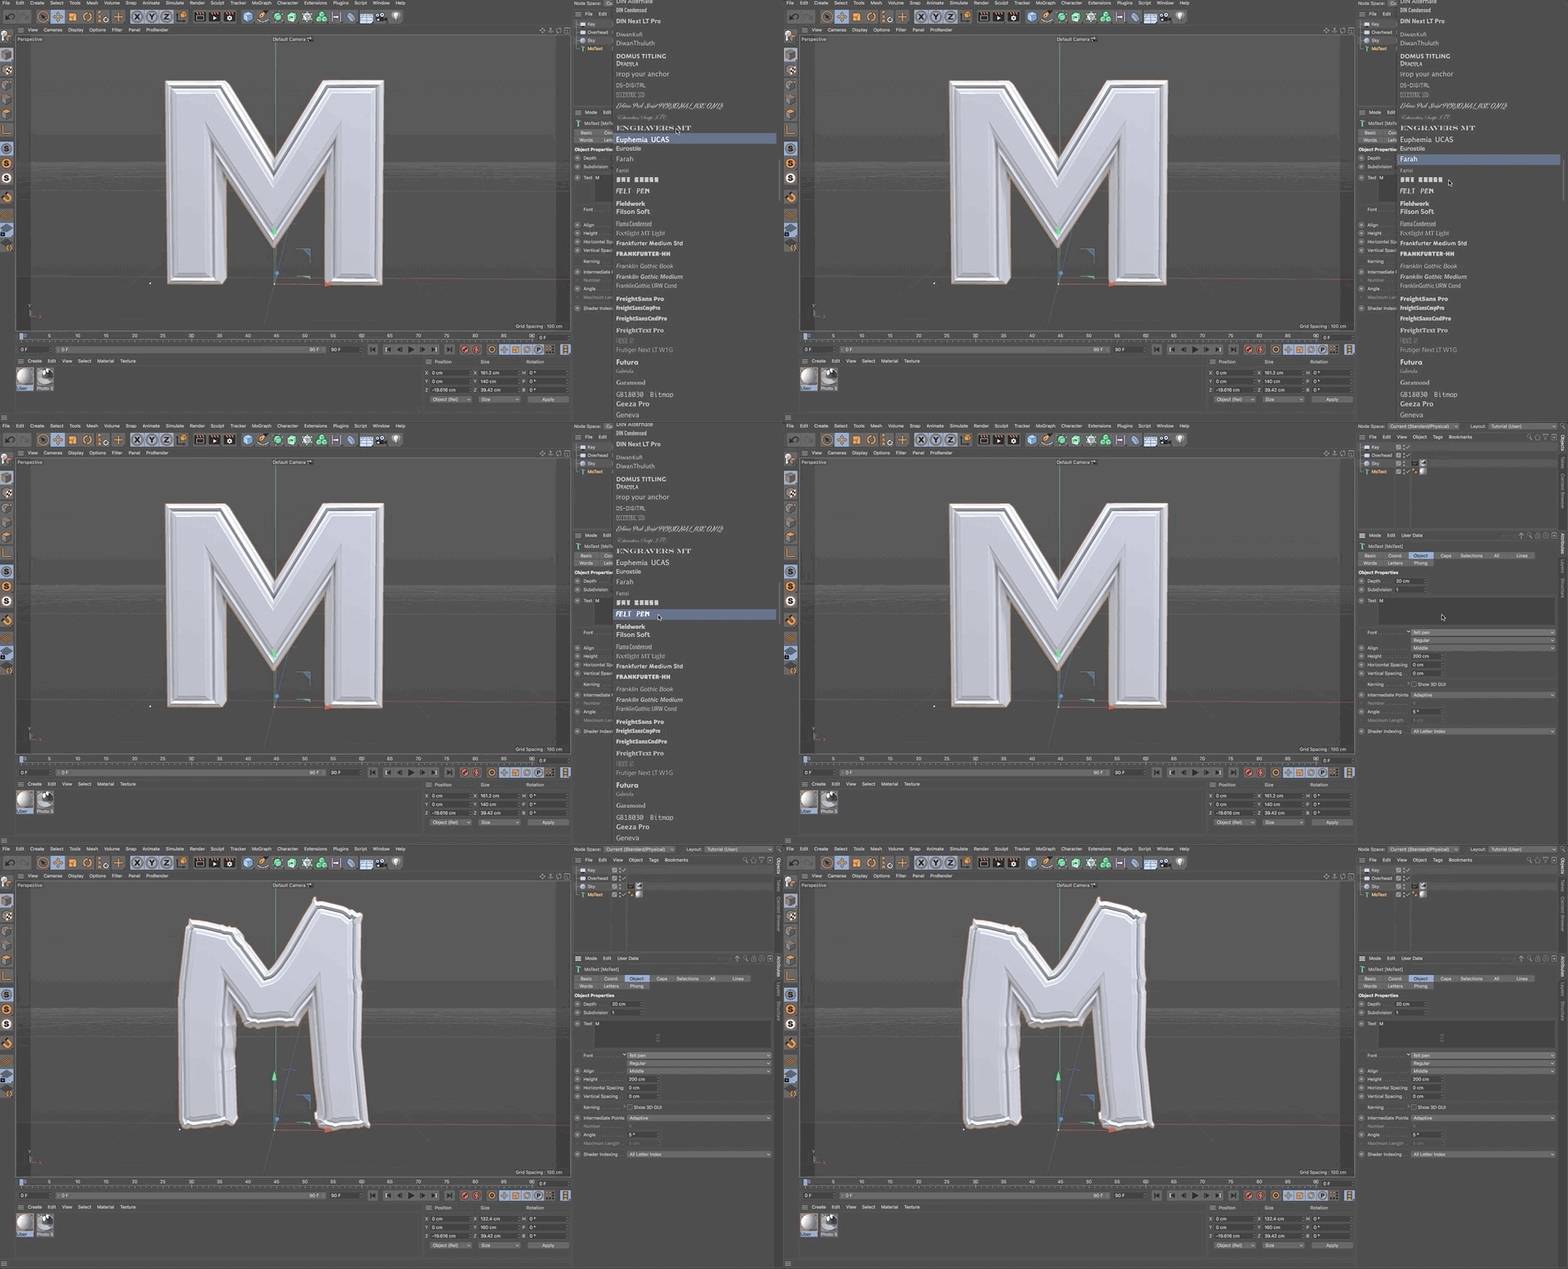
Even the best of us experience aha moments in the midst of 3D animation work, and with Release 21 of Cinema 4D that's no longer a clear cause for concern.
If you decide to change your font after you've created a bevel, you can — without changing the bevel profile (as long as you're working with MoText, of course):
EDITING OBJECTS IN CINEMA 4D R21
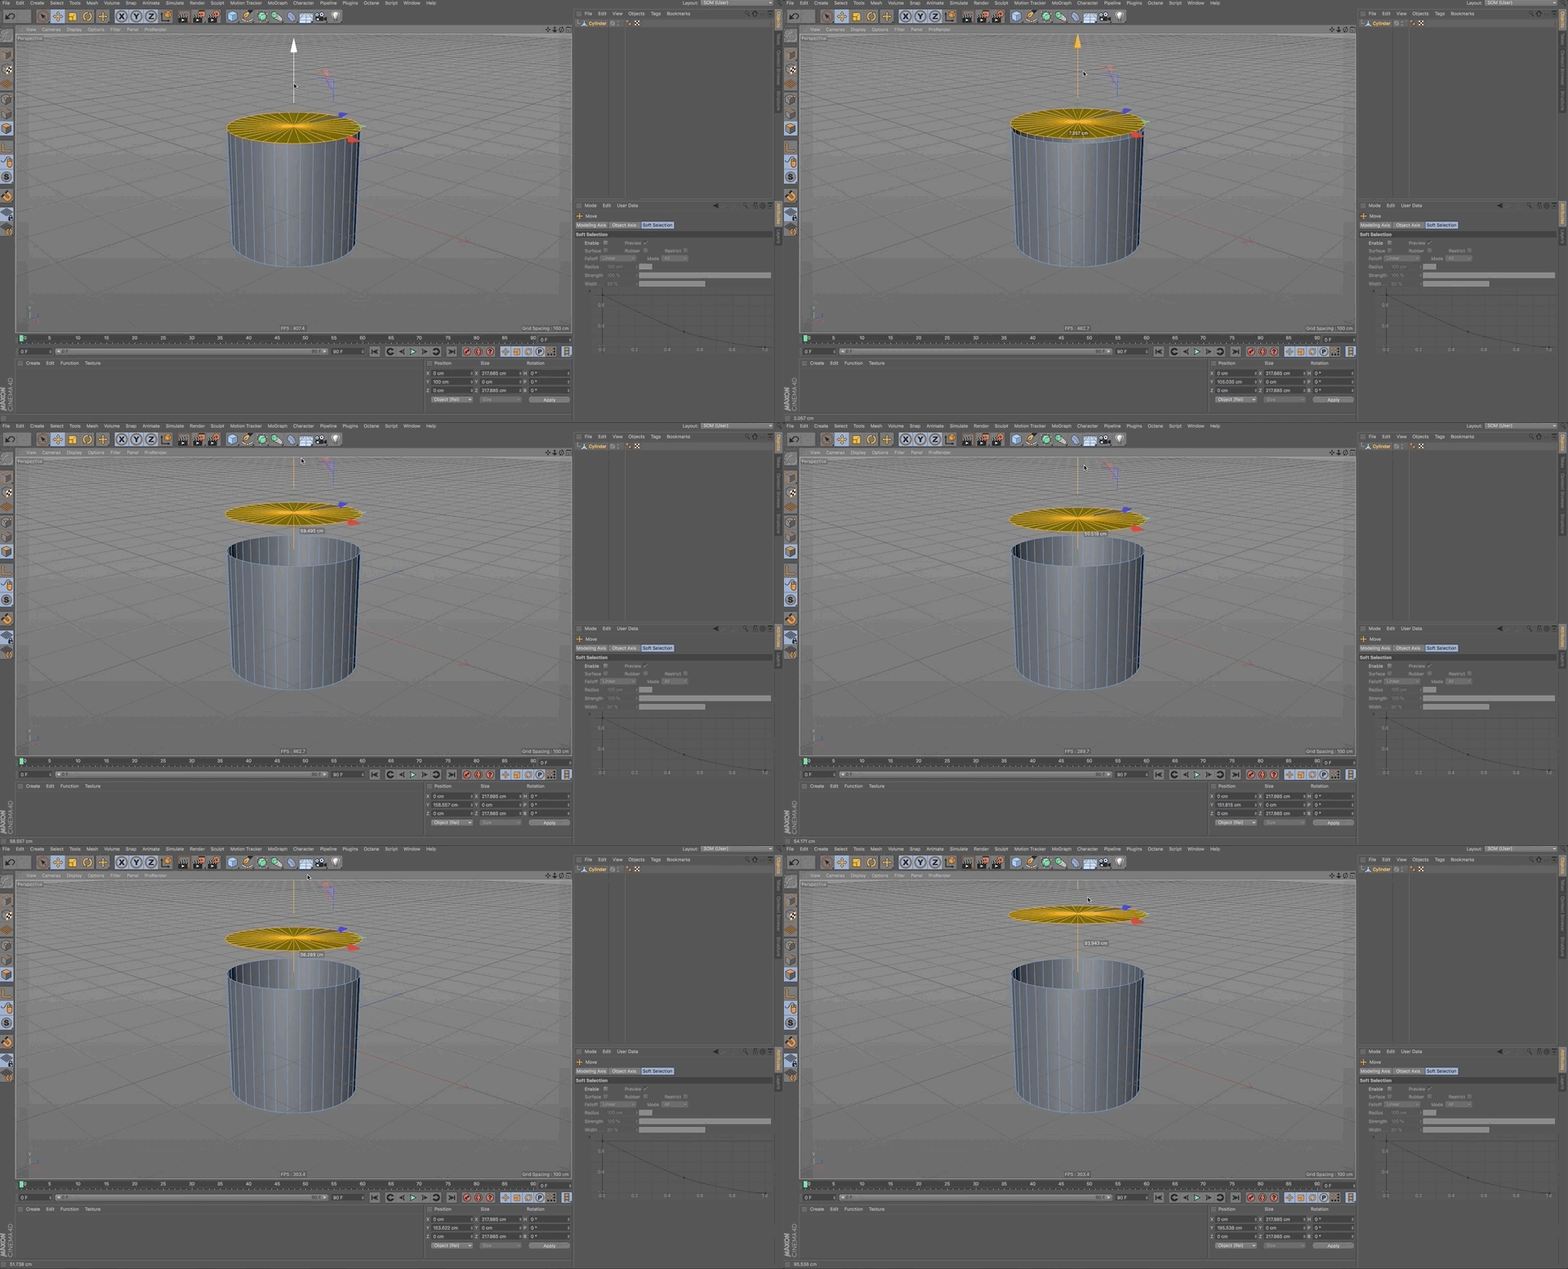
Ever popped a cap in Cinema 4D? You're not alone.
Fortunately, the previously painstaking work of editing 3D objects in this app has been significantly simplified in Release 21.
No longer will you lose your cap when loop-selecting it and extending the shape:
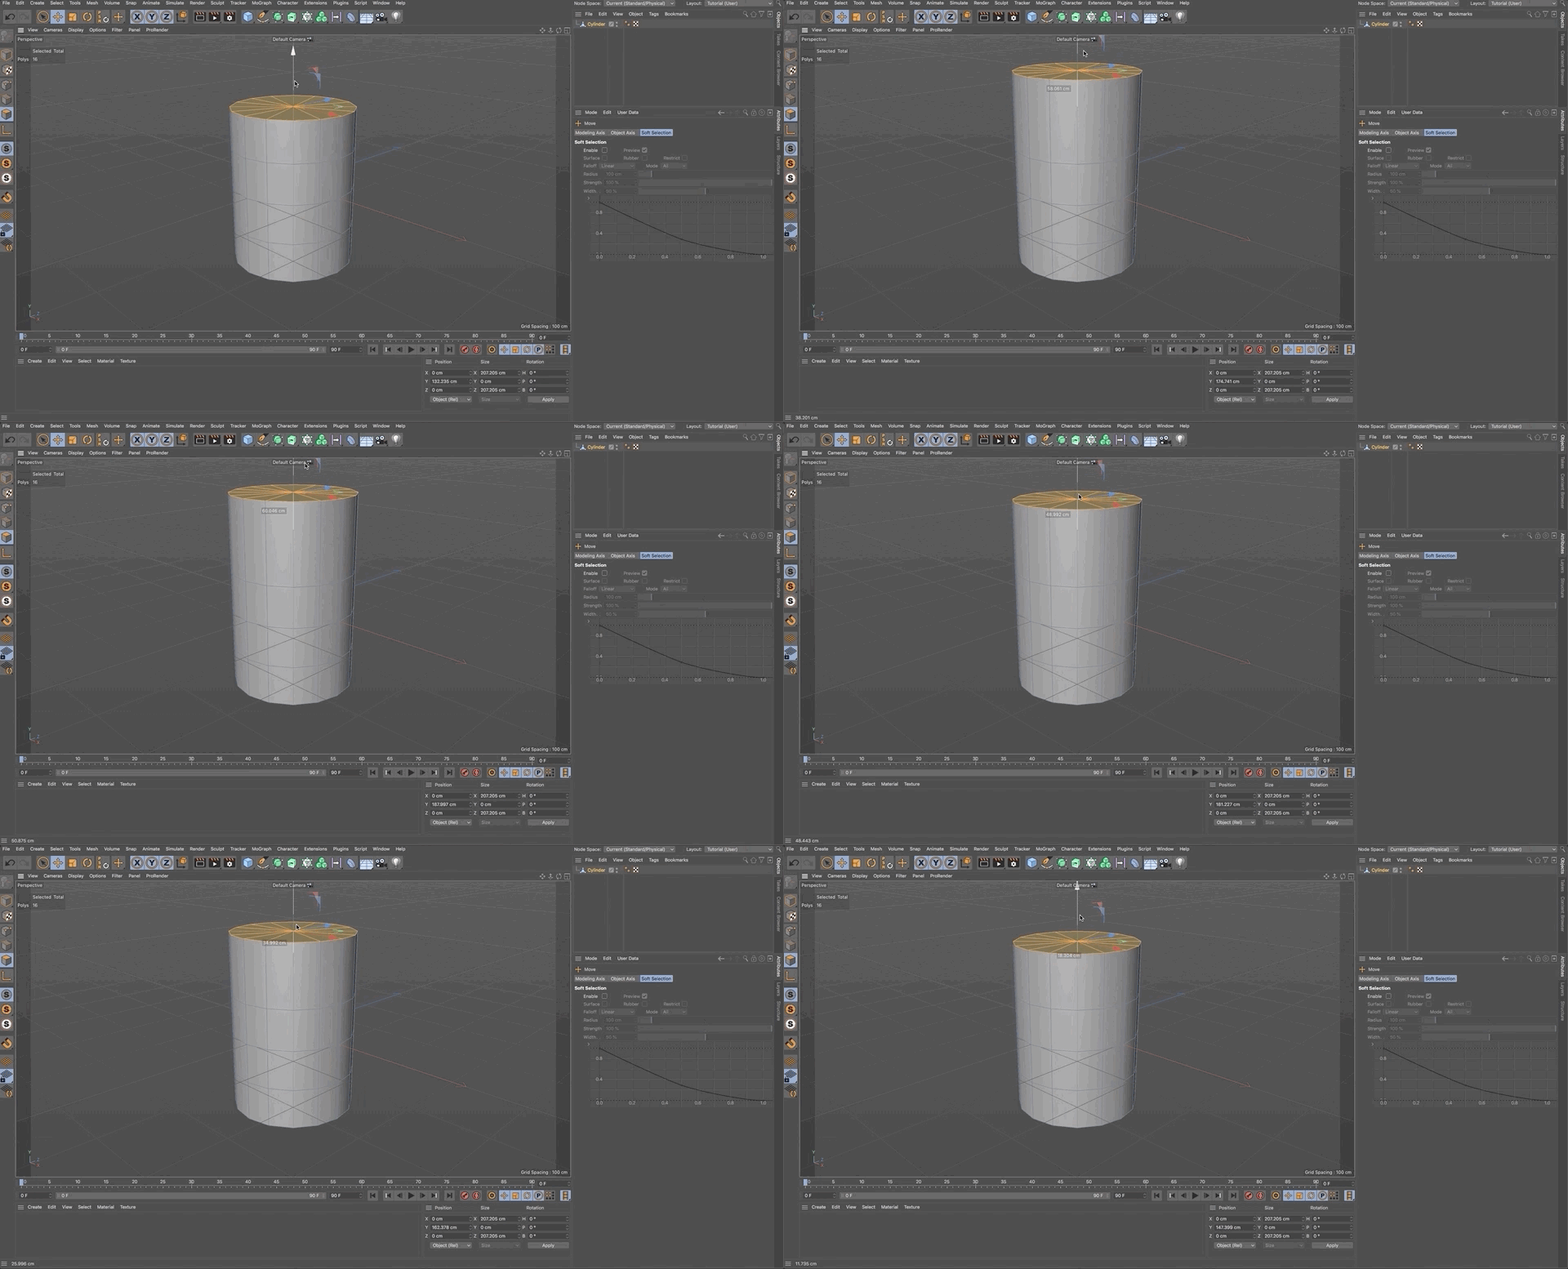
In R21, your cap remains properly attached to your object:
SHADING SECTIONS IN CINEMA 4D R21
Adding shading to your object is a pretty standard step in 3D design, but in past releases Cinema 4D required you to manually input code snippets in the Selection field to assign a shader to a specific portion of your work.
Now, all you have to do is enable a specific selection in the Selection tab and then drag and drop it into your shader's selection field. Cinema 4D R21 will do the rest, automatically applying it to the selected region of your object:

You can even choose between Polygon and Edge Selections.
Mastering Cinema 4D R21
Adding 3D to your toolkit is one of the best ways to up your value and expand your capabilities as a motion designer.
With the new pricing options and enhanced features of Cinema 4D, there's never been a better time to master the world's leading 3D animation software — and there's no better way to learn than with School of Motion (97% of our alumni recommend us!).
CINEMA 4D BASECAMP
Taught by our very own EJ Hassenfratz, who helped us review Cinema 4D R21 and created today's Caps and Bevels Tutorial, Cinema 4D Basecamp will have you utilizing Cinema 4D like the pros.
Plus, when you sign up for a session of Cinema 4D Basecamp, Maxon will provide you with a short-term license of Cinema 4D for use in this course!
Learn More About Cinema 4D Basecamp >>>
FREE TUTORIAL: CREATE A CLAYMATION IN CINEMA 4D
SOM founder and CEO Joey Korenman created a tutorial that'll teach you how to make a shader that looks like clay, and animate something that looks like stop motion — all in Cinema 4D.
-----------------------------------------------------------------------------------------------------------------------------------
Tutorial Full Transcript Below 👇:
EJ Hassenfratz (00:00): Cinema 4D the Caps on bevel system gets a much needed facelift and it makes creating beautiful texts, a snap let's check it out.
EJ Hassenfratz (00:21): And this video I'm going to be covering one of the big new updates, the cinema 4d R 21 in that is caps and bevels and how it totally can change the way that you work with not only three texts, but generator, objects like extrude and sweeps objects. Now, if you want to follow along with what I'm working on, be sure to download the project files. The links will be in the description below. All right. So let's dig into the new caps and bevels in our 21, and I'm going to use a MoTeC subject cause that's kind of like the most obvious use case for the new capstan bevels, but keep in mind that you can also access these same cap controls and cap updates in extrudes or sweeps here. So I'll cover that a little bit later, but just want you to be aware that the new caps in bevels are not just limited to mow techs.
EJ Hassenfratz (01:10): Okay. So I'm just going to delete those too, but let's go ahead and dig in here. And one of the biggest things is if I want to have just a rounded bevel, this is kind of the default, uh, bevel shape. I just go in just click and drag and adjust this size and you see, we have a nice rounded bevel and it's applied to the front and the back. Now you might think like, oh, woopty, do what's the big deal with that? Actually, that's pretty huge because if you remember in our 20 and below, let me just jump into our 20 here. If you wanted to add a nice round bevel to the front and back of your, uh, Motech subject, you have to go into the caps and remember the start and end caps were separated and you'd have to go to fill it cap on the one, fill the cap on the other one.
EJ Hassenfratz (01:54): And if you wanted to adjust each of these options, you'd have to do that for each of the start and end. So it was a lot of just manually changing things, making sure that everything was kind of matching. And there's just so many settings that you had to take care of. Meanwhile, in our 21, they're fused together, they're mirrored. You can control both your start and end caps at once and get really nice. Bevels really easily. Okay. But if you want to have those separate bevel controls, you can still separate them by just checking on the separate bevel controls. And you can go knock yourself out by applying different bevels on your front and back end. So that's a big like quality of life, kind of a enhancer there. Um, but one thing that's really cool is we have the size here. We can adjust the shape depth so we can actually get like more of an inner bevel kind of going on.
EJ Hassenfratz (02:47):
So you can see here, nice concave kind of deal there. We can also adjust the segments. And again, this is going to control both the segments on the front and back. If I just go into my, uh, garage shading lines, you can see all those segments there and there's the shape depth I can get this really nice concave bevel or, you know, bloated out a convex bevel, lot more control there. Uh, another cool thing is the ability to get a step type of bevel shape. And let me just get out of garage shading lines here and here, you can see that we have all these different segments or steps of that stepped bevel shape. So we can go like really cool, like art deco kind of thing, and adjust the size here. And you're going to see that we have this a new way to calculate the, uh, bevels here.
EJ Hassenfratz (03:42): Let me just go and grab this SSO so we can really see what's going on here, but we've got all these really cool stepped bevels and again, you can control however many you want and again, get really cool like art deco kind of stuff. You're going to see as I crank this up, we're actually not going to get all those really weird jenky edges that used to have to watch out for in the past. And when I say jenky edges, I'll show you what they look like, because what is new in our 21 is the ability for the new caps and bevels to avoid self intersections. So if I check this off, you can see all these points kind of going out all over the place. And this is how bevels were calculated in order versions. But with this new calculation, we can crank up this bevel size as much as we want, and we're not going to get those weird kind of jaggy points, jutting out all over the place.
EJ Hassenfratz (04:35): So let me just jump back into our 20 and show how limited the Phillip types were or the bevel shapes were. So I just showed you how you could add like a whole bunch of different steps in all versions of cinema 4d. You had one step or two step in that was it. You couldn't do three, couldn't do four. So again, just kind of, it's kind of amazing how limiting the old bevel system was in comparison to our 21, where you can crank up however many steps that you want. So steps really cool. Uh, one of the most powerful features though, uh, as far as the bevel shape goes, is this curve now right away, you can see that if I crank up this size all the way we get this really nice chiseled tax, which is huge in its, in its own, right? Because chiseled texts was something that you would have to model from scratch.
EJ Hassenfratz (05:31): And actually one of my very first tutorials was how to actually do that. And there's a whole bunch of steps. And you had to know some modeling techniques, but no, not any more. You just basically crank up the size all the way it can go. And there you go, you got beautiful chiseled texts, again, both on the front and the back. And that's with just the standard linear, uh, Bezier curve in this curve editor. But one of the coolest things about this curve editor is that I can command or control, click and add points and just kind of click and drag here and get this like wavy kind of thing going on and check that out. We can actually control the bevel profile by just clicking and adjusting all these points in this little spline editor here. Okay. So really cool stuff. So, I mean, we want to do something like this.
EJ Hassenfratz (06:23): Let me just grab this point, maybe delete that point, but we've got this nice little kind of wavy thing. And if we up the segments, we can smooth that out a little bit too, so we can adjust both the size of that bevel, how far that goes, something like that. And you can see what we got going on there, and we can also adjust the sheep depth as well. So how far out that bevel is going? So really cool stuff. The ability to be able to do something like this was previously not, uh, able to be done at all, uh, unless you just kind of used a sweep object and made your own, uh, profile spline or something like that. So this just is massive as far as, uh, control goes. And one of the cool things that was added to our 21 was if you right, click in this, uh, area here and let me actually just move this on up.
EJ Hassenfratz (07:16): But if you right click there's these new functions that you can, uh, execute in the curve editor and the first one's double. And if I just do that, you can see it just doubles up that curve. Let me just go ahead and undo that. So it just doubled up this entire curve that we had. Okay. So let me do that again. So let me right click go to double. You can see that my curve just kind of repeated, let me go ahead and undo that and let's check out the other new function, which is Symmetra rise. Say that five times fast, but Symmetra is basically mirrors your spline. So you can weight more easily create very complex bevel profiles, which is really, really cool. So in addition to, you know, being able to have full control over what your bevel profile spline looks like in this busy, uh, spline curve editor, we can also load up a bunch of handy-dandy presets.
EJ Hassenfratz (08:13): Isn't that fancy. So we'll go ahead and load up some presets. You can see all these really cool preset, uh, shapes we have. Uh, one of the nice things is we have the ability to do these like inner bevel, inner chisel kind of things. And we can adjust how much we want a VAT by using the shape depth and the size. So really cool, kind of like inner bevel shape. We got let's go and check out another preset. Uh, here is, uh, shifted bezel. Again, you can see the profile curve spline in this little curve editor, but just really great stuff. Let's go load up another one. Let's do a step. And this, the difference between this one and just the other step one is we have, if I just increase this, we have these nice curves. And when you apply reflections or reflective materials to this, this is really going to catch the highlights of your, your lights and stuff, and have a lot more smooth edges to catch more of those nice reflections and catch the light.
EJ Hassenfratz (09:15): So really nice stuff that you can go ahead and do that. You can also save your own presets. So if I right click and reset to default, and let's just say, I got something like this and I'm like, yeah, that's really cool. Many use this a lot. So I'm just going to go ahead and click save preset and sure. That could be me and this could just be, you know, a test and hit. Okay. And then when you go into the load preset, you, there we go test. I can easily apply that. Let me just reset the default and actually show how you can apply that. So here we go. There's the test and there is my saved awesome bevel. I should have named it. Awesome bevel. Uh, I missed my chance, but there we go. We got this really, really cool bevel shaped going on.
EJ Hassenfratz (10:01): So this is huge. Uh, I just want to show you how big it is, because again, if we jumped back into our 20, there's absolutely no option to create your own bevel, uh, profile shape. Okay. You are limited to just these fill it types here. So huge updates to the caps and bevels here. Uh, again, one of the biggest things is this avoid self intersection because before you'd really have to watch how big your bevel size was. And again, if you didn't, you'd get these jenky edges, let me just go and show an AR 20 again. So if I just go ahead, let's constrain and make these bevels really big. Again, there is no way to avoid that. You'd basically just be limited to, you know, uh, you know, I'm limited to this, like I'm limited to five centimeters because any more you'd get these, this intersection.
EJ Hassenfratz (10:55): So it was so limiting the old cap system. So I just, I love showing the old way and the new way, because it is quite an update to this whole cap and bevel system here. But again, I want to show how this isn't only limited to Motech. So here, I just have some paths that I brought in from illustrator that I'm going to use an extrude object on. So again, this could be your own logo, whatever you want to do, but here I have this like called game of Thrones style, school motion, uh, logo. And basically if I want to chisel this, have that really nice, cool medieval chisel, fancy, you know, Harry Potter chisel kind of stuff. All I have to do is up this size, adjust the shape depth they get. If I go into my garage, shading lines here and just kind of see a good like profile, uh, view here, you can see, I can make this kind of like a concave shape, a chisel or a convex chisel.
EJ Hassenfratz (11:52): And again, uh, let's just up the segments here, make this really nice and smooth. So there we go, a really nice chiseled edge. Let me get out of this garage shading lines, but that's, that's how easy it is to get this really nice chiseled shape. Now we have some thickness to our, uh, extrude here. So let me just go ahead and get rid of it. Whoop. Let's not do that, but just give it a, a movement of zero. So zero extrusion, and you're going to see that, that just kind of flattens everything out. So a little gotcha. Is that if you want really nice chisel and you want it on both sides and basically no extrude at all. Okay. So what you're going to have to do is just put any very small value, like 0.0, zero one hit enter, and now you have this really nice sharp chisel with no extrude depth or anything like that.
EJ Hassenfratz (12:46): Again, just putting in that very low value, and now you can adjust this however much you want. Okay. So really, really nice stuff. Be able to have so much control now over your a chisel or a bevel shape. So we can get, if we get the shape depth of zero, or even if we change this to curve, we've got this nice chiseled curve, it's move this on up. And here, we're going to have to adjust the shape depth here to a hundred percent. And now we've got this really super sharp, uh, chiseled curve. And if I command click anywhere in here, we can control this own, like our own concave kind of inner chisel, uh, going on here as well. So just so much control, really huge. Uh, this is something that I wish I had a long time ago when I worked on 3d texts all the time when I worked at a news station, animating NBC logos all over the place.
EJ Hassenfratz (13:42): So just so, so much flexibility and control here over your bevels. Hopefully see a lot of people making really cool beveled, text and logos and stuff like that now. Uh, but the one thing I also want to show, if I go back to my initial example, here was I got this wacky bevel curve going on. Remember that was my awesome curve that I saved. Uh, I want to show that, you know, this is we're using Gotham as a font, right. But what if we choose something else, like let's do something wacky, uh, let's do this felt pen for no reason whatsoever. You're going to see that this still holds up. Okay. So the great thing about, uh, the new bevel feature is that this works and holds up. Well, no matter what kind of font you're using. Okay. So again, because of that, uh, avoid self intersections.
EJ Hassenfratz (14:37): We're not going to get any of that. Junkiness happening on our, uh, geometry here. So we can have full flexibility to use whatever font we want, uh, without needing to, you know, be worried about like, oh no, is this font gonna work? Okay. Uh, with, with this chisel or this bevel or anything like that. So here is, uh, you know, uh, uh, font with Sarah on it. And you can see that this holds up very well. If I, let me just reset this to default, if we want to make a chiseled, uh, Sarah font, we can do that very easily. Again, not having to worry about any of those jenky edges that we would typically have. Okay. So this is just, again, so much flexibility, not limited to whatever type of a font that, uh, you might want. Uh, really just that the possibilities are really endless.
EJ Hassenfratz (15:35): And let me, one of the, one of the fonts that I really like was this croquette really nice stuff. And if you get this nice little, very graphical kind of font, and if I just adjust the size, we get this really nice chisel just automatically. And I rented a bunch of different examples of this as well, uh, for this tutorial. But again, if I want just, uh, no extrusion whatsoever, go to the depth and if I hit zero again, it's going to flatten everything out. But if I go 0.001, that's the secret sauce right there to get this really sharp razor, sharp edge on your chiseled texts and all that good stuff. So another big, uh, quality of life enhancement as far as caps go are with sweeps. So, uh, one thing I would do a lot is I'd sweep a circle along a, uh, another circle or another path, another spline.
EJ Hassenfratz (16:31): And what if you just wanted nice rounded edges on this? So what I'll do now with the new updated caps and bevels is just crank this all the way up to 100 in Wala. You just crank up the segments too. So if we had very low segments, all we'd have to do is just crank this up all the way to maybe, you know, 15 segments, we get this nice, smooth, rounded edge there. Now this might again, might not actually make you go, wow, that's cool. But let me show you again, let me show you how you had to do it before an older version. So here we are our 20 GaN. If we wanted to add nice rounded, bevels, we'd have to go to fill a cap, fill the cap, and then we have to guess how big our radius could be without going with this, getting this janky a result there.
EJ Hassenfratz (17:20): So you'd have to really eyeball it and be like 111, and then really crank that up. And then 111 here, and then really crank that up there. And again, like, no, that's actually not 111. We need to bring this back a little bit. Maybe it's 82 and we'll bring this back to 82. Uh, what if we want to change the size here, we have to then adjust this as well. And we got to go change this and then change this again. And this illustrates how much of a pain in the butt this used to be. If I go ahead and I adjust the radius here, make it a little bit bigger. I just make this value even bigger here as well. So like 150 and wildlife, like so huge. Time-saver when using sweeps, uh, again with extruded, same kind of thing. Uh, just anything with this caps option, uh, going on here.
EJ Hassenfratz (18:14): So, uh, you know, lofts, there's also caps with lofts. There's also caps with waves. So all these generator objects that create geometry based on splines have this new updated, uh, bevel feature, which is really, really nice. So again, we can even go into this sweep, say, we don't want round. We want curve. We can just go in here and just start adjusting this however we want and just do some nice, uh, modeling here, which I don't know what this would actually be, but, uh, yeah, just something like that. Maybe it's a cran, we've got a cran going on there. So we got the cran little tip and it's bent, right? So we'll just delete that and we can give a nice little cran shape. We'll at that adjust the shape depth here. You make the circle a little bit bigger. So there's our, our cran that we can then go in and adjust however much we want just the shape depth here too, and get that the model, the type of shape that we want.
EJ Hassenfratz (19:18): Now, you're going to see why we have this little line here and that's from this brake Fong rounding. If I uncheck that, you can see, we have a much smoother unified kind of shape going on. So a little, uh, helpful thing to know about that. Breaking the Fong rounding there and bevel outside, just kind of thickens everything as you can see, uh, just uncheck that. So a lot of really cool flexibility, again, maybe for this, uh, we want to adjust the end cap, uh, differently. So we'll go and separate bevel controls, and we'll just add some nice round us, uh, roundness to the, uh, the end cap there. So really cool stuff. So much more flexibility. Hopefully it's kind of drives home a lot of the changes and how, you know, if you were poo-pooing caps and bevels before maybe this opens your eyes to like, Hey, actually, this is a really cool feature.
EJ Hassenfratz (20:11): So one other thing that's really nice about caps in general in our 21 is how it's handled when you make an object editable. So in the past, there used to be a create single object in your caps tab. And if I just jump back into our 20, you can see this create single object. And basically what that would do is if you made this editable and then made this, uh, child, and then if you made this other object editable, you would have a fused cap and extrude. Now, if I went ahead and undid that and uncheck this and made this editable and then made this other extrude object editable, you'd see that the caps in the rounding would be separate objects. See how it explodes out like that nine times out of 10, you would not want that kind of behavior. You want everything to be fused together.
EJ Hassenfratz (21:03): So in our 21, that's the automatic, that's the default functionality of making an object editable. If I make this editable and then make this extruded editable, you can see it's already creating this as one single object, another area where this is super handy. And this is something that would annoy the heck out of me is if you made a cylinder and you made this editable, right, and you wanted to say, do a loop selection and move this up or down, that would actually be separate. Okay. So let me go ahead and show you how that worked before. So this would drive me nuts. You'd make this cylinder editable. Okay. You go and do the same thing. I just showed you. You grab that loop selection and you're like, I just want to move this up. What the heck? So the default functionality in older versions of cinema 4d is that the caps on a cylinder would be separate.
EJ Hassenfratz (21:57): So you'd have to do something like select all of your objects, right? Click go to optimize. Then do you loop selection and then move this up or down without having that cap just kind of be disconnected and fly off all over the place. So again, a lot of quality of life enhancements in our 21 being another thing you're going to notice, and this is just a general, a cinema 4d AR 21 is the primitives have different segments by default. So they're a lot less dense as far as subdivisions, as you can see here, we have a lot less subdivisions for, let me just grab another cylinder here. So we have the height segments of four rotation, segments of 16. If we go and check out what the default cylinder settings were in previous versions, you can see that it's a height segment of one and rotation segments of 36.
EJ Hassenfratz (22:51): So just some subtle things that you'll see as you start getting your feet wet in our 21. But that default, uh, create single object. Being a default functionality is a small thing, but a big, uh, workflow enhancer. We don't have to, you know, deal with, uh, separate caps flying off or anything like that. So one last thing I want to cover. That's a really cool enhancement is in the past, if you want to do apply, say a different material, like let's just make a red material here and you wanted to place this on just the rounded bevel of your object. You'd have to go on that material and remember what the selection was. So our one was for the front cap rounding. Okay. And then if you wanted to actually be the front cap, that's actually C1. And if you didn't know that, uh, you could easily be really confused as to like, how can I isolate and apply materials to just specific areas on my texts?
EJ Hassenfratz (23:50): Well, in cinema 4d, art 21, there's this new selections tab that is very helpful for if you ever forget, uh, what those different, uh, polygon selection letters and numbers were. Okay. It's like the secret secret codes to, uh, getting these materials to certain parts of your object. So if I want to be start bevel to be a selection, I'll just check that on. That's going to create the polygon selection. And then now all I'd have to do is drag and drop that into that selection. While, uh, we have the R one selection, let's go back to our MotoX tax. Maybe we'll, uh, do shell what's the shell. Well, the shell, if we drag and drop the shell in there is the actual extruded part of your object. And in addition to, you know, having all these different selections available, there's also these edge selections as well.
EJ Hassenfratz (24:44): Okay. So we can enable all of those a start and end cap edges to be able to do whatever you want with that as well. Okay. So cool little enhancements all over the board that add up to being a major new feature to our 21 that hopefully you get a lot of use out of and you enjoy a ton. So captain Babel is pretty dang cool. Right? We're going to have more tutorials about some of the other cool new features in our 21, like field forces and the mixing middle control rig in the near future. So be sure to stay tuned for that. Now, if you want to keep up to date with all the latest news in cinema four D M the MoGraph industry in general, please subscribe and I'll see you in the next one. See ya
ENROLL NOW!
Acidbite ➔
50% off everything

ActionVFX ➔
30% off all plans and credit packs - starts 11/26

Adobe ➔
50% off all apps and plans through 11/29

aescripts ➔
25% off everything through 12/6
Affinity ➔
50% off all products

Battleaxe ➔
30% off from 11/29-12/7
Boom Library ➔
30% off Boom One, their 48,000+ file audio library
BorisFX ➔
25% off everything, 11/25-12/1

Cavalry ➔
33% off pro subscriptions (11/29 - 12/4)

FXFactory ➔
25% off with code BLACKFRIDAY until 12/3

Goodboyninja ➔
20% off everything

Happy Editing ➔
50% off with code BLACKFRIDAY

Huion ➔
Up to 50% off affordable, high-quality pen display tablets

Insydium ➔
50% off through 12/4
JangaFX ➔
30% off an indie annual license
Kitbash 3D ➔
$200 off Cargo Pro, their entire library
Knights of the Editing Table ➔
Up to 20% off Premiere Pro Extensions
Maxon ➔
25% off Maxon One, ZBrush, & Redshift - Annual Subscriptions (11/29 - 12/8)
Mode Designs ➔
Deals on premium keyboards and accessories
Motion Array ➔
10% off the Everything plan
Motion Hatch ➔
Perfect Your Pricing Toolkit - 50% off (11/29 - 12/2)

MotionVFX ➔
30% off Design/CineStudio, and PPro Resolve packs with code: BW30

Rocket Lasso ➔
50% off all plug-ins (11/29 - 12/2)

Rokoko ➔
45% off the indie creator bundle with code: RKK_SchoolOfMotion (revenue must be under $100K a year)

Shapefest ➔
80% off a Shapefest Pro annual subscription for life (11/29 - 12/2)

The Pixel Lab ➔
30% off everything
Toolfarm ➔
Various plugins and tools on sale

True Grit Texture ➔
50-70% off (starts Wednesday, runs for about a week)

Vincent Schwenk ➔
50% discount with code RENDERSALE

Wacom ➔
Up to $120 off new tablets + deals on refurbished items


