Learn After Effects the Right Way
Master the After Effects interface and build a real animation skillset. Enroll in All-Access to unlock AE Kickstart and 50+ other courses.

Save all the textures, gradients, and grain from Affinity Designer in a PSD file for your Adobe After Effects animations with this handy guide.
Having the ability to scale your assets without losing any quality makes using vector graphics a great option in After Effects. However, by limiting your designs to vectors only, textures, gradients (if you convert to shape layers), and grain have to be added inside of After Effect.
With tools like Ray Dynamic Texture by Sander van Dijk the process of adding textures to your designs can be less tedious, but more a tool with even more granular control can help make your designs come alive.
If only there was a tool that could do both vector and raster work? Hmm...
VECTOR + RASTER = AFFINITY DESIGNER
Affinity Designer really starts to flex its muscle when the user combines vector graphics along with raster data. It’s like having Adobe Illustrator and Adobe Photoshop in the same program.
Let me show you how you can use this tool to export high-quality PSDs. To add raster (pixelation) data to your assets, jump over to the Pixel Persona.

Once you are in the Pixel Persona work space, the user is presented with additional tools, which include:
- Marquee Selection Tools
- Lasso Selection
- Selection Brush
- Paint Brush
- Dodge & Burn
- Smudge
- Blur and Sharpen
Many of the tools found within the Pixel Persona have a similar resemblance to Photoshop.

Using Brushes in Affinity
One of my favorite tools is the paint brush. The ability to add brush textures to my vector designs has been a powerful option. As mentioned in previously, there are third party tools that give users the ability to paint textures in Illustrator, buy my files quickly became very large (over 100mb) and the performance became prohibitively slow.
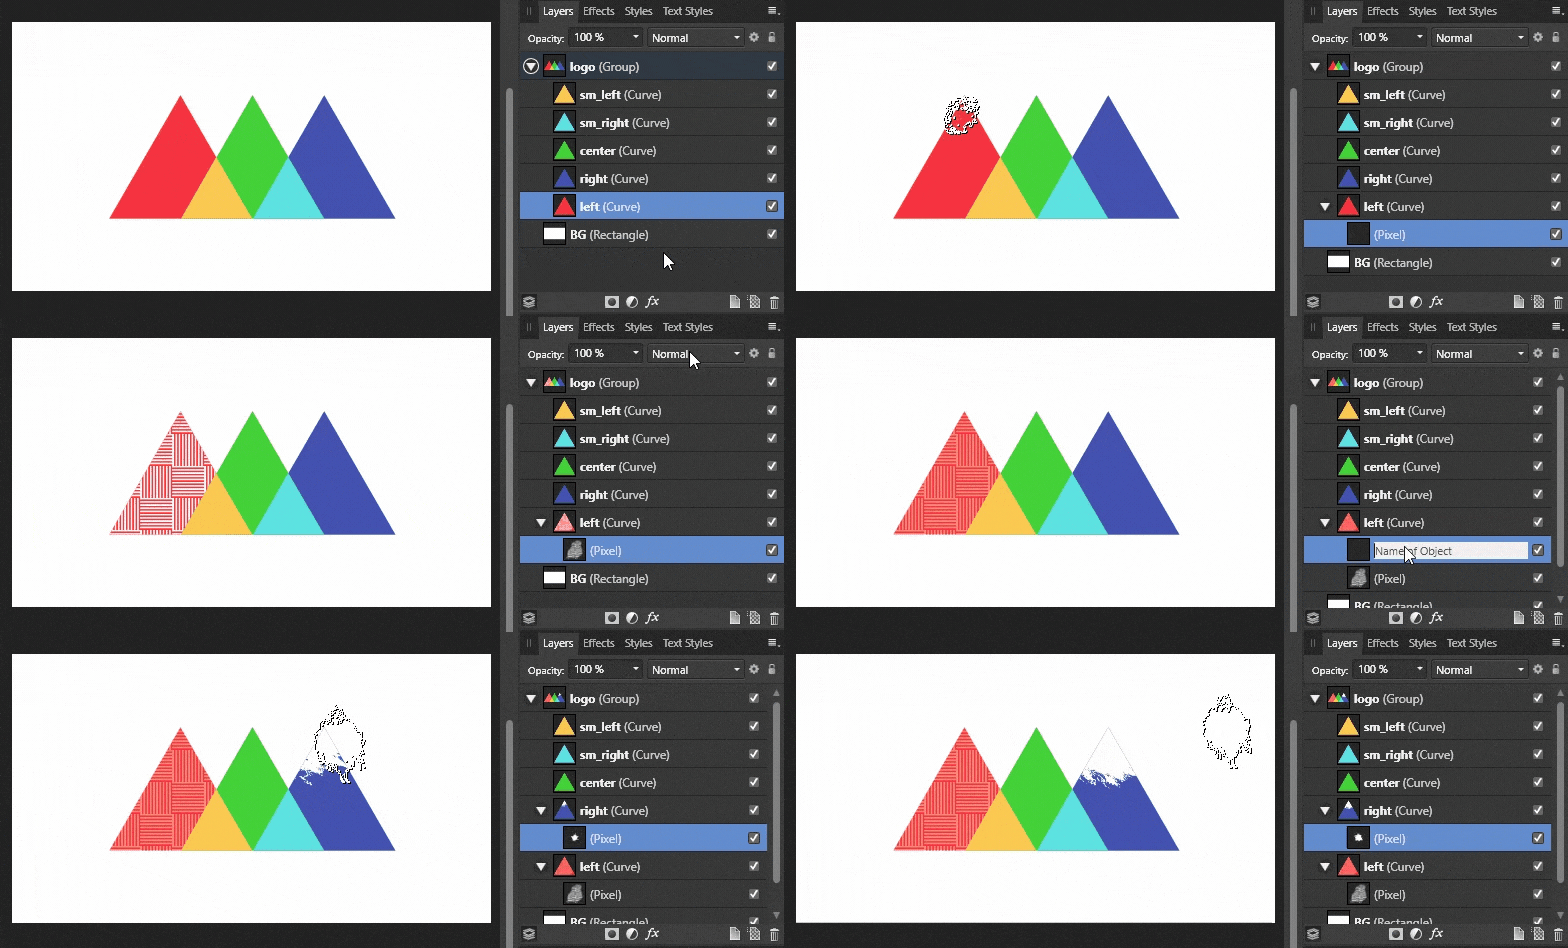
Due to the masking features in Affinity Designer, it is easy to keep your brush work inside of your vector layers. Place a pixel layer as a child of your vector layer and paint away.

The example above uses Pattern Painter 2 by Franketoon and Fur Brushes by Agata Karelus. For more brushes, check out the first article in this Affinity for MoGraph series to help you start building your brush library.
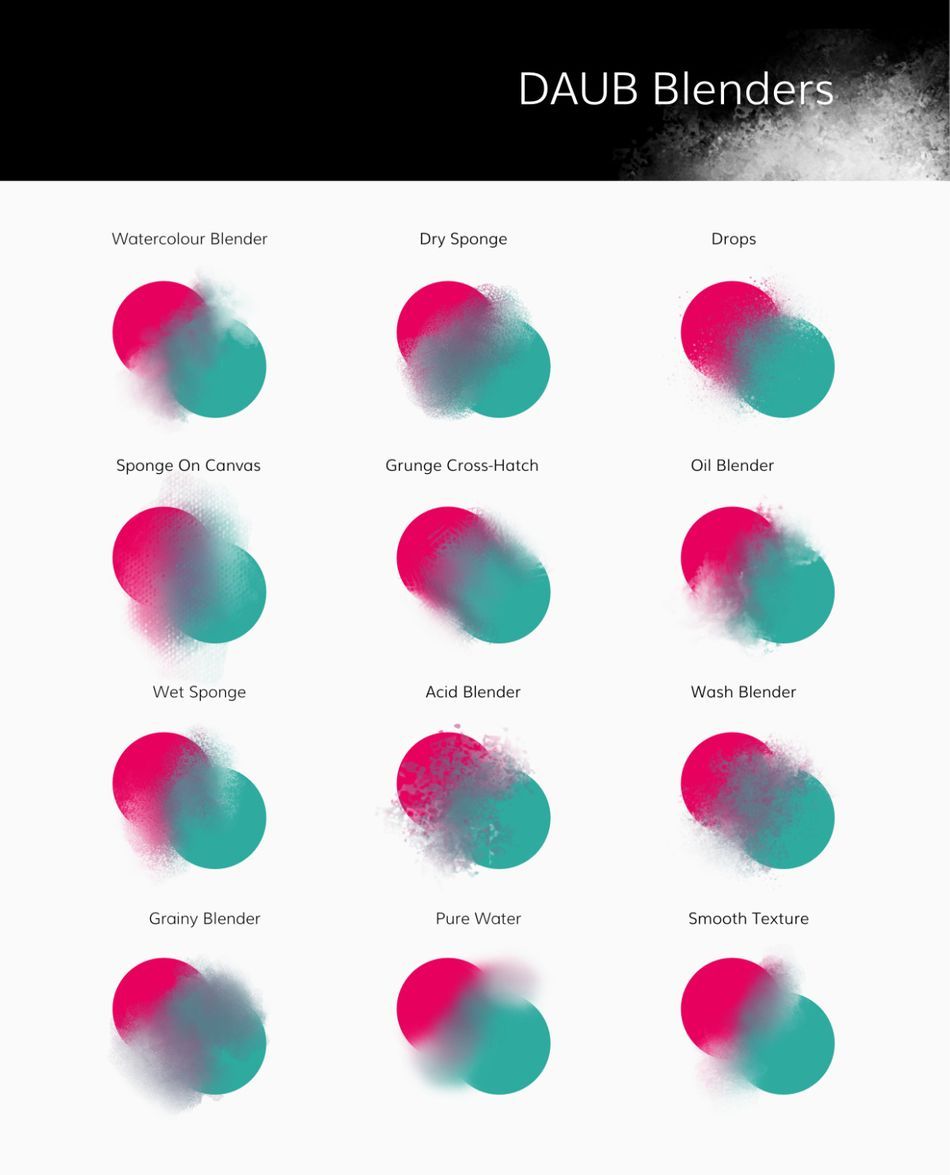
Once brush textures have been added to your design, you have more blending options using the smudge tool. The smudge tool gives the user the ability to blend your pixel-based artwork using any brush for more artistic style.
Here is a free brush set called Daub Blender Brush Set that was specifically designed for being used with the smudge tool. The link to the brush set also contains a video on how to install the brushes.

Layer Effects in Affinity Designer
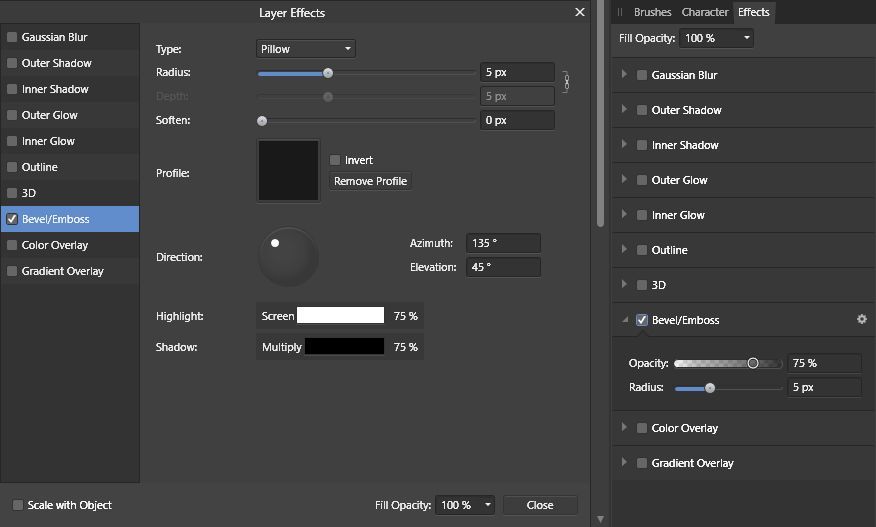
For even more options, layer effects can be added using the Effects Panel. In the Effects Panel, you have the option to apply the following effects to your layers/groups:
- Gaussian Blur
- Outer Shadow
- Inner Shadow
- Outer Glow
- Inner Glow
- Outline
- 3D
- Bevel/Emboss
- Color Overlay
- Gradient Overlay
At first glance, the Effects Panel looks basic, but be sure to click on the gear icon next to the effect name to open up the advanced options.

Exporting as a PSD from Affinity Designer
Once you have added raster data, effects, gradients, and grain to your design, EPS is not a viable export option. EPS only supports vector data. In order to preserve our design, we need to export the project as a Photoshop file.
The preset that you want to utilize for After Effects is “PSD (Final Cut X)”. In the next article we will look at more advanced options to help custom tailor how your PSD files are organized inside of After Effects.
In addition to keeping your design in tack, all the layer names will carry over to After Effects or Photoshop if you need to use additional tools found there. If you have Affinity Photo, you can also easily jump from Affinity Designer to Affinity Photo for more pixel based options.

Importing Affinity Designer PSDs into After Effects
When you import your PSD into After Effects, you will be presented with the same import options that would be present with any other PSD file. The options include:
- Footage - your file will be imported as one flattened image. You can also choose a specific layer to import.
- Composition - your file will retain all layers and each layer will be the size of the composition.
- Composition - Retain Layer Size - your file will retain all layers and each layer will be the size of the individual assets.

ENROLL NOW!
Acidbite ➔
50% off everything

ActionVFX ➔
30% off all plans and credit packs - starts 11/26

Adobe ➔
50% off all apps and plans through 11/29

aescripts ➔
25% off everything through 12/6
Affinity ➔
50% off all products

Battleaxe ➔
30% off from 11/29-12/7
Boom Library ➔
30% off Boom One, their 48,000+ file audio library
BorisFX ➔
25% off everything, 11/25-12/1

Cavalry ➔
33% off pro subscriptions (11/29 - 12/4)

FXFactory ➔
25% off with code BLACKFRIDAY until 12/3

Goodboyninja ➔
20% off everything

Happy Editing ➔
50% off with code BLACKFRIDAY

Huion ➔
Up to 50% off affordable, high-quality pen display tablets

Insydium ➔
50% off through 12/4
JangaFX ➔
30% off an indie annual license
Kitbash 3D ➔
$200 off Cargo Pro, their entire library
Knights of the Editing Table ➔
Up to 20% off Premiere Pro Extensions
Maxon ➔
25% off Maxon One, ZBrush, & Redshift - Annual Subscriptions (11/29 - 12/8)
Mode Designs ➔
Deals on premium keyboards and accessories
Motion Array ➔
10% off the Everything plan
Motion Hatch ➔
Perfect Your Pricing Toolkit - 50% off (11/29 - 12/2)

MotionVFX ➔
30% off Design/CineStudio, and PPro Resolve packs with code: BW30

Rocket Lasso ➔
50% off all plug-ins (11/29 - 12/2)

Rokoko ➔
45% off the indie creator bundle with code: RKK_SchoolOfMotion (revenue must be under $100K a year)

Shapefest ➔
80% off a Shapefest Pro annual subscription for life (11/29 - 12/2)

The Pixel Lab ➔
30% off everything
Toolfarm ➔
Various plugins and tools on sale

True Grit Texture ➔
50-70% off (starts Wednesday, runs for about a week)

Vincent Schwenk ➔
50% discount with code RENDERSALE

Wacom ➔
Up to $120 off new tablets + deals on refurbished items


Learn After Effects the Right Way

Master the After Effects interface and build a real animation skillset. Enroll in All-Access to unlock AE Kickstart and 50+ other courses.


