How to use Adobe Media Encoder on a Remote Computer to Render your Adobe After Effects Projects.
While laptops have become more powerful over the years, I find it frustrating to render projects on my laptop when I have a 8 core, 16 threaded computer sitting at home twiddling its thumbs. And while I like to hang out in coffee shops waiting for a render to complete so that I can hog all the available bandwidth from the substandard free wifi to upload my video, I would rather spend my time not tied to my computer.
Fortunately, Adobe Media Encoder can be used as a remote render farm for both Adobe After Effects and Adobe Premiere Pro. This article will focus on the former. It’s surprisingly easy. Let's dig in.
Advantages of the Cloud
While working on active projects, I always keep my entire After Effects project on Google Drive. Some of the advantages include:
1. PROJECT BACKUP
As project files are saved and assets are created, they are uploaded to the cloud providing three copies of the project (cloud, laptop, desktop).
For automatically syncing my computers with Google Drive, I use a third party solution called Insync. I have found it to be very reliable and provides more features than the stock solution from Google.

2. PROJECT VERSIONS
Each time a project file is saved, a copy of the project file is created. Therefore, if you didn’t increment and save your After Effects project file, you can still roll back to the saved state from an hour or a week ago.

3. SHARING
Projects and assets are easily shared with others from any computer, tablet, or phone.

How to Create a Remote Render Farm Using Adobe Media Encoder
Now that your project files are synced between your coffeehouse companion and your desktop computer, let’s configure Adobe Media Encoder to keep an eye out for our project file.
On the computer that you want to render the project, open Media Encoder and make sure that the Watch Folders panel is visible by going to Window > Watch Folders (Ctrl + 3).

Add a watch folder by clicking on the “+” in the upper left hand corner. Be sure to create a folder that is synced on your cloud storage. It can be any folder on the same cloud storage that your After Effects project is stored on.
Once you have created a folder, you can create default encoding settings for any project loaded into the watch folder. If you need multiple encoding settings, create one watch folder for each encode settings. If you need a single project rendered to multiple formats, you can also add additional outputs for a single Watch Folder.

Now open the Queue Panel (Ctrl + 1). Be sure to check the box in the upper right hand corner “Auto-Encode Watch Folders”. Otherwise the project will only be loaded to the Queue panel and not rendered.

While sipping on a pumpkins spice latte, let’s send your project to the desktop computer. In order to do so, the project panel in After Effects needs to be setup with the Watch Folder in mind.
When an After Effects project is added to the Media Encoder watch folder, it will render any composition in the root folder of the Project Panel. Therefore, if you don’t want a composition to be rendered, be sure to place it in a folder.

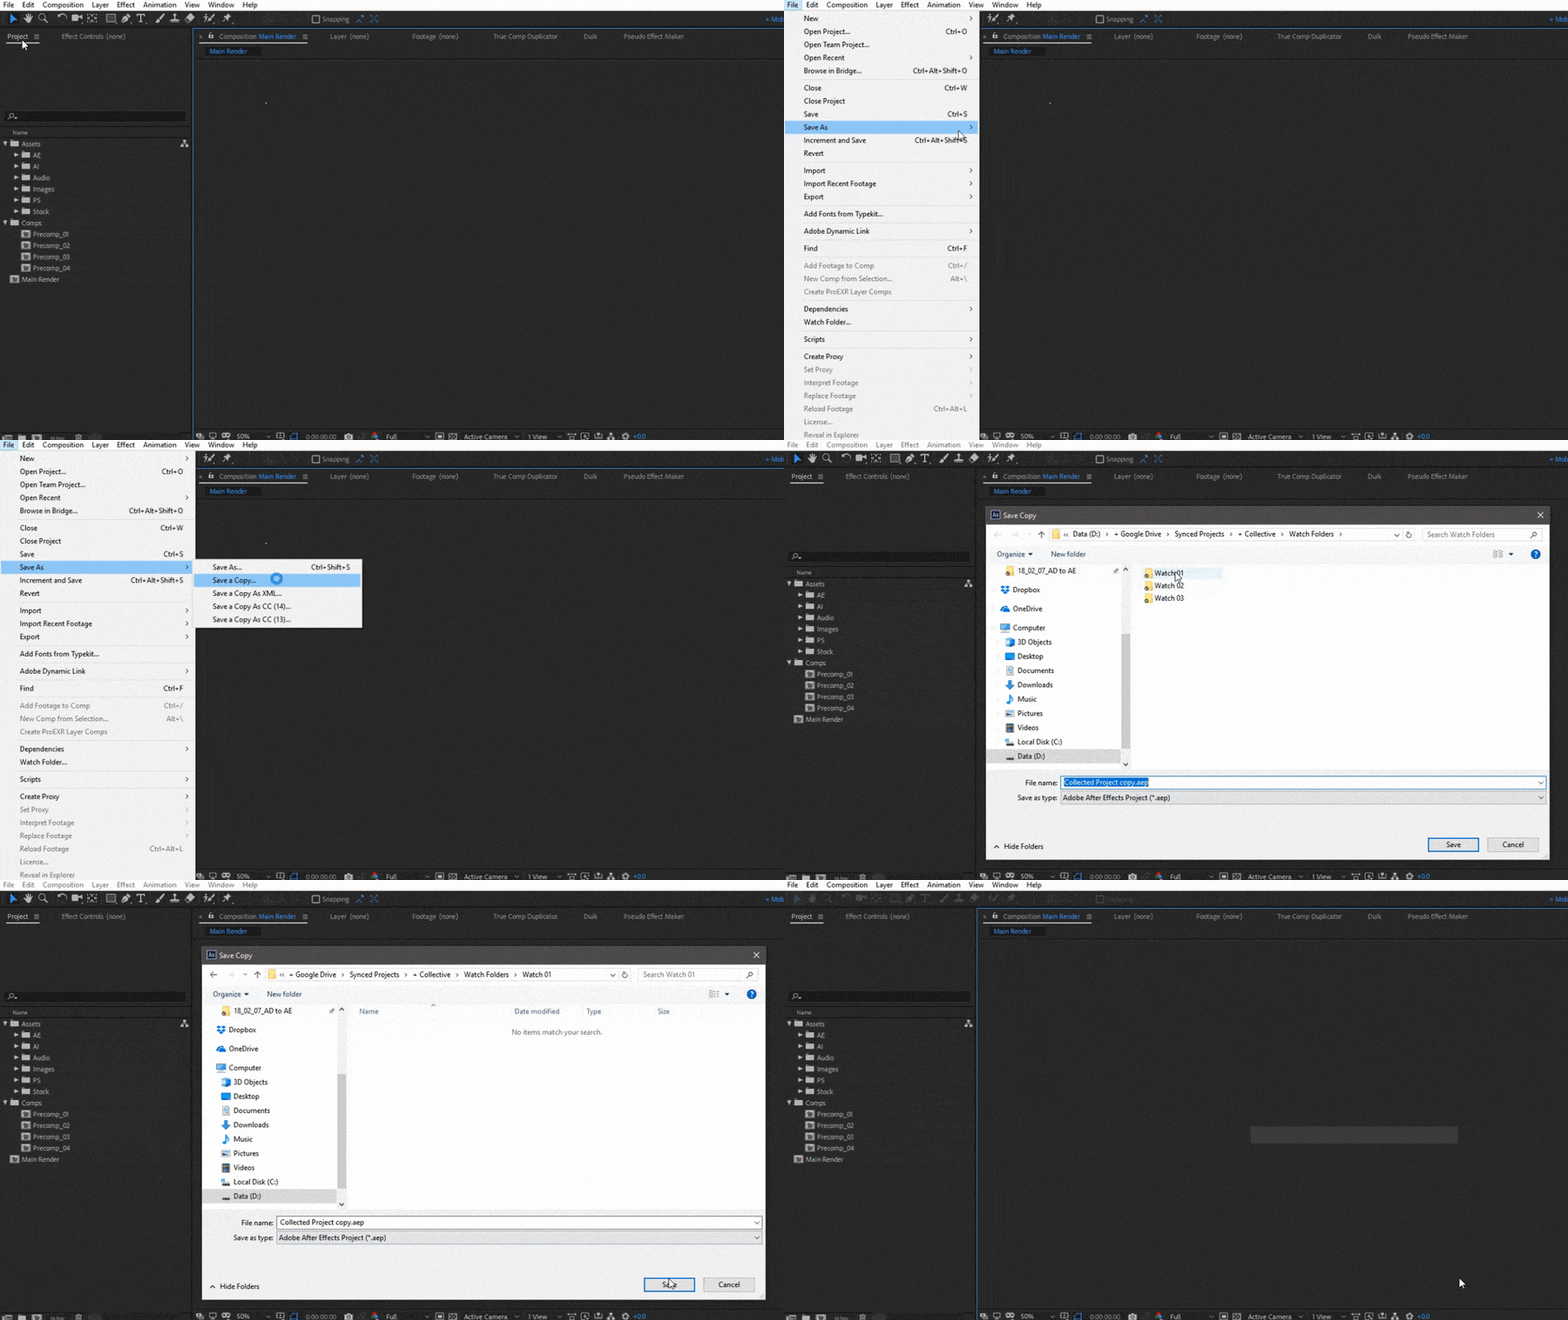
Save a copy of your project file to your Watch Folder. As long as all of your assets are saved on the network, all you need is the project file itself. Once the project file synced to the cloud network, Adobe Media Encoder on your desktop machine will get to work.

If you don’t have all of your project assets synced to cloud storage, you will have to collect all the files by going to File > Dependencies > Collect Files.


When you save the collected project to your Watch Folder, the project must be saved so that the After Effects project is in the root of the Watch Folder. Watch Folders won’t work with project files located in subfolders.

When After Effects collects files, it generates a report text file about the project. Be sure to discard it prior to placing your project in the Watch Folder because Media Encoder will try to render it using your encoding settings.
Once Media Encoder has finished rendering your project, two folders are created. Output and Source. The Source folder contains the project file that was rendered.

The Output folder is where you will find your rendered project file. Since the Watch Folder Output is located in a folder synced to the cloud, your file will be uploaded automatically making it available on your laptop or any other device that can access your cloud storage.
The only downside to using Adobe Media Encoder as a remote render farm is that your computer that you want to render the project file on has to be powered on with Media Encoder open. If you search for ways to remotely power on a computer and load an application at start, there are ways to accomplish the task, which fall outside the area of this article.
If you don’t have a second computers to utilize as a remote render farm, you could sweet talk a friend into setting up a shared folder on their machine to catapult them to best friend status. Regardless of who’s machine you are utilizing, using Adobe Media Encoder as a remote render server will give you more time to do the things you want instead of loitering at coffee shops...unless that’s your thing.
If you want to learn more about After Effects check out After Effects Kickstart!
ENROLL NOW!
Acidbite ➔
50% off everything

ActionVFX ➔
30% off all plans and credit packs - starts 11/26

Adobe ➔
50% off all apps and plans through 11/29

aescripts ➔
25% off everything through 12/6
Affinity ➔
50% off all products

Battleaxe ➔
30% off from 11/29-12/7
Boom Library ➔
30% off Boom One, their 48,000+ file audio library
BorisFX ➔
25% off everything, 11/25-12/1

Cavalry ➔
33% off pro subscriptions (11/29 - 12/4)

FXFactory ➔
25% off with code BLACKFRIDAY until 12/3

Goodboyninja ➔
20% off everything

Happy Editing ➔
50% off with code BLACKFRIDAY

Huion ➔
Up to 50% off affordable, high-quality pen display tablets

Insydium ➔
50% off through 12/4
JangaFX ➔
30% off an indie annual license
Kitbash 3D ➔
$200 off Cargo Pro, their entire library
Knights of the Editing Table ➔
Up to 20% off Premiere Pro Extensions
Maxon ➔
25% off Maxon One, ZBrush, & Redshift - Annual Subscriptions (11/29 - 12/8)
Mode Designs ➔
Deals on premium keyboards and accessories
Motion Array ➔
10% off the Everything plan
Motion Hatch ➔
Perfect Your Pricing Toolkit - 50% off (11/29 - 12/2)

MotionVFX ➔
30% off Design/CineStudio, and PPro Resolve packs with code: BW30

Rocket Lasso ➔
50% off all plug-ins (11/29 - 12/2)

Rokoko ➔
45% off the indie creator bundle with code: RKK_SchoolOfMotion (revenue must be under $100K a year)

Shapefest ➔
80% off a Shapefest Pro annual subscription for life (11/29 - 12/2)

The Pixel Lab ➔
30% off everything
Toolfarm ➔
Various plugins and tools on sale

True Grit Texture ➔
50-70% off (starts Wednesday, runs for about a week)

Vincent Schwenk ➔
50% discount with code RENDERSALE

Wacom ➔
Up to $120 off new tablets + deals on refurbished items


