A step-by-step guide to rendering After Effects projects with Adobe Media Encoder.
Like Pavlov's dog, you're probably programed at this point to salivate when you hear the render 'brrrrinnng' sound in After Effects. However, while it may be totally natural to want to quickly render your work directly in After Effects, it is actually a much better workflow to use Adobe Media Encoder to render out your projects. Adobe Media Encoder will save you time, flexibility, and it will also make it much easier to collaborate with others when you need to render a project.
But how is this done? In the following article I'll show you how to render out projects from Adobe Media Encoder.
What is Adobe Media Encoder?
Adobe Media Encoder is a video rendering application that comes bundled with After Effects in the Creative Cloud. AME (as the cool kids say) allows you to hand the rendering process off to another application, so you can keep working in After Effects while your compositions render in the background. This will allow you to keep working on your project instead of sitting around waiting for the render to complete, which means you'll need to find a new time to catch up on all those YouTube videos.
How to Export from After Effects to Media Encoder
Using Adobe Media Encoder to render out an After Effects project is surprisingly easy. Here's a quick breakdown of the process:
- In After Effects, Choose File > Export > Add to Media Encoder Queue
- Media Encoder will Open, Your After Effects Composition will Appear in the Media Encoder Queue
- Adjust your Render Settings via Presets or Export Settings
- Render
Now that you know the outline, I'll break down each step in a little more detail below.
STEP 1: SEND PROJECT TO MEDIA ENCODER
To send a project from After Effects over to Adobe Media Encoder you must add it to the AME Queue. Thankfully, there are a couple of ways to add your After Effects project to the queue.
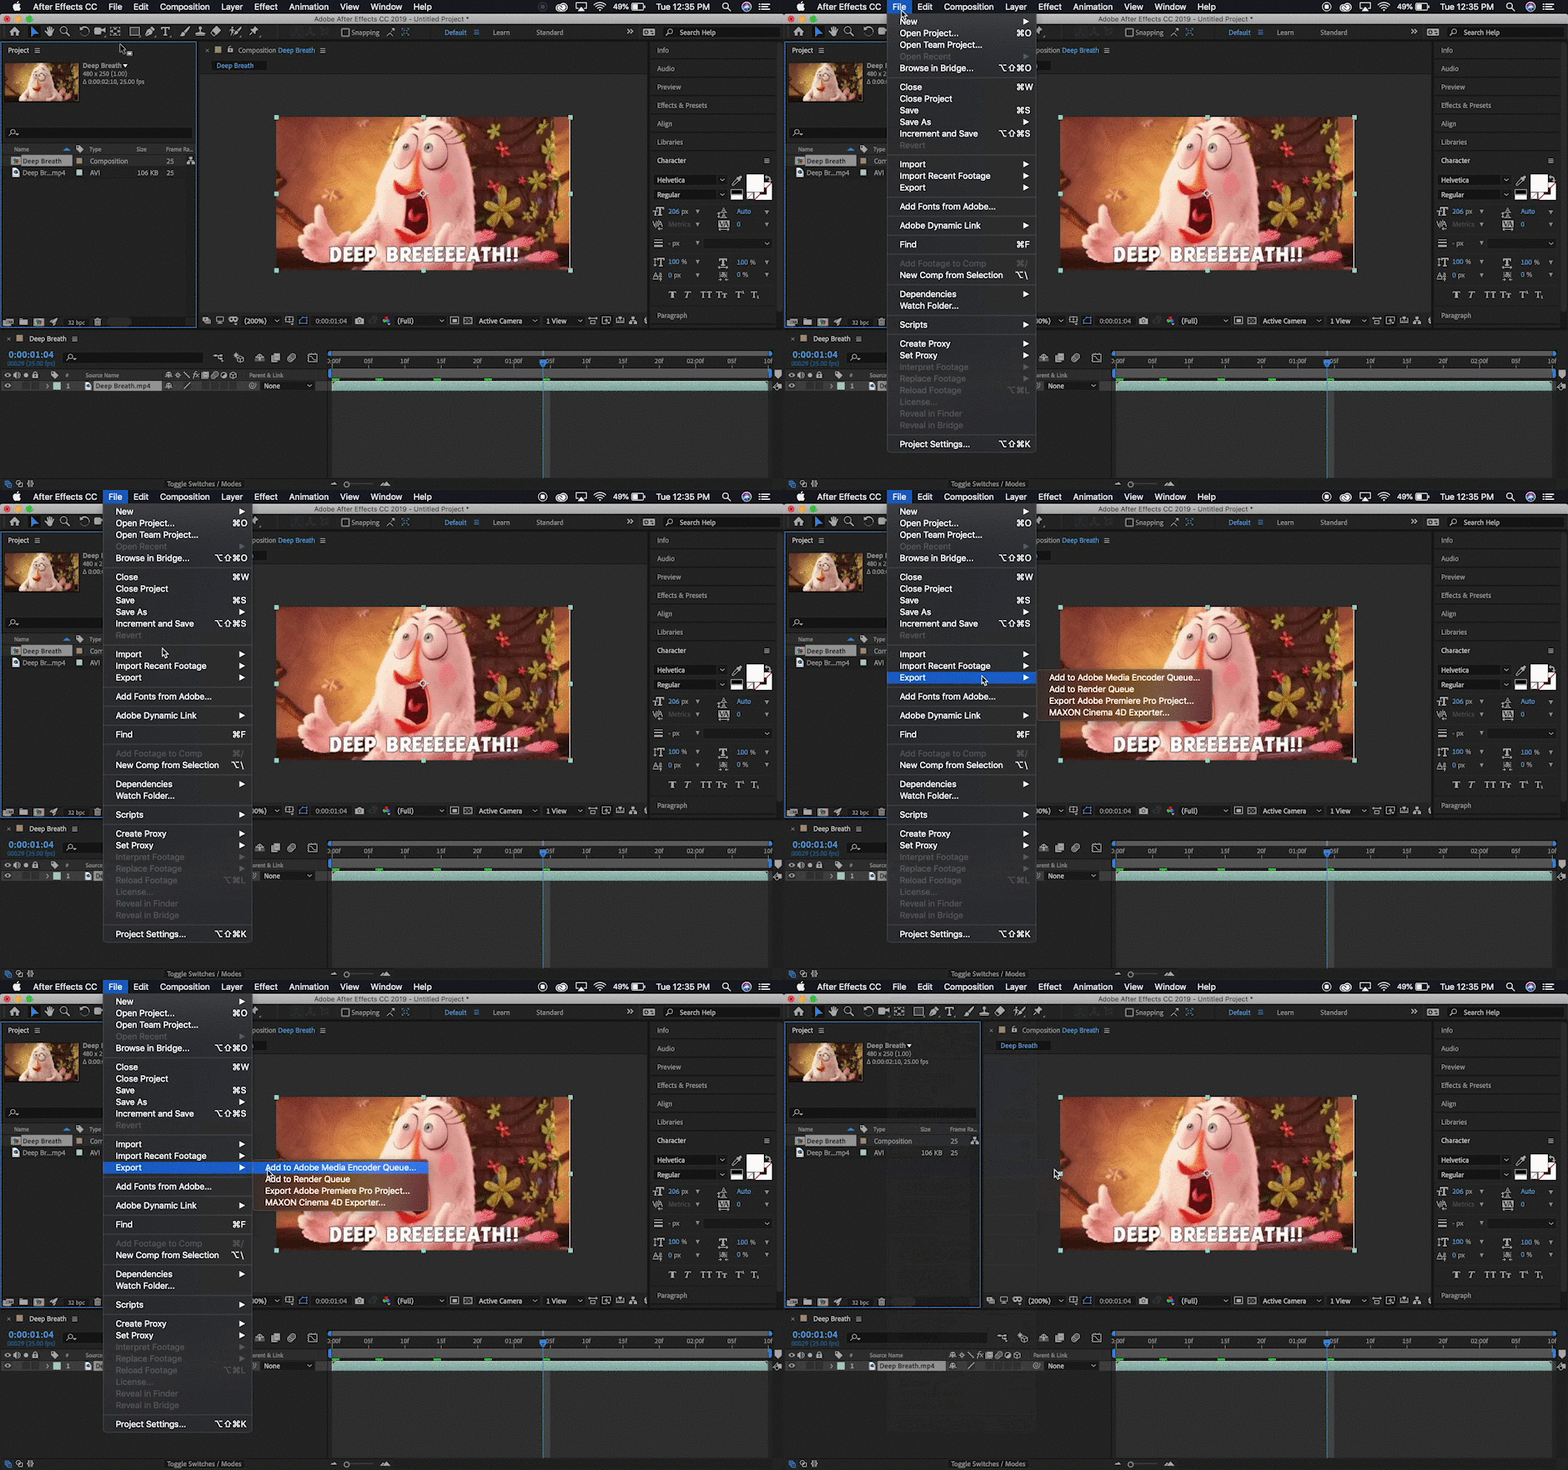
Option 1: Choose File > Export > Add to Media Encoder Queue
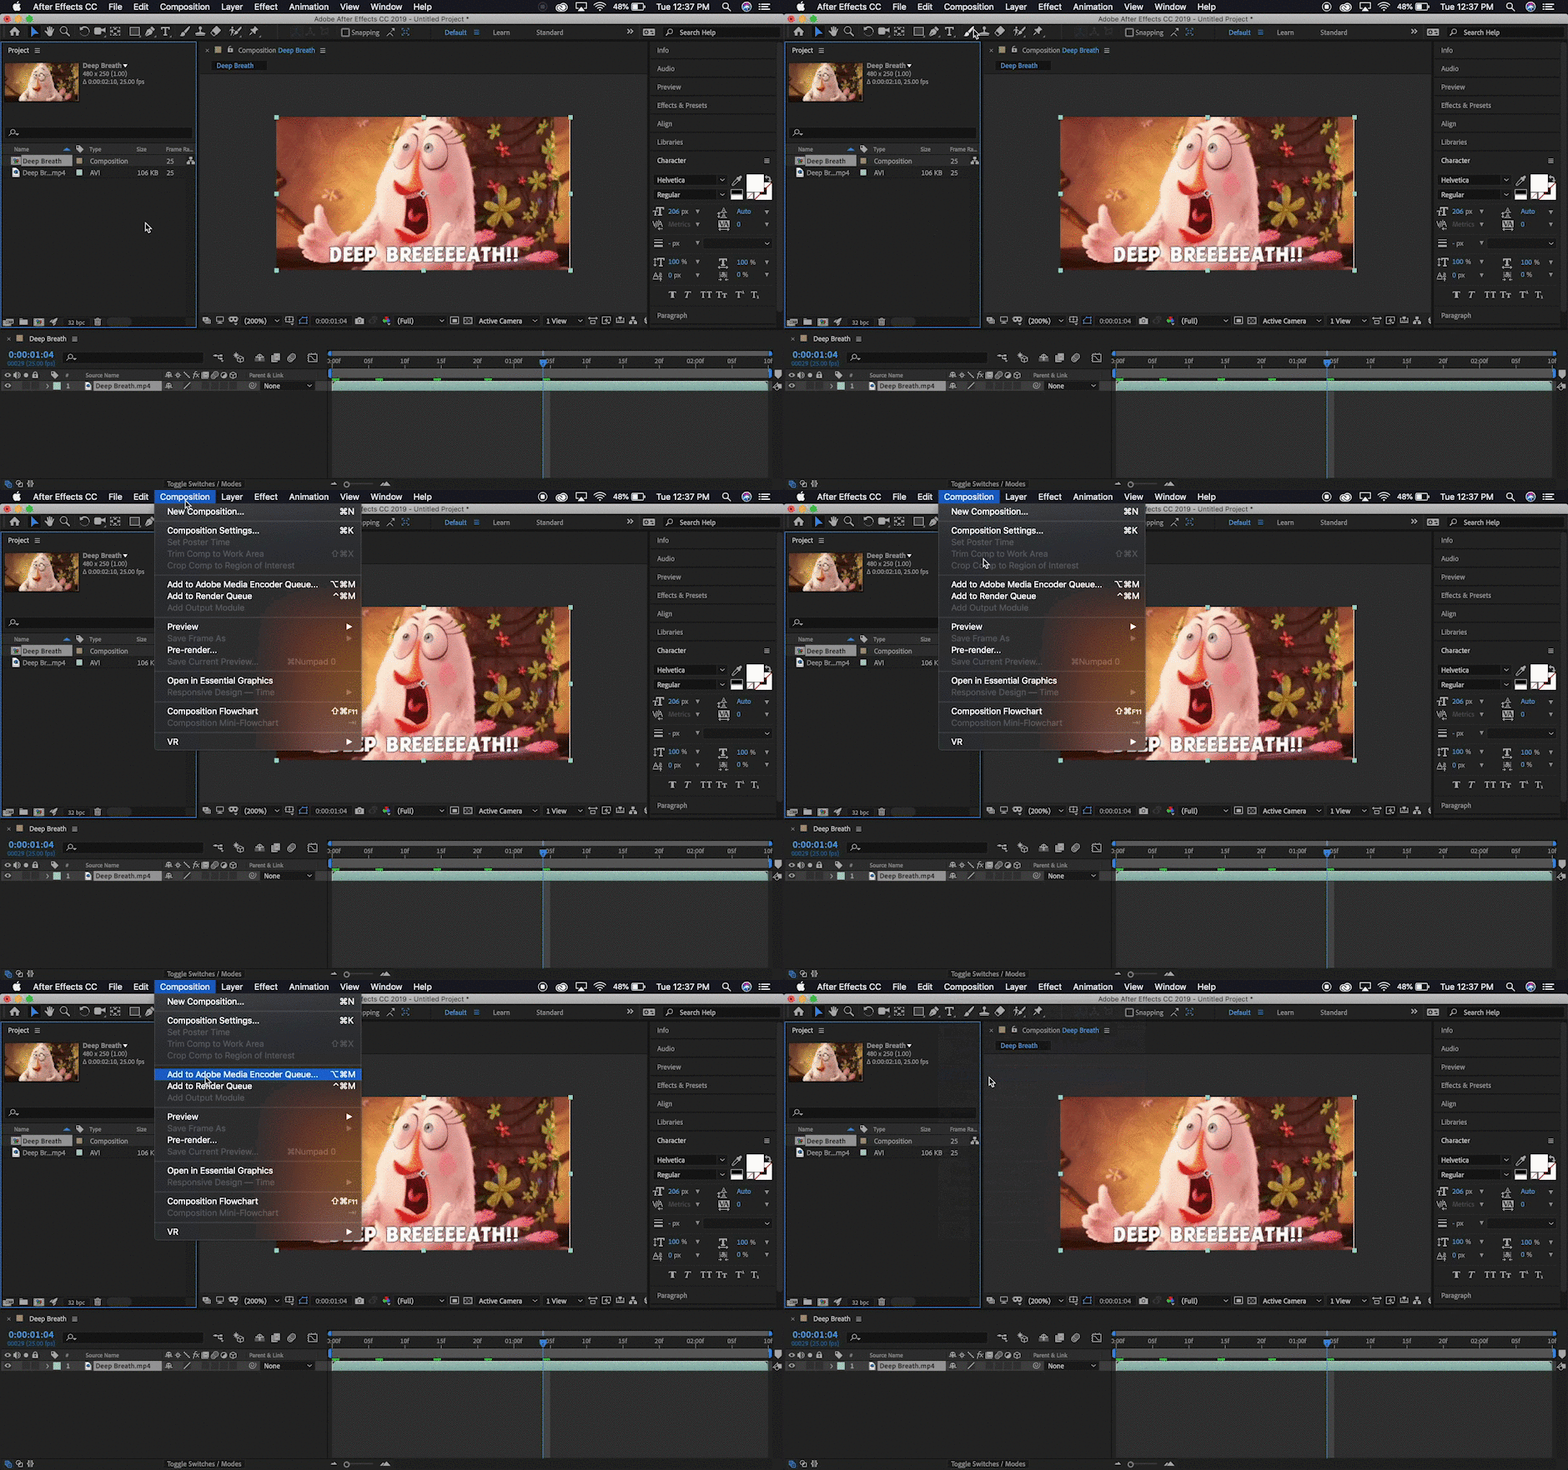
Option 2: Choose Composition > Add to Media Encoder Queue
Option 3: Keyboard Shortcuts
Alternatively you can add your composition to the Media Encoder queue with the keyboard shortcut CTRL+Alt+M (Windows) or CMD+Opt+M (Mac).
STEP 2: LAUNCH MEDIA ENCODER
Adobe Media Encoder should automatically launch when you queue your project from After Effects. However, If you are not already working in After Effects you can use one of the following three methods to send After Effects projects to the Adobe Media Encoder queue.
- You can drag one or more items to the Queue from your desktop or media browser.
- You can choose one or more files from the Add Source button.
- You can choose one or more files by double-clicking on an open area in the Queue panel.
Note: Be sure to keep Adobe Media Encoder updated to the latest Creative Cloud version. You might run into issues if you have conflicting versions of After Effects and Media Encoder.
STEP 3: ADJUST EXPORT SETTINGS
Your export settings box in Adobe Media Encoder is almost identical to the export settings box in Adobe Premiere Pro. You can find the 'Export Settings' window by selecting the colored text under 'Format' or 'Preset'. Here's how to adjust your settings:
- Make sure the items you want to render are in the Adobe Media Encoder Queue panel.
- Use the Format pop-up menu to choose the best video format option for your output. Note: Format is not the same as video wrapper. If you want to learn more about video codecs check out our Video Codecs in Motion Graphics tutorial here on School of Motion.

3. Use the Preset pop-up menu to choose the best video preset option for your output. Or you can use the Preset Browser to add a preset to your Queue.

4. Choose where your files will be saved by clicking the text for the Output file, and then find the folder for your exports in the Save As box.

5. Adjust any other necessary settings. There are a lot of settings to mess with in this window. You can adjust everything from the bit rate to pixel aspect ratio. It gets really nerdy in here... Click OK.
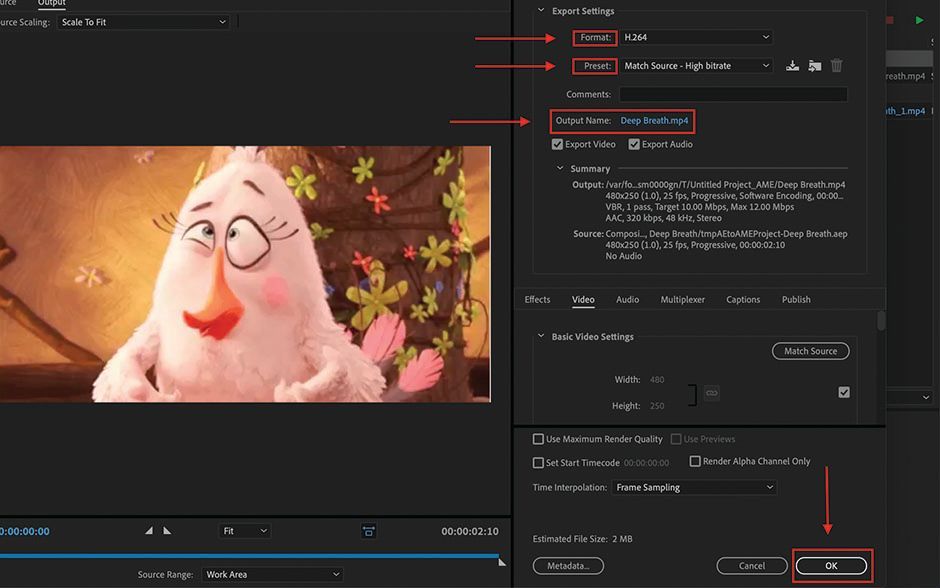
You can also get to the Export Settings box by doing the following steps.
- Select one or more items in the Queue
- Choose Edit > Export Settings
- Set your export options in the Export Setting dialog box
- Click OK
STEP 4: RENDER
Once you've adjusted out all of your settings, you're ready to start the encoding process. To render in Adobe Media Encoder simply click the green play button in the top right hand corner of the Queue dialog box.
A really cool thing that I love about Media Encoder is that you can export a master copy from After Effects once. If anyone on your team needs a video in a different format, you can simply duplicate the video in your Media Encoder Queue, adjust settings, and render a new video format.
Now that you know your way around Adobe Media Encoder, check out our After Effects Kickstart course to start learning your away around After Effects from the ground up! And if you want to learn more about video codecs check out our 'Video Codecs for Motion Design' tutorial here on School of Motion.
ENROLL NOW!
Acidbite ➔
50% off everything

ActionVFX ➔
30% off all plans and credit packs - starts 11/26

Adobe ➔
50% off all apps and plans through 11/29

aescripts ➔
25% off everything through 12/6
Affinity ➔
50% off all products

Battleaxe ➔
30% off from 11/29-12/7
Boom Library ➔
30% off Boom One, their 48,000+ file audio library
BorisFX ➔
25% off everything, 11/25-12/1

Cavalry ➔
33% off pro subscriptions (11/29 - 12/4)

FXFactory ➔
25% off with code BLACKFRIDAY until 12/3

Goodboyninja ➔
20% off everything

Happy Editing ➔
50% off with code BLACKFRIDAY

Huion ➔
Up to 50% off affordable, high-quality pen display tablets

Insydium ➔
50% off through 12/4
JangaFX ➔
30% off an indie annual license
Kitbash 3D ➔
$200 off Cargo Pro, their entire library
Knights of the Editing Table ➔
Up to 20% off Premiere Pro Extensions
Maxon ➔
25% off Maxon One, ZBrush, & Redshift - Annual Subscriptions (11/29 - 12/8)
Mode Designs ➔
Deals on premium keyboards and accessories
Motion Array ➔
10% off the Everything plan
Motion Hatch ➔
Perfect Your Pricing Toolkit - 50% off (11/29 - 12/2)

MotionVFX ➔
30% off Design/CineStudio, and PPro Resolve packs with code: BW30

Rocket Lasso ➔
50% off all plug-ins (11/29 - 12/2)

Rokoko ➔
45% off the indie creator bundle with code: RKK_SchoolOfMotion (revenue must be under $100K a year)

Shapefest ➔
80% off a Shapefest Pro annual subscription for life (11/29 - 12/2)

The Pixel Lab ➔
30% off everything
Toolfarm ➔
Various plugins and tools on sale

True Grit Texture ➔
50-70% off (starts Wednesday, runs for about a week)

Vincent Schwenk ➔
50% discount with code RENDERSALE

Wacom ➔
Up to $120 off new tablets + deals on refurbished items


