UV Mapping Project Breakdown
If you want to create stylized artwork that blurs the lines of 2D & 3D learning the basics of UV Mapping in a must! And you don't need to waste your money on a 3rd party software! You have everything you need in Cinema 4D's BodyPaint. In this article, I'll breakdown my journey into UV mapping and how I applied those steps to create the finished animation below.
{{lead-magnet}}
Getting Started with UV Mapping
First, let me encourage you. You don't need to be a world class 3D modeler, and spend hours creating painfully perfect typology to get decent results. Especially when you have tight deadlines knocking on your door!
In fact, Making It Look Great 11, the 3D modeling course I purchased after completing Cinema 4D Basecamp, is still on my to do list.
Just a simple understanding of primitives, splines, extrudes, deformers, and box modeling is more than enough. The best part? The objects you create don't even need to connect into one perfect, single mesh, typo-logical, super blob!
You can make lots of simple individual objects. The only one caveat is you will have to make your primitive objects editable. But you can do it! Don't be afraid!
If you wanna do a little bit of research on Pinterest, type in low poly uv mapping game art to get inspired!
Here's some low-poly inspiration I've found:
- Low-Poly Well
- Low-Poly Trees and Logs
- Low-Poly Funky House
- Low-Poly Containers
- Low-Poly Ships
- Low-Poly Game Character
Alright, now that you've studied up and are feeling encouraged, let's begin!
1. Create a simple 3D model.
I have created this low poly Thundercats Sword Of Omens using a mix of basic modeling techniques in C4D. The blade/grip was made using a box primitive made editable (C), the extrude tool & the Loop/Path (M ~ L) cut tool. The guard was made with a spline tool to create the shape, an extrude tool (M ~ T) to add thickness, and symmetry tool to duplicate the guard. The badge was made with a primitive cylinder.

2. Connect Objects and Delete
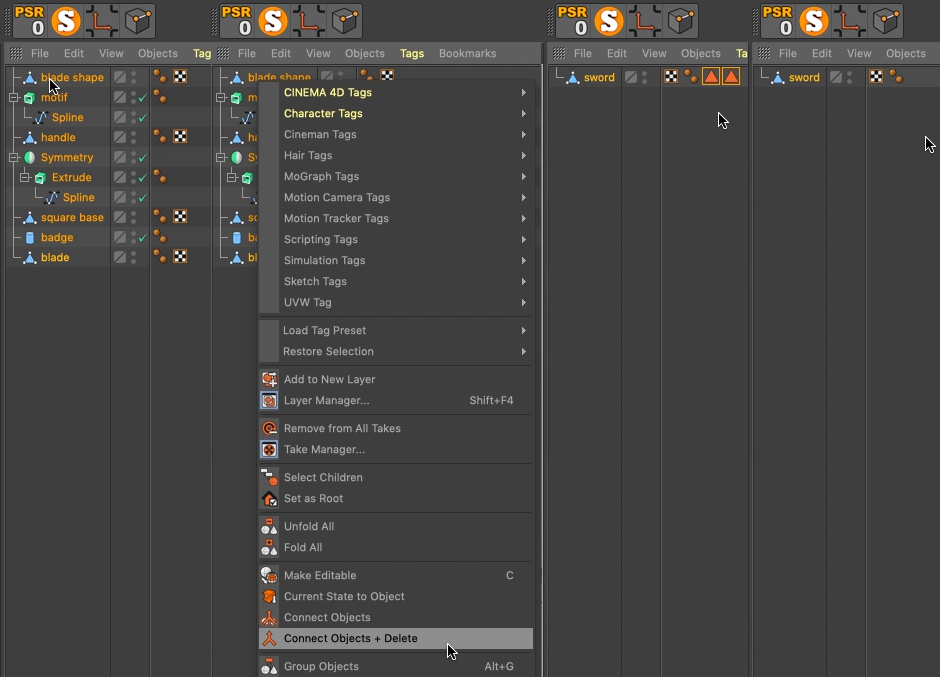
Select all your objects in your object panel by clicking and dragging, or clicking one object and then pressing command/ctrl A to select them all.
Right click and choose Connect Objects & Delete to create a single poly mesh. Now click on the model in the viewport, select polygon mode, command/ctrl A to select all the face, then (U~O) to optimize the model to make sure all faces of the polygons remain connected. Double click the object and rename it. Also select and delete the polygon selection tags (the orange triangles).
Note: Be sure to either save incrementally or keep an extra copy of the assets in a null hidden away, should you ever want to return to the original and make edits.
Don't be scared that the separate object polygons are overlapping each other. I'll show you how to select them independently.
3. UV Tags
First, you may have noted when you converted the primitives & extrudes into a single poly mesh that a square checker box symbol appeared next to your object in the objects panel. That my friend is a UV Tag.
Inside, it holds all the UV information you need to apply your custom texture.
Don't delete it!
If you don't have it, you can re-apply a new UV Tag by simply selecting your object, clicking tags in the object menu, scrolling down and press UV tag/set from projection. It will create a new UV based off of the angle of view port. Don't worry too much about getting the UV to project correctly.
We will fix that shortly.
4. Switch to UV Edit Layout
Change your layout to BP - UV Edit.
You should now have our model viewport, along with the UV viewport, showing the information collected from your generated UV Tag.
It probably looks like a dog's breakfast, and turned the hardest of stomachs into an IBS sufferer (gross...)! Relax, you've got this! First, I'll show you how to mush it back into something recognizable!
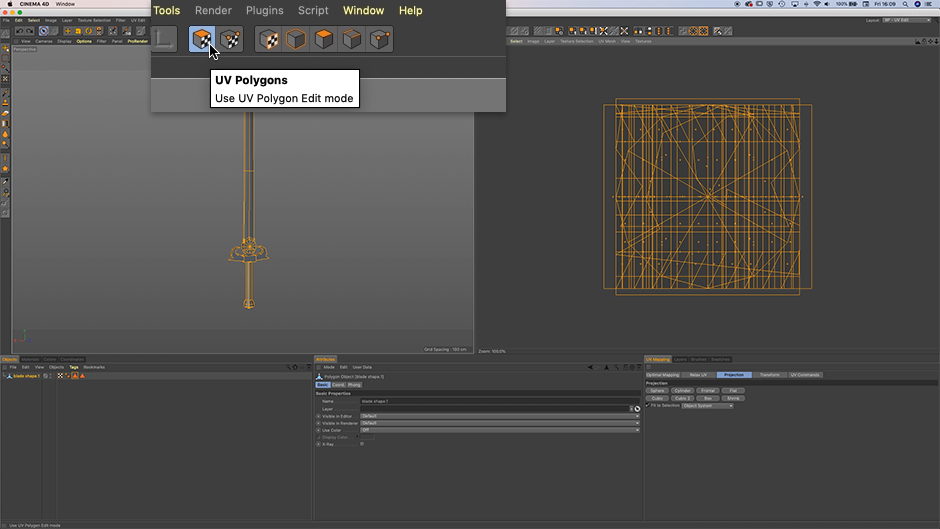
Click on UV Polygons Edit Mode.
Now, whatever is selected on your object view port is selected in your UV view port, and highlighted in yellow.
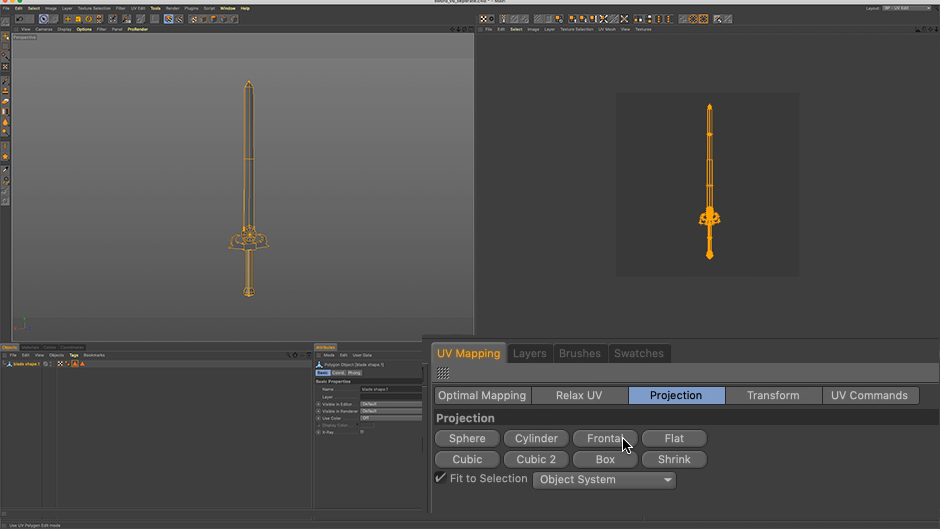
Press command/ctrl A to select all the UV islands on the whole model, and then under the UV Mapping/Projection select Frontal. This will mush it all back together, according to the object view port's angle. This is more for yourself to make it friendlier to look at as you start to cut it up.
At least for now it still looks like a sword!
5. Applying UV Grid Texture
Let's add UV grid texture to help better see how your texture would be applied to your model.
Return to your standard layout view. Go to your material panel (below the animation timeline) and click create/material. Double click the new material and open the material editor panel. Click on color, and under texture click the three dots icon (...) on the far right. Select UV_Grid_Sm.jpg in the folder, tex folder.ps.
The reason you create a "tex folder" for your texture is to allow C4D to know the location of your textures. Otherwise, you get an annoying message:
"This image is not in the project search path. Do you want to create a copy at the project location?"
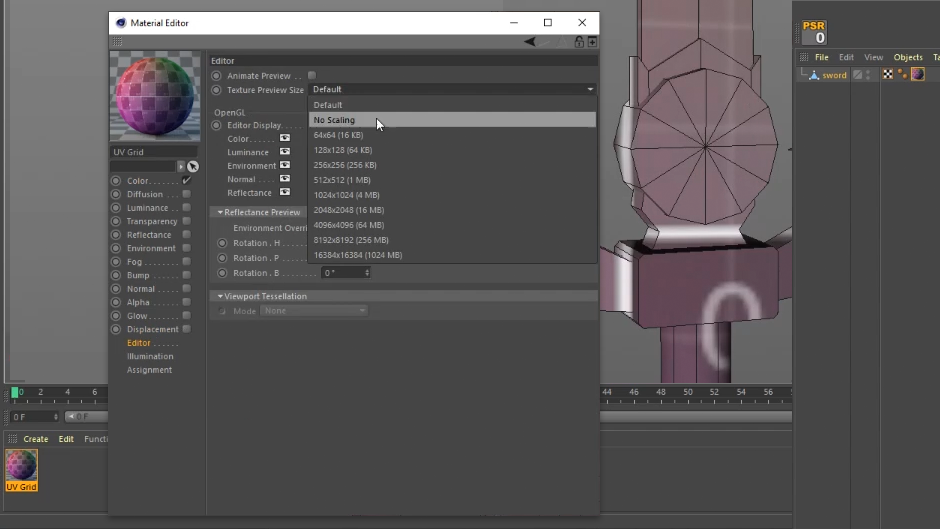
Now, drag the new material onto your sword object. The material will appear low in resolution. To resolve this, double click your material again and select editor.
Under Texture Preview Size, change it from default to No Scaling. Now the image texture should appear sharper.
6. Unwrapping a Square/Rectangle
Let's start with something simple, like the square/rectangle shape at the center of the sword.
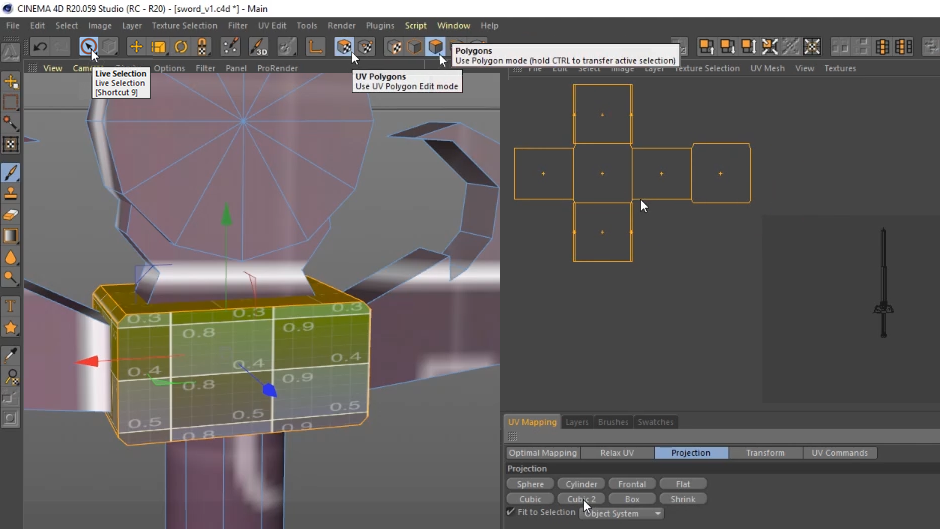
Switch to Polygons to select the square. Click any polygon face and then press U + W (or alt click in the R19 release of Cinema 4D) to select all the polygons connected to that shape.
Under UV Mapping/ Projection click Cubic 2. This is a great tool for quickly unwrapping squares and rectangles.
Make sure you are back in UV Polygon Edit mode to be able to select the polygon islands or move them. If you un-selected them by mistake don't worry, select any face with your selection tool and it will highlight in yellow, then press (U~W or alt click) to select all the polygon islands.
Now press E (Move Tool) and drag the selection to it. Drag it off the canvas, out of the way for now, so that you can deal with the next selection. You can also press R to rotate or T to scale your UV islands in case your UV grid texture is displaying at the wrong size or angle. Navigate around your UV canvas using the 1 key to pan & 2 key to zoom.
7. Unwrapping Frontal Projection
Next, we are going to unwrap the cross-guard using frontal projection.
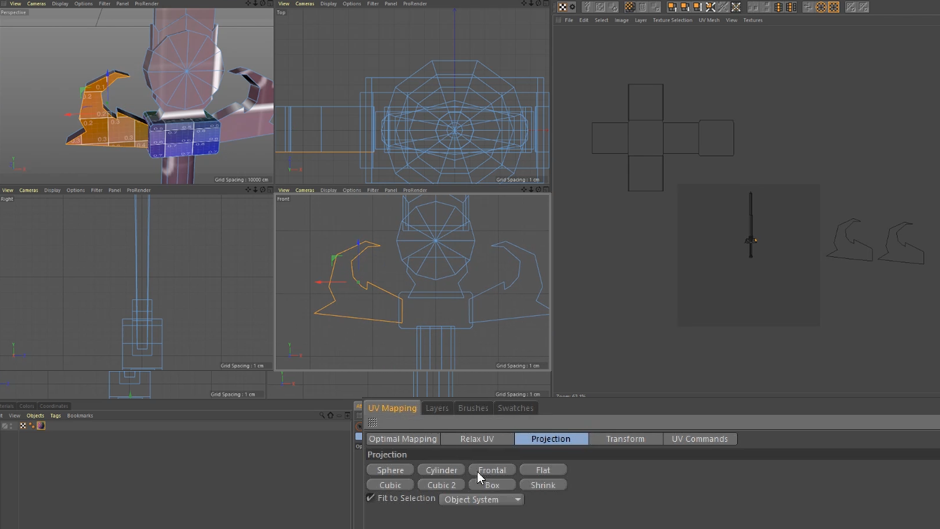
For this, you will need to change the view port to 4 view windows by clicking the button in the right hand corner of your view port, and make sure the Front View window is highlighted. You can also toggle between the view ports using the F-keys.
- Top View (F2)
- Right View (F3)
- Front View (F4)
- All 4 Views (F5).
Select the front face of one of your cross-guards. Go to UV Mapping/Projection and click Frontal. It's going to snap off the polygon as the angle that your view port is displaying.
If you are in perspective view you will notice UV will have skewed the polygon islands at the angle of the perspective view port. This is not what you want. Especially if you're planning on painting this face on.
The beauty is, you can just do it again very easily. Just click on your front view port and once again UV Mapping/Projection and click Frontal and the polygon islands are now accurately projected.
Now just repeat the process by rotating your view port to the other side of the cross-guard, and getting the opposite face with the same method. Then pick the two shapes and use your move tool (E) to drag them off the canvas out the way.
8. Relaxing UV's & Cut Selected Edges
Now all that's left is getting the joining strip between the two faces of the cross-guard.
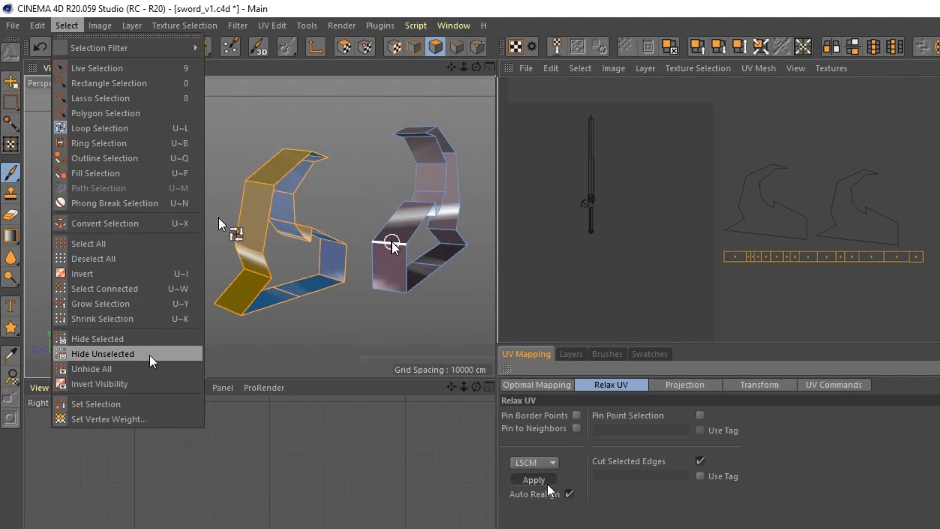
Once again, make sure you are in Polygon mode. Press (U~L) to get a loop selection of the remaining part. With your selection made, Select/Hide Unselected and it will hide anything that is not selected on your view port.
This is a great way to solo select parts to better see if other objects are hidden. Now we need to unwrap this, but first we need to tell Cinema 4D the edge it's going to unwrap from.
Imagine you are going to take a pair of scissors and cut somewhere so that you can flatten it out. Where would that be? It would be against an edge that could be hidden or not seen by the camera. In my case, that would be the part that is inside the square, or the middle part of the sword.
So I will rotate around to that corner and use my edge selection tool and select that edge. Now that I have selected my faces with the loop tool, and chosen my edge, I will cut from UV Mapping/Relax UV and check the Cut Selected Edges tick box. This will remember the edge I selected to cut from. I'll also make sure I keep Pin Border Points & Pin to Neighbors unchecked.
You can either choose LSCM or ABF. Whatever produces better results.
Before pressing Apply, be sure to check Auto Realign. You want this to relax straight. If you don't check Auto Realign it will sometimes project at an odd angle.
If you get it wrong, don't worry. Just go back to Projection/Frontal and then back to Relax UV and hit apply again.
Now you have that nice tidy unwrap.
So go back and Select/Unhide All to make all your objects, and UV islands, visible again. Select your polygon island strip and move it off the canvas again, next to the other matching parts of your cross guard. Now repeat the process again with the other side of the cross-guard.
9. Optimal Mapping, Realign & Equalize Island Size
Sometimes when UVs are projected or unwrapped/relaxed, they don't match parts in size.
To resolve this, in the UV Polygon Edit mode, select all the family members of the part. In this case, we will use the cross-guard. Go to the Optimal Mapping tab, making sure the radio button realign is selected & the Equalize Island Size checkbox is ticked.
Then click Apply. This should equalize/resize the islands to the correct size. It will also snap it back onto the UV Canvas. So go ahead and move it back off the canvas, and re-order it in whatever manner suits you with the move tool (E).

10. Box Projection
A large portion of the UV unwrapping will be done using the Relaxing UV's & Cut Selected Edges Method. I thought this would work for the blade of the sword, but I was wrong!
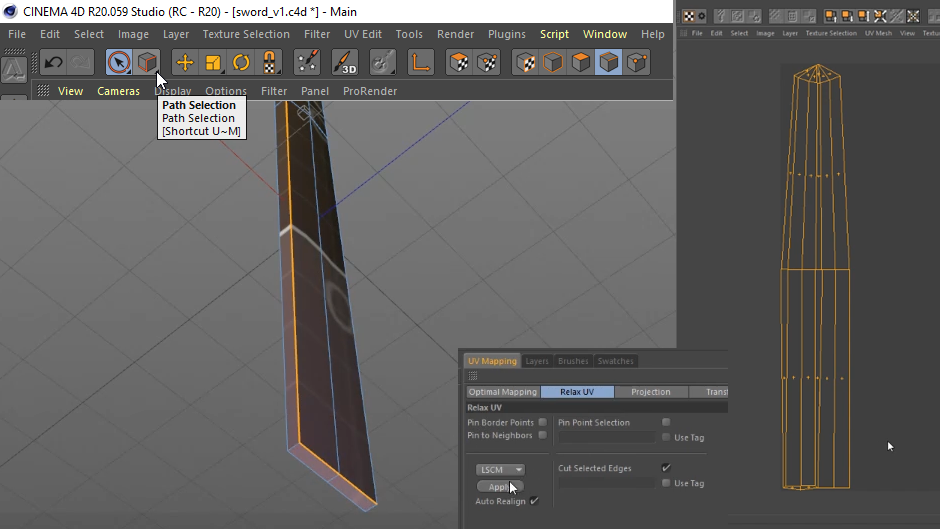
This method is great, if it were a more organic texture that required hair brushing! But I need to draw vector style patterns on the blade, so I need a flatter way of unwrapping the sword.
Here is a tip to display in the photo above. Under the edge selection drop down menu in the UV layout is the Path Selection tool (U~M). It's great for tracing out longer edge path selections!
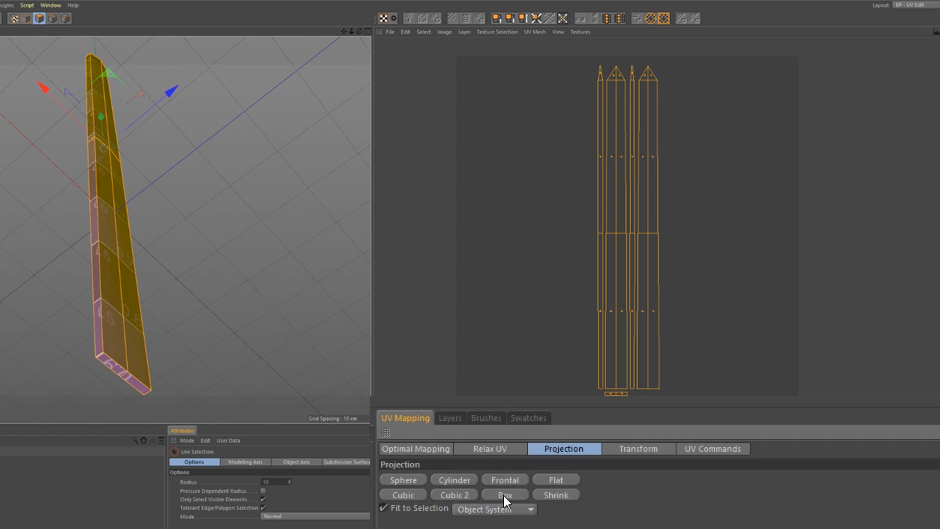
Reset that UV by once again making sure it's selected, and then going to UV Mapping/Projecting and pressing Frontal. Then this time pressing Box.
Now you should have a cleaner projection for painting on.
11. Sphere Projection
Let's tackle the blade handle next.
We separate the blade into two parts using two different methods. The handle grip we could use is the Relaxing UV's & Cut Selected Edges method.
The Pommel of the handle (ball thingy at the bottom) is shaped like a sphere. What do you know?! There is a sphere button in the projection settings! Yipee!
Let's go into the front or right view. Make sure our selection tool (9 key) is set to Only Select Visible Elements and then select all the faces of the Pommel. Then go to UV Mapping/Projection and select Sphere.

I'd encourage you to just to click on all the projection types, so you can see how it unwraps the UVs. Each new model may require a different solution. Don't be scared to just play. I've already shown you how to reset your UVs if you make any mistakes.
12. UV Mapping Transform
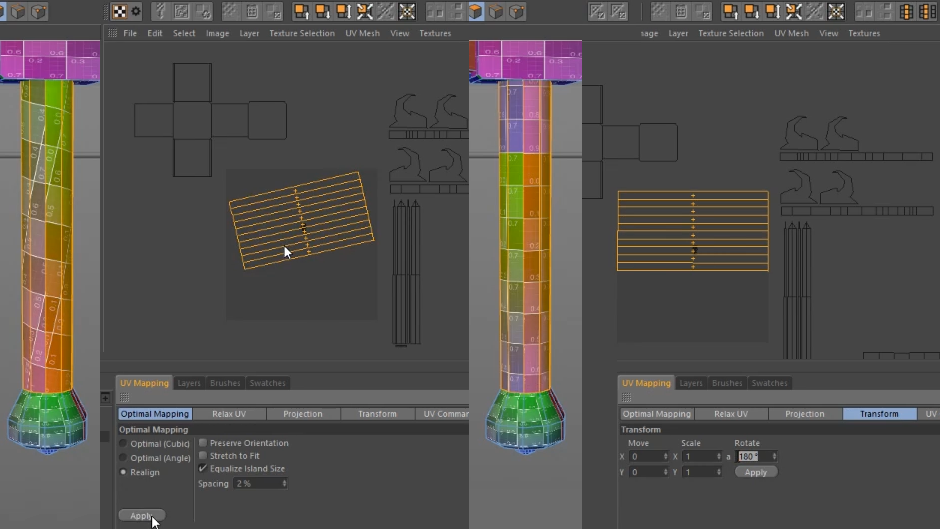
I unwrapped the handle using the Relaxing UV's & Cut Selected Edges method, but it unwrapped at an odd angle. So to straighten out the angle I went to UV Mapping/Optimal Mapping with Equalize Islands Size & Realign and clicked Apply. This will flatten it out, but now the UV was upside down.
I went to UV Mapping/Tranform and set the rotation 180° and clicked Apply. Now as you can see the UV numbers on UV Grid Texture are the right way around.
13. Get it all back on the Canvas!
The rest of the UV's should be done pretty much in the same ways I've already shown you. So let's move on to the next part!
The next part is kinda like playing a game of Tetris! You just need to fit all these shapes onto the canvas.
Feel free to rotate (R) them, or scale (T) them in any way you would like. Just maximize on filling up all the gaps. Try not to leave too many blank areas. The bigger your shapes on the canvas, the higher the resolution of your textures will be. I myself tried to keep shapes of the same parts still close to each other, so I knew what I was painting once I took it in to Photoshop.

14. Creating a UV Texture
Click on the materials tab. Currently your UV texture has a red cross on it. That means its has not been applied to the UV canvas. Hence the grey background.
Click on it and the cross will turn into a pen icon. Now the UV texture has been applied to the UV canvas. It has also made the texture accessible under the UV layers tab. It's also just a good way to see how the UV is being applied to your model.

To create a new UV texture, go to Materials/Create and click New Material.
Click the red cross to make it visible on the canvas. Double click the thin grey cross (it's barely visible!) and new panel should appear. Re-name the material and choose the resolution.
I chose 4096x4096 as I wanted it to be high res and I will be zooming really close on the sword while animating. Keep the resolution at 72 dpi.
Remember, too high and your view port could chug a bit when animating. Also, be sure to change the default white color (background) to a darker color. I left my bits per channel to 8 bits, as I'm using fairly flat textures. When you're done in the settings click ok.
Under the UV canvas, a background color based off the color you chose for your texture has been created. Next you need to create a UV Mesh Layer that will be seen in your Photoshop file as polygon islands won't be visible in your Photoshop texture.
Your first step is to choose the color of your UV mesh layer.
Go to the Colors tab and choose a color. Next, go to the Layer tab above the UV canvas and select create UV Mesh Layer. Below your polygon islands outlines of a UV Mesh have been drawn. It's also been added to your Layers as a 2nd layer called UV Mesh Layer.

Go to File/Save Texture As and choose UV_Texture.psd from the drop-down menu. Now open up your new texture in Photoshop.
15. Painting textures in Photoshop and Illustrator.
You are on the home stretch! Now the fun part!
Open your UV_Texture.psd file. Just like in C4D you will now have two layers, the UV Mesh Layer and the Background layer.
You can use your UV Mesh Layer as a guide when you paint. Once you are done you can turn the eye off on that layer before you save. As you don't want to render your UV Mesh Layer.

I'm not that great at Photoshop. I have better control over drawing vector shapes with bezier curves in Illustrator. Perhaps Design Bootcamp should be next on my radar?
So I'm going to create one extra step you may not need. I'm going to go to Edit/Copy Merged. Then open up Illustrator and make my canvas the same size as my Photoshop file by going to File/Document Setup & choose Edit Artboards.
Then change the artboards to 4096x4096, go to Edit and then choose paste in place (Shift+Ctrl+V). Now I'll create a new layer, draw with my textures and save the UV_Textures.ai file.
Now, just drag & drop the UV_Textures.ai file onto the Photoshop canvas of the UV_Texture.psd and a panel labelled Open As Smart Object appears. Just click ok and smart object will appear on your layers panel. Save the photoshop file Ctrl/Command S and return to the C4D.

16. Reload Image
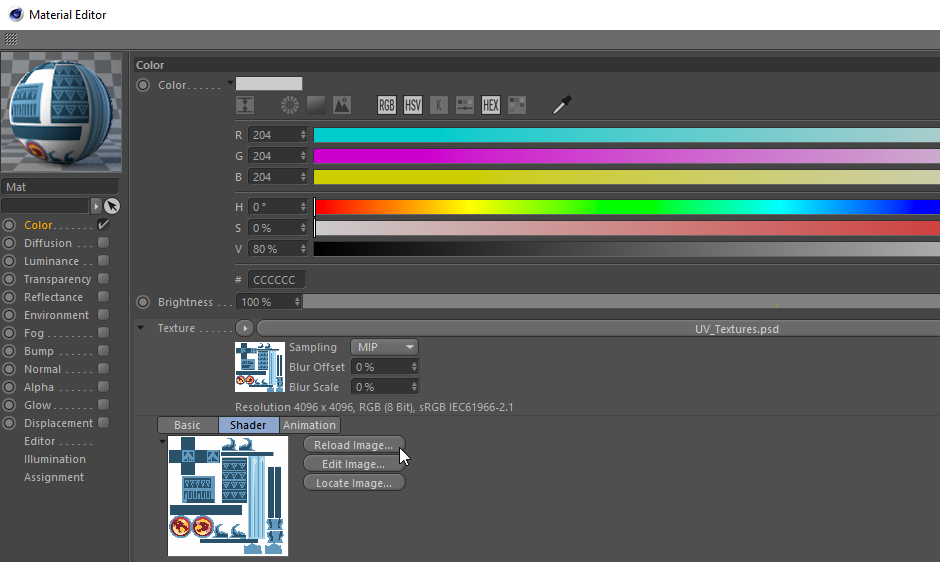
To update the texture in C4D, if it has not already been done, (Ie. If your C4D files were open all along), double click the circle icon of the material. This will open the Material Editor. Click the color tab and then click the small black triangle next to the left of the texture button.
Select Reload Image, and the texture should now update. You will need to do this every time you edit your Uv_Texture.psd
Done and done, now let's learn more!
Check out the full Cinema 4D UV Mapping tutorial. If you are new to Cinema 4D I'd recommend Cinema 4D Basecamp. I have personally greatly benefitted from Cinema 4D Basecamp and in only 6 months I went from 3D newbie to creating online 3D education content! Imagine what you could do with your new found powers?
ENROLL NOW!
Acidbite ➔
50% off everything

ActionVFX ➔
30% off all plans and credit packs - starts 11/26

Adobe ➔
50% off all apps and plans through 11/29

aescripts ➔
25% off everything through 12/6
Affinity ➔
50% off all products

Battleaxe ➔
30% off from 11/29-12/7
Boom Library ➔
30% off Boom One, their 48,000+ file audio library
BorisFX ➔
25% off everything, 11/25-12/1

Cavalry ➔
33% off pro subscriptions (11/29 - 12/4)

FXFactory ➔
25% off with code BLACKFRIDAY until 12/3

Goodboyninja ➔
20% off everything

Happy Editing ➔
50% off with code BLACKFRIDAY

Huion ➔
Up to 50% off affordable, high-quality pen display tablets

Insydium ➔
50% off through 12/4
JangaFX ➔
30% off an indie annual license
Kitbash 3D ➔
$200 off Cargo Pro, their entire library
Knights of the Editing Table ➔
Up to 20% off Premiere Pro Extensions
Maxon ➔
25% off Maxon One, ZBrush, & Redshift - Annual Subscriptions (11/29 - 12/8)
Mode Designs ➔
Deals on premium keyboards and accessories
Motion Array ➔
10% off the Everything plan
Motion Hatch ➔
Perfect Your Pricing Toolkit - 50% off (11/29 - 12/2)

MotionVFX ➔
30% off Design/CineStudio, and PPro Resolve packs with code: BW30

Rocket Lasso ➔
50% off all plug-ins (11/29 - 12/2)

Rokoko ➔
45% off the indie creator bundle with code: RKK_SchoolOfMotion (revenue must be under $100K a year)

Shapefest ➔
80% off a Shapefest Pro annual subscription for life (11/29 - 12/2)

The Pixel Lab ➔
30% off everything
Toolfarm ➔
Various plugins and tools on sale

True Grit Texture ➔
50-70% off (starts Wednesday, runs for about a week)

Vincent Schwenk ➔
50% discount with code RENDERSALE

Wacom ➔
Up to $120 off new tablets + deals on refurbished items


