A New Experience with Field Forces in Cinema 4D R21
Release 21 of Cinema 4D has attracted immense attention, and we've honored our role as motion design experts and educators by offering in-depth analyses and video tutorials from our 3D Creative Director and Cinema 4D Basecamp instructor EJ Hassenfratz on many of the new and enhanced features, including caps and bevels and Mixamo character animation.

One of the most powerful components of C4D often flies under the radar, however; so, in our latest tutorial we highlight and break down Field Forces, which, according to EJ, "everyone's going to be raving about!"
With Field Forces in Cinema 4D R21, expect an entirely new experience working with dynamics, cloth, hair, and particles.
The Cinema 4D R21 Field Forces Tutorial
{{lead-magnet}}
What are Field Forces and How Do They Work?
Ideal for art directing your animations and scenes, and delivering on Maxon's promise to deliver a 3D motion design program for all, Field Forces in Release 21 serve as a powerful way to control particles, dynamics, hair and even clothing in Cinema 4D.
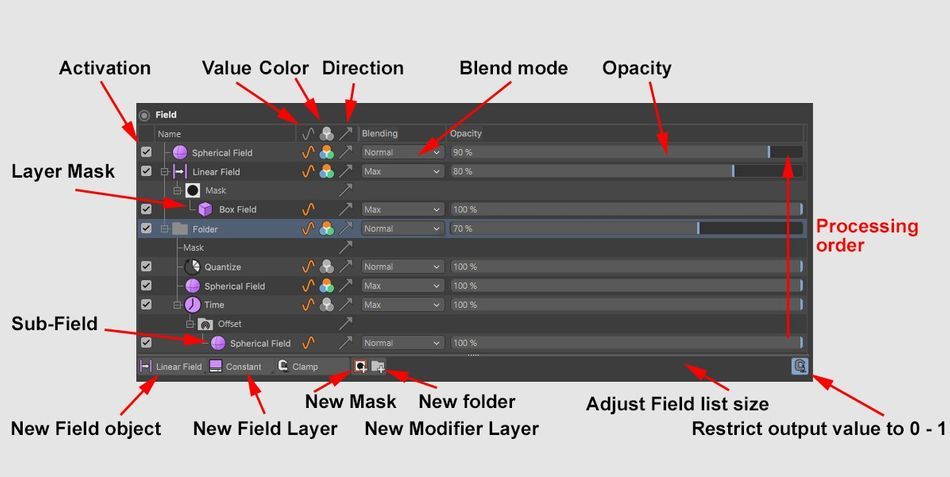
The new Field Forces feature allows you to blend Field Objects and Forces by utilizing recognizable and traditional tools to complete tasks such as changing the blending mode or strength of an effect and creating masks and sub-fields.
Using Fields in Field Forces
By combining, mixing and setting different objects and parameters, you can create new forces and field shapes.
In his tutorial, EJ demonstrates how, for example, adding noise to a particle emitter can create a turbulent displacement of the particles leaving the emitter.

EJ then adds a spherical field and sets the blending mode to Add. With a simple setup and a few button clicks, you can start pulling the particles into the spherical field.
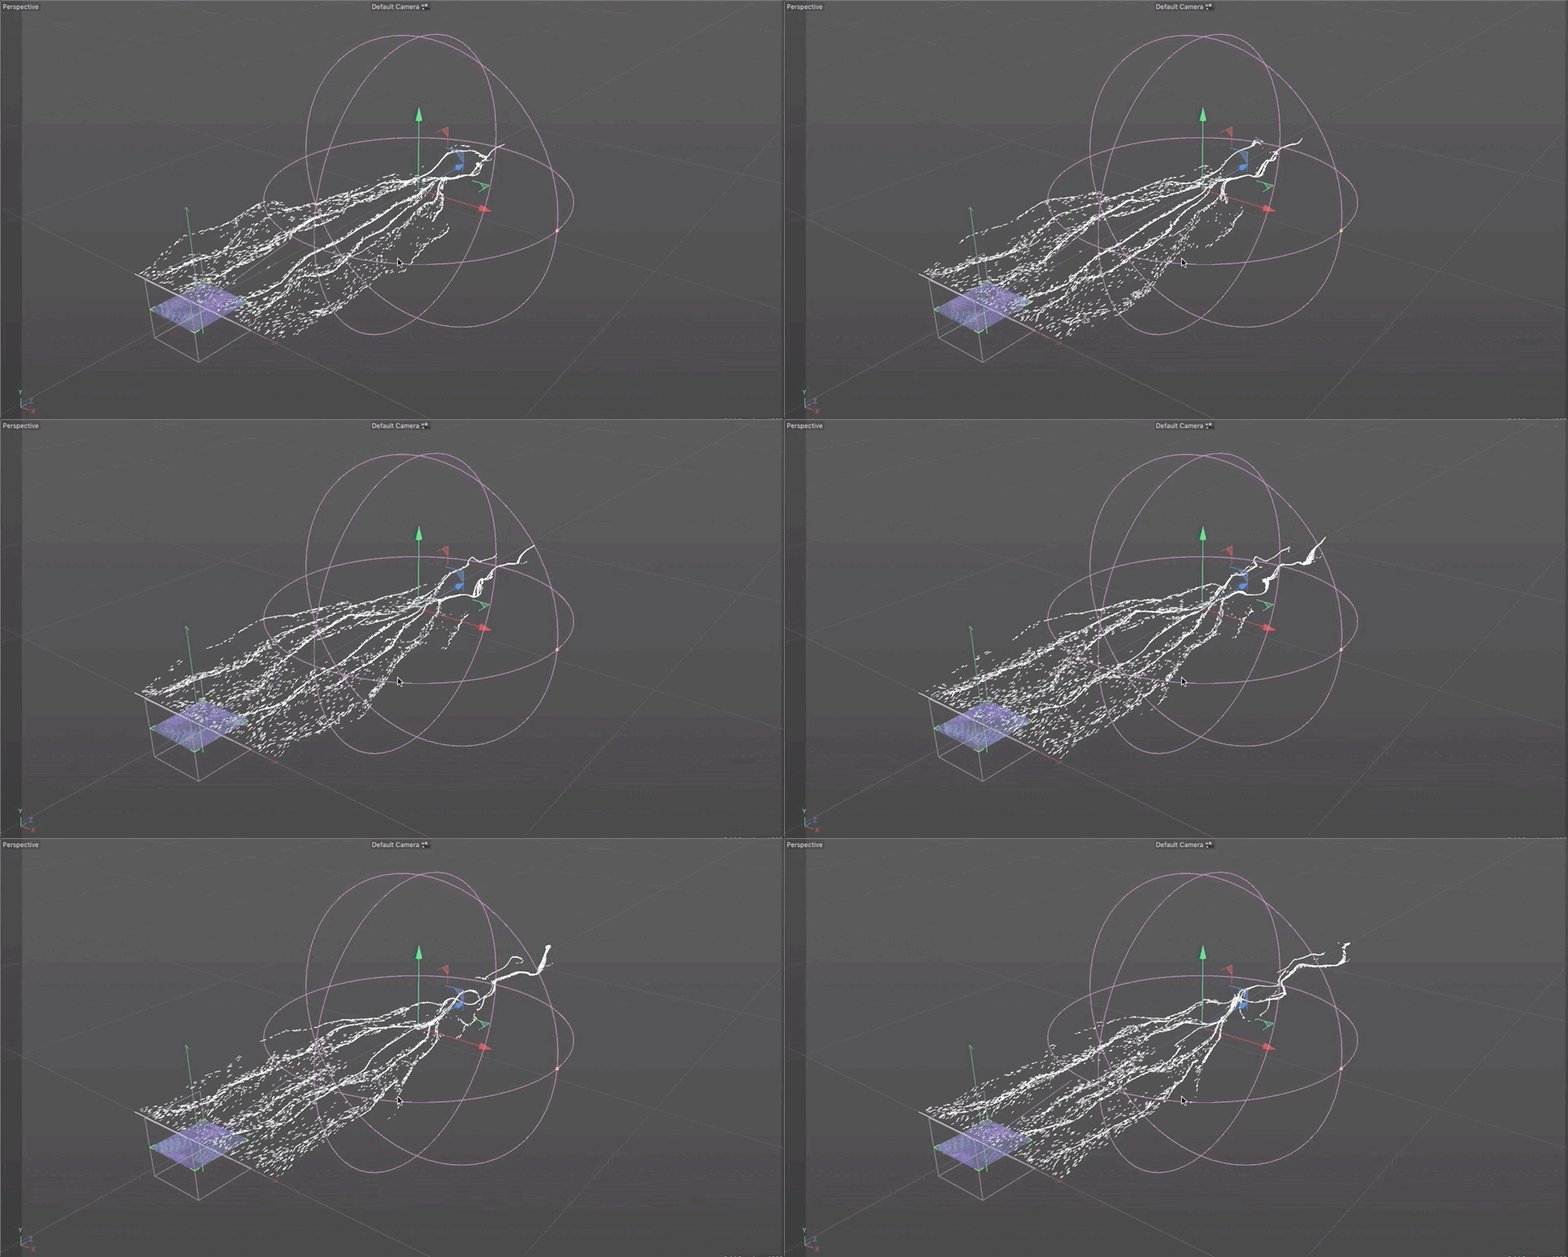
Using Objects and Volumes in Field Forces
Field Forces aren't limited to using fields to attract, repel and manipulate. You can now have objects react to the actual surface area of an object and not the anchor point of the main object, allowing secondary objects to roll, bounce and attract to the geometry of your 3D object.

Using Splines in Field Forces
Looking to add in another level of art direction? Splines allow you to control the direction and path of particle emissions and other objects.
In his tutorial, EJ uses a helix spline and spherical field to trigger a repelling vortex that dynamically reacts to a Voronoi-fractured object, causing pieces to fly everywhere and even bounce off the floor.

Plus, splines are editable and can even be keyframed, for greater flexibility.
Become a Cinema 4D Expert
In EJ's tutorial, we only scratch the surface of what's possible with Field Forces in Cinema 4D R21. If you want to master Maxon's 3D software, and learn from EJ himself, enroll in Cinema 4D Basecamp.
Adding 3D to your toolkit is one of the best ways to up your value and expand your capabilities as a motion designer — and there's no better way to learn motion design than with School of Motion (our approval rating is higher than 99%!).
Plus, when you sign up for a session of Cinema 4D Basecamp, Maxon will provide you with a short-term license of Cinema 4D for use in this course!
Learn More About Cinema 4D Basecamp >>>
-----------------------------------------------------------------------------------------------------------------------------------
Tutorial Full Transcript Below 👇:
EJ Hassenfratz (00:00): With every new cinema 4d release, there's always one feature that seems to fly under the radar. And I feel like field forces is that powerful new feature instead of a 4D R 21 that everyone's going to be raving about. Let's go and check out field forces
EJ Hassenfratz (00:27): In this video, I'm going to break down the new feud forces in cinema 4d, R 21, and show you how it can completely change the way you work with dynamics, cloth, hair, and particles. Now, if you want to follow along, there's going to be some project files you can download in the description of this video. So what the heck are fueled forces, where if you go to your simulate menu, you see all of these old, uh, particle forces that we've all grown to know and love. And there is our field force. Now, basically what a field force can do is allow you to use MoGraph fields to control the direction of particles or even control dynamics, cloth, hair, uh, all kinds of stuff. So what the field force essentially is, is all of these old, uh, field or old, all of these old particle forces wrapped into one.
EJ Hassenfratz (01:18): So let's go ahead and add a field force source scene. Here's an emitter that is just a flat a line. Basically you can see that the emitter is a size of 625 and the X, and then we're just birthing a whole crap ton of particles, a thousand, uh, being, uh, emitted there and a speed of 300 centimeters. Okay, so let's go ahead and let's start using fueled forces to manipulate these particles. So field force has a few different settings here. One is to just add to the velocity of whatever object you have currently flying, whether that be particles or dynamic objects. Another one is to just set the absolute velocity so you can actually set the speed and it's going to maintain that speed throughout the entirety of the movement. And then you can have different fields, help particles or dynamic objects, change the direction, not contribute to the motion at all, just changing the direction of that.
EJ Hassenfratz (02:20): So let's go ahead and use some fields to help change the direction of this object. So, uh, you might be wondering, well, what is the, uh, wind, uh, particle force here, uh, that we have here when basically what wind is, is a linear field. And you'll see that when I added a linear field to my list here, you can see we have the linear fall off and you can see all these little dashes here, what those dashes are, are vector lines. And they determine the direction in which a particle is flowing. So you'll notice if I move this up and down, you can see that all of my particles are actually moving this way, the way the, the actual fall-off is facing. Okay. So let's go ahead and let's change the direction to this is facing in the positive Z. Let's go ahead and do the positive Z here, and you'll see that actually the positive Z is shooting all the particles back the other way.
EJ Hassenfratz (03:18): So let's try negative Z and now you'll see, we'll get back to how we had this before. Okay. So this is really cool. We can control the direction by just rotating this field, this linear field linear fall off, and you can see, we can then, you know, key frame this, if we want to, to have this kind of rotate all types of different ways, which is really, really cool now where the real fun happens is once you start adding different types of fields in here. So maybe we go ahead and let's add a random field to randomize all this stuff, and you can see that now we are randomly, uh, moving and changing the direction of these particles. One thing to know about the blending modes with fuel forces, the only modes that really work are add and subtract. Okay. So what I'm going to do is add to this and let's go into our noise and let's just scale this up to about 500 and you can more see the giant noise happening here.
EJ Hassenfratz (04:19): And you're going to see that all of the particles just stop moving. And that's because what's going on is our linear field is no longer taking effect in these particles. Just get wrapped up in all of these random directions that you can see here. Now, what we can do is go to our random field, maybe add some animated noise. So now we have all the F this really crazy undulating jitter going on. So what's going on in why our particles are just stopping. Is this linear fueled again, ramps from a hundred percent strength to 0% strength. And you can see as that little linear push from that linear field is dying out because our linear field goes to 0% strength right here. Now to get around this, we can just go into our linear field and go to the remapping tab. And we can either adjust this in our offset, or we can just bring this min value all the way up to a hundred percent.
EJ Hassenfratz (05:10): So there will be no die off. So basically what's happening is our linear field is going to have a hundred percent strength throughout the, uh, linear, uh, field here. So now this is basically your wind deformer or your wind, uh, your wind particle force that you have up here. Okay. So we can change the direction. And there we go. Now, this is one way to get, uh, particles moving in one direction. There's another way you can go ahead and add a, uh, directional force and that's by using a different field. So let me go ahead, delete that linear field. And I'll have like all these little fireflies, which are kind of cool, but a better way to do this is using a solid layer. Okay? So here's our solid layer. And if we go and add a solid, you can see that if I place this below my random field, all of these particles are now flying upwards in the upwards direction because we have this direction in our solid, that is represented as X, Y, and Z.
EJ Hassenfratz (06:17): And since we have a value of one in the Y all of our particles are the direction of the particles and the vectors are going to be facing upwards. And you can see all these vector lines throw up facing upwards. Now, what if we want to have this going in the Z direction? Well, we would go ahead and put any value, like one in the positive Z direction. Now you can see, we just changed the direction of those vector lines. You can see as I make this direction even longer, my vector lines are even longer in our noise is kind of getting blown out from how powerful the vector strength is. So maybe we'll get a value of two in that direction. Now we've got this really cool wavy, uh, particle movement coming from the random noise that is kind of undulating and rotating all of our vector lines here.
EJ Hassenfratz (07:12): Now, a better way to see this is if we go to our force field, go to our display, and here we can choose how much density of our vector lines we're seeing. And then we can also like flatten this out so we can see any flat 2d plane, what our vectors look like. Okay. So we can really see this ramped up and you can see there's our noise kind of represented in there. So if we go back to our noise and maybe crank, uh, not crank down, how do you, let's just tamper this down, wrecking to crank something down. But as I bring the scale of a noise lower, you can see that represented in the, uh, vector direction. So if I make this even lower, you can see that the vector, it's not a smooth noise. So we're getting all of this crazy wacky, uh, particle movement going on with, I make this very large.
EJ Hassenfratz (07:57): You can see this nice, smooth noise. Look at that, looking good. So really cool particle stuff you can do. Uh, another thing we can do as well is mix even more fields together. So we've got this big, old noise going on, and we can, uh, add in a, let's do a spherical field and you can see what the spherical field on this vector. Let me go and just let me add onto this, wherever I move this fearful field. Let me just really scale this up and move this down. You can see wherever I move this, it's going to attract these particles. Now I can go into this fearful field and go to the strength and really crank up the strength, remove that inner offset. And now you can see, I can kind of influence the direction of which these particles are flowing. So I can maybe capture some of these particles on the end and have them veer off to the side here, or maybe have this kind of in the center.
EJ Hassenfratz (09:00): And all of these particles are now kind of getting sucked into this black hole. So this is like your attractor, okay. The older, uh, attractor particle effect. Basically that's just a spherical field that we can use in combination with other types of fields here. Now to create a, uh, something that disperses or deflects objects, we can go ahead and use the, uh, subtract. And what that'll do is now you'll repel all of these particles, just like putting in a negative number for the attractor, uh, particle force. Okay. So a lot of really cool things we can do here. We can go ahead and where this really starts to look cool is if you go and maybe add a, uh, a tracer, so we're tracing all of those lines, look at that. Super cool looking good. And then we can go ahead and make a, uh, hair material.
EJ Hassenfratz (10:01): And that's one way we can go ahead and it's down here. It's cut off, but it's in your materials right below, uh, the new Uber grass material. And it's right underneath the grass material. There's our hair material. Let's go ahead and let me make like a bright blue kind of color here. And let's go to our speculum, maybe turn that on or turn that off and just have the thickness be consistent. Let's throw that on the tracer. And we got something like this, look at, wow, that's looking cool. Don't even have any lights or anything like that, but that's super cool if I do say so myself. So, uh, that's a little bit of scraping the surface of what you can do with the field force and particles. But like I said, there's a lot more you can do with field forces, right? So that was using field forces with particles and be honest, I don't use particles that much, uh, where I think the field force is going to be very, very powerful and actually use a lot more often is in the area of dynamics and cloth, or even here, uh, because field forces can also affect those things as well.
EJ Hassenfratz (11:09): So for example, one thing that I think is going to be very useful and something that you are unable to do in previous versions is actually have objects be attracted to the surface of another object. So here I have just a little animation with my plus sign, and it is animated with just a vibrate tag and it's just moving back and forth. And what I want to have is these fears kind of be attracted to the surface of the object. Now, in previous versions, you were just stuck with an attractor force or attractor, uh, particle for, so let's just grab an attractor, let's make it a child of this plus sign. And let's crank up the strength of this attractor to about 500. And you're going to see you that everything's just going to kind of fall. So let's go ahead and turn off the gravity in our scene.
EJ Hassenfratz (11:58): So I'm going to hit command or control D to bring up our project settings. And if you go to the dynamics tab, we're just going to turn off that gravity. So give the gravity a value of zero and hit play and going to see things are still bouncing around. Let's go ahead and go into all of our dynamics tags that we have here and go into the force tab and just give a little bit of follow position follow rotation. So this will try to have these objects maintain their original position rotation. Maybe add a little bit of linear dampening, so they won't move linearly so much. And now you'll see, let me actually crank this up even more. It's maybe 1500. You can see that the best you could do in previous versions of cinema 4d is using a tractor and you can see all of my spheres are now attracted to not the surface of my object, but where the access center is of my attractor.
EJ Hassenfratz (12:55): So if I have my attractor over here, let's hit play. You're going to see that all the spheres are going to be attracted to that part. So there was no way previously to use the surface of the object as an attractor. Well, in cinema 4d or 21, we can now use field forces to correct that issue. So let's go ahead, get rid of this attractor. Let's go to our particle forces and go to field force. And now we can do with cinema 4d. Our 21 is we can drag and drop our object into this field force force menu here. And you can see this is going to be represented as a volume object here. Okay. And what we can do is basically say, you know, Hey, uh, we're going to set the absolute velocity, which means you're going to set the velocity of the objects at this absolute, uh, strength.
EJ Hassenfratz (13:46): And one thing we're going to need to do to have this act as an attractor is go ahead and change the strength to a negative number. So it won't kind of deflect. It will actually attract all of these little spheres. So let's go ahead. Let's hit play. You're going to see that nothing is really going on here. You're seeing our little vectors. So what's actually going on is our vectors. Don't expand past the volume of our object. So the vectors aren't reaching these spheres, so they can't be sucked in by them. So what we're going to do is go to our direction tab here. And this is basically determining the length of those vectors. They're too short right now. They're not reaching all these other spheres. So what we can do is change this length from use value to no remap. Okay. Now, if I scale this down, you can see there's all of our little lines.
EJ Hassenfratz (14:38): Okay. But one thing I'm going to do is go to my display and I'm going to uncheck this display vector length. And now we can just see what our vectors are looking like. So let's do on this box size down to about zero centimeters. So we just have a flat box and let's maybe make this box a little bit bigger, maybe 500 by 500, and let's bring up the line density here. So now you should be able to see all of these little vectors. They're now expanding out beyond the original surface here. And if I go ahead and hit play now, cool. Now we have those vectors that aren't basically constrained to the surface of, or the volume of our little plus sign and analysis acting upon and attracting all these fears here. And you can see all of these little vectors kind of always pointing towards the surface of an object.
EJ Hassenfratz (15:34): Okay. So very important. And we didn't use a use value here, because again, you're going to see that now our volume is determining how big those vectors are. Now you can increase the radius here and you can still see that that's really not doing anything at all. So very important workflow here. Let's go to no remap, and this will not allow those vectors to be remapped to just the inside of a, of a volume of an object. So this is something that previously not been able to do before. This is so cool. Uh, and something that I've been wishing for for a long time. So along with objects to create vectors, to be able to make dynamic objects, go towards the surface of an object, you can actually use splines to create vectors in art, direct dynamics that way, and have them follow, say an arc spline, or say a spiral spline as we have here, helix spline.
EJ Hassenfratz (16:32): So let's just go ahead and set up this scene. So I have my dynamic object here. It's a Verona fracture, and basically the trigger is set to immediately. I'm going to change this to velocity peak. So what we're going to do is just have another object in that object is a plane effector in that plane. Effector is going to set that initial velocity by whatever we put in this position tab here. So I'm going to make it a very low position, uh, transformation value here. And that will just nudge the dynamics just enough to then trigger that dynamic. So if I go ahead here, we've got at philosophy peak. Let's go ahead and let's control that plane effector using a fall-off. And I'm just going to go ahead and use a spherical fall-off. Now, if I go in hit play, you should be able to see that if I move my spherical field, I can move that spherical field.
EJ Hassenfratz (17:25): It'll nudge just those little fragments, just enough that let me just move this forward a little bit, that it will trigger the dynamics and the dynamic objects or Verona fracture pieces will fall. Okay. So we got all this action going on, which is looking really good. Okay. Got this fearful field doing its thing. Uh, but what if we wanted to have these pieces kind of spiraled downwards as they fall? That's where we can go ahead and add our field force, going to particles, field force, and then just drag and drop this. He'll explain into this field force. And we're just going to leave this at, add to velocity for now, and let's see what changes here. So let's get our spherical field in here and you're going to see not a whole lot's going on. You can see some rotation, let's go to our field force again, and let's go and make this field force box.
EJ Hassenfratz (18:18): Big enough. Let me scale this up. We're not quite seeing much of our vectors right now, so let's go ahead and change that. Let's go to the splay. Uh, let's make the line density a little bit longer, so let's go and get this display link up and you can see there's our vector lines. And you can see if I, especially, if I go from the above view, you can see these vectors are pointing in a spiral direction, which is really cool. Okay. So that's exactly what we want. So let's go and let's try this again. So let's change this strength to say 45. This time you can see that the vectors are getting very long at the top. So let's hit play and let's get our spherical field in. Now you should see a little bit more of the objects kind of swirling around. Well, let's make this very pronounced.
EJ Hassenfratz (19:12): So let's go and crank this up to maybe 80 and let's make it. So these vector lines are really clogging up the, the viewport here. So what we're going to do is in our field force, in the helix, we're going to go to this direction tab, and we're going to say, just use normalize, and then go back to our display and bring this display length down. So you don't see all those large, huge lines or something like that. And let's see what we got. So we're going to hit play garner spherical field, triggering the dynamics. Now you're really seeing those pieces kind of swirl away, which is really, really cool. Okay. But the one thing you're gonna notice is that the swirling won't stop, stop the swirling. So how can we do that? Well, we can do this by utilizing a fall-off in the actual field force itself.
EJ Hassenfratz (20:03): So we can actually reference the same. He'll explain. And we can go into this helix, go and change this distance mode of how this fall off is working by just choosing a radius. And let's just make the radius a little bit bigger. So you can see there's our radius right there. And basically what should happen is we should get the spiral from our field force. But then once it actually is, is arking any specific direction. It should stop getting affected by it as it leaves this helix, uh, radius here of this fall off. So you can see how big that fall off is. Okay. It's kind of like a cylinder almost, but if we go back to frame zero and then move this around again, you can see the arking, you see the twisting, but then there's no more spinning. Okay. Because we added that fall off to our field force there.
EJ Hassenfratz (20:56): Okay. So really cool stuff. We get some cool spinning going on. Let's go ahead and let's replace the helix with say a arc blind. So we can just drag and drop this over this helix and just replace that spline. Let's do the same thing with the fall off here, just drag and drop that in there and replace it. And now you see, we have this arc spline. Let's actually just hide that helix. And if we go to our field force, you should be able to see, especially if I make the display longer, you should see all these vectors arking in the same direction as that are exploring. Okay. So let's just make this box size very small in the Z so we can see this more flat. Okay. Looking good. And now what we can do is in this field force, fall off. Maybe we shrink this down a little bit
EJ Hassenfratz (21:48): So now we just have a little bit of our arc field force. So again, this is going to act as a fall off as well. So let's go in, let's get our spherical field, move it right there, hit play, and then just move it down. And wa everything, all of our, uh, objects, all of our fractured pieces are kind of floating up in following the arc of those vector lines, which is really, really cool. All right. So really awesome stuff. Something like that. Now you can play around with some different effects here. So we are doing add to velocity. Maybe we can do set absolute velocity, and this will kind of just set the speed of the velocity at that 80. So if we do this, you can see that's the speed. It's very constant. It kind of doesn't look that realistic at all, but Hey, maybe it's what you're going for. Uh, let's maybe go and crank up that strength to say 1 35 and let's go like that. And you can see that that's still not that fast. Let's go back to our field force. Let's really crank this sucker up. There we go and go to our spherical field. Boom.
EJ Hassenfratz (23:05): So we've got some really cool effects. You can see that as I move this up and down, it's actually affecting a lot of these other pieces too. So with this workflow, basically what you want to do is just move this once, get all those chunks flying, and they'll go into a pile right next to your object or wherever your arc continues on down. So really cool stuff, art directing your dynamics to fall in whatever direction you want. We can even move this arc. All this stuff is editable, removing these vector lines. I mean, you want these to arc more towards the screen here, so let's see what that looks like. So let's go back to frame zero, get our spherical field. Now we got all this stuff kind of falling in front of our screen, just like that
EJ Hassenfratz (23:57): Just really, really cool stuff. And again, that's, that's using the set absolute velocity. If you just do add to velocity, it's a little bit more realistic, a little bit more, uh, controllable. Uh, but again, you're going to need to tweak the settings a little bit more. Let's say one 50 for this to get this looking good. You can see this follows the arc pretty nicely, but then we got this nice scattering going on. And again, that's more realistic. It's not as a straight, as much of a straight line as our, uh, set, uh, absolute velocity, but it I'd say it's looking pretty, pretty dang good. Now, one quick note about the splines and using them to kind of drive your vector directions and, uh, your field forces. Sometimes when you apply a spline, sometimes the direction in which that spline is going, you can see that I had reverse going on.
EJ Hassenfratz (24:57): You can see that we're actually pointing in way different directions here. So if I had this reverse turned off, let's go ahead and hit play. Let's go to the spherical field. You're going to see that things are actually going to go backwards. Okay? They're not going to jump out forwards like we did before. And that's because of the way the spline direction from start to end is going. So it's very important that when that happens, if it's not acting predictably using your spline, that you just hit reverse. And now you can already see that this is now acting in this direction versus this direction. So each blind has their own reverse toggle here that you can then use. And that will again, do a load of difference as far as, uh, which way you want your vectors to be pointing. So keep that in mind, having that reverse again, that's on most, uh, spline objects here that you can use to then create vectors and art direct and drive the direction of your dynamics.
EJ Hassenfratz (25:56): So, one last cool way you can use field forces is by utilizing volumes. So we're talking volume builders here. You might be wondering, well, how can you use a volume builder to create anything? Cool. Well, I'll show you. Well, here we have just a standard emitter. I didn't change anything from the defaults. And what I'm going to do is go ahead and I'm going to grab a volume builder. Okay. And what I'm going to do with this volume builder is just go ahead and throw in a random field. So I'm going to go to my feud menu and just get a random field and place it underneath the volume builder. And you'll see, there we go. We got our scientists in this field and we got this big blob, but you're going to notice one new thing in the volume type in that is vector.
EJ Hassenfratz (26:44): So we can actually utilize different objects and fields to create vectors using the volume builder here, which is really cool. So if we go ahead and use this volume builder as a field force, by going to particles and going to field force, and then just placing that volume builder directly inside of our object, just going to do volume object here, you can see that if I change this to change direction, if we have the emitter going, let's go and you can see Justin there let's go to our field force and let's change the display. And let's remove some of the density of the voxel size. Maybe we scale this up a little bit. So now you can see a little bit more of the crazy little vectors pointing all randomly, and we're getting all these little particles bouncing all over the place. Now this doesn't look all that great.
EJ Hassenfratz (27:36): It looks like a lot of these particles had way too much coffee. So what we can do is start utilizing some of the tools inside of the volume builder to help smooth out and create more cool effects. So we look at our little menu here. We have a vector smooth button. If we click that, you can see that that just smooth out all of those vector directions to a very nice and smooth path. So what I can do is just decrease the voxel size here, and that noise that we were using from that random field will be much more smooth. And you can see that this has way less of a really crazy looking effect. Now, if I go and hide this volume builder, so we just see our particles here, you can see that we're getting some interesting stuff going on here. Let's go ahead and NEPA.
EJ Hassenfratz (28:24): We'll place the emitter in a tracer object. So let's go and just grab a tracer. And now we get these really cool lines. Okay. Now, one thing you're gonna notice is that once this object gets out of this bounding box, once these particles get out of the bounding box data shoot off into nowhere because they have no more vectors to tell them where to go. So how we can fix that, go to the random field. And in this creation space, it sets a box. Now that box is fairly small. What we can do is change this to 1000. What am I going to do to make this 1000 be entered into all of these entry boxes in the scale. I'm just going to select all of these sizes and then just hit command and enter in that old transfer, that 1000 to all of those highlighted, uh, scale markers.
EJ Hassenfratz (29:13): So the little quick tip there, but once we have that, we have a much wider swath of area that our vectors can now, uh, work with our particles can now travel through. So we have more vectors to give them further directions on where to go outside of that original, small bounding box state. So if we go and hit play again, you can see now we have more little stuff going on. We're still getting some weird issues there. So maybe we'll have to, you know, smooth out our, uh, vector smooth a little bit more, maybe even make the voxel size a little bit bigger, but there we go. We can really get this voxel by voxel distance. So this is basically just using like a Gaussian blur on our vectors. So we can bring this down to proudly low. Don't want to bring him down too much, but maybe we'll bring this down to two and got all these really cool wavy lines.
EJ Hassenfratz (30:08): And maybe we'll just stick with 10 for voxel size. So let's see what we have looking good. And this is just kind of, you know, flowing off into space, which even that is a really cool effect. We've got some pretty smooth out, uh, noise coming from our random field and things are just kind of flowing out now where the true power comes in and where you can really start to get some cool stuff is in this vector, smooth, uh, option. If you hold the button down, we can get this vector curl. Now, once we add this, we're going to place this below our smooth, we got all this really cool curling noise. That's really, really fun. And this is just super, super awesome. So you got that. We have our tracer. If we go ahead and create some hair material, so let's go to, uh, do do materials, new hair cutoff it's right there at the bottom.
EJ Hassenfratz (31:01): And then we can just go ahead and apply that to our tracer and boom, we got something cool going on. We've got some really cool noise going on. Let's maybe up the emitter to birth 20, 20 little, uh, things there. Maybe even make the emitter size bigger. Now we've got all kinds of stuff going on. So this is all dependent on the size of your emitter, how many, uh, particles you have and just look at all this cool stuff. Really awesome. So you can go ahead and render that, make some really cool abstract Moe Graffy stuff and no X particles, you know, and this is something that you typically would have only been able to do in X particles before, but we've got this really cool, uh, curl noise inside of cinema 4d R 21, fueled forces is super deep. And I feel like we're just scratching the surface on all the possibilities that lie in this new feature in seven 40 R 21.
EJ Hassenfratz (32:03): Now, if you want to learn more about some of the other features that have been added to our 21, be sure to check out the other tutorials that I've done on this channel, covering things like mixed smoke control, rig and caps. And bevels now, if you want to keep up to date with all the latest information in the industry of cinema 4d, or just MoGraph in general, be sure to subscribe to this channel. And if you want to know more about the courses we offer to help you take your career to the next level, check out the school of motion courses page. Thanks so much for watching and I'll see you in the next one.
ENROLL NOW!
Acidbite ➔
50% off everything
ActionVFX ➔
30% off all plans and credit packs - starts 11/26

Adobe ➔
50% off all apps and plans through 11/29

aescripts ➔
25% off everything through 12/6
Affinity ➔
50% off all products

Battleaxe ➔
30% off from 11/29-12/7
Boom Library ➔
30% off Boom One, their 48,000+ file audio library
BorisFX ➔
25% off everything, 11/25-12/1
Cavalry ➔
33% off pro subscriptions (11/29 - 12/4)

FXFactory ➔
25% off with code BLACKFRIDAY until 12/3

Goodboyninja ➔
20% off everything

Happy Editing ➔
50% off with code BLACKFRIDAY

Huion ➔
Up to 50% off affordable, high-quality pen display tablets

Insydium ➔
50% off through 12/4
JangaFX ➔
30% off an indie annual license
Kitbash 3D ➔
$200 off Cargo Pro, their entire library
Knights of the Editing Table ➔
Up to 20% off Premiere Pro Extensions
Maxon ➔
25% off Maxon One, ZBrush, & Redshift - Annual Subscriptions (11/29 - 12/8)
Mode Designs ➔
Deals on premium keyboards and accessories
Motion Array ➔
10% off the Everything plan
Motion Hatch ➔
Perfect Your Pricing Toolkit - 50% off (11/29 - 12/2)

MotionVFX ➔
30% off Design/CineStudio, and PPro Resolve packs with code: BW30

Rocket Lasso ➔
50% off all plug-ins (11/29 - 12/2)
Rokoko ➔
45% off the indie creator bundle with code: RKK_SchoolOfMotion (revenue must be under $100K a year)
Shapefest ➔
80% off a Shapefest Pro annual subscription for life (11/29 - 12/2)

The Pixel Lab ➔
30% off everything
Toolfarm ➔
Various plugins and tools on sale

True Grit Texture ➔
50-70% off (starts Wednesday, runs for about a week)

Vincent Schwenk ➔
50% discount with code RENDERSALE

Wacom ➔
Up to $120 off new tablets + deals on refurbished items


